| 编辑推荐: |
文章本次内容是关于c++编译过程的,内容如下:
C和C++的程序结构 预编译 编译过程及链接,希望对您有所帮助。
文章来自于csdn,由火龙果Delores编辑推荐。 |
|
C和C++程序结构
我们来看一个基本程序,由animal.h ,animal.cpp,human.h,human.cpp ,main.cpp等5个文件组成:
------------------------------
animal.h 头文件 这样写:
------------------------------
#ifndef _animal_H
#define _animal_H
#include "iostream.h"
class animal
{
public:
int move;
void out_put();
}
void animal :: out_put()
{
cout<<"move="<<move<<endl;
}
extern animal Dongwu; //加了extern
关键字声明定义在其他文件中
void show();//函数声明 #endif |
------------------------------
animal.cpp 文件 这样写:
------------------------------
#include "animal.h"animal Dongwu;
//定义animal对象
Dongwu
void show()
{
cout<<"show move="<<Dongwu.move<<endl;
} |
------------------------------
human.h 头文件 这样写:
------------------------------
#ifndef _human_H
#define _human_H
#include "animal.h" //human类
要从animal类
中继承
#include "iostream.h"
class human: public animal
{
public:
int thought;
}
void showme();//函数声明
#endif |
------------------------------
animal.cpp 文件 这样写:
------------------------------
#include "animal.h"
human me; //定义human对象 me
void showme()
{
cout<<"thought="<<human.move<<endl;
} |
```c
------------------------------
main .cpp 主函数文件写法:
------------------------------
#include "human.h"
#include <iostream.h>
void main()
{
animal.out_put();
show();
showme();
} |
我们发现,但凡是声明一般都放在了头文件中,比如animal类的声明以及show();等函数的声明。
但是为什么这么做呢?我们接下来将会说明。
预编译
我们发现了头文件中有一些带#开头的关键字,如:#define,#ifndef,#endif,等等。
这阶段是预处理阶段,比如说·#define m 5,那么在该阶段会将程序中的m全部替换成5
想必对于#define,大家都熟悉,接下来我们说说条件编译的关键字:
条件编译指令:#ifdef,#ifndef,#else,#elif,#endif等。
我们通常这样使用:
#ifndef xxx
#define xxx
..............
..............
#else
.............
......
#endif |
如果这是程序中的条件选择,想必大家就很好理解了:
if ( xxx==Null)
{
xxx=true;
..............
..............
}
else
{ .............
......
} |
只不过,程序中的条件选择是在程序运行的时候才被执行的,而条件编译是在预编译时执行的条件选择。
那么条件编译有什么作用呢?
#ifndef Linux
linux平台下运行的函数
#else
#ifndef windows
Windows平台下运行的函数
#endif
#endif |
我们可以看到,这样可以兼容不同的平台,想在linux平台下运行,只要在条件编译前添加#define Linux就好了
另外,也可以通过这种方式来选择不接入某些不需要用的模块,提高编译速度
除此之外,还有一个作用,举个例子,头文件中这样写:
#ifndef _human_H
#define _human_H
#include "animal.h" //human类 要从animal类
中继承
#include "iostream.h"
class human: public animal
{
public:
int thought;
}
void showme();//函数声明
#endif |
我们可以把每一个文件看做一个函数,用函数来理解过程就容易多了:
void human()
{
static _human_H=false;
if(_human_H==false)
// #ifndef _human_H
{
_human_H =true; // #define _human_H
animal(); // #include "animal.h"
iostream(); // #include "iostream.h"
......待编译内容
......待编译内容
} // #endif
} |
假设每一个头文件都是一个函数,每个文件中每#include一个头文件的时候,就相当于调用一次那个函数。
用了条件编译,我们可以保证,每个头文件只调用一次,但是为什么要只调用一次?
假设两个函数这样:
void animal()
{
static _animal_H=false;
human();
}
void human()
{
static _human_H=false;
animal(); // #include "animal.h"
} |
你猜会发生什么,是不是会死循环?两个函数相互调用直到天荒地老。并且调用多次编译器会显示重复定义的错误。
如果加了条件选择:
void animal()
{
static _animal_H=false;
if(_animal_H==false)
{
_animal_H=ture;
human();
}
}
void human()
{
static _human_H=false;
if(_human_H==false)
{
_human_H=true;
animal(); // #include "animal.h"
}
}
|
这样我们能保证每个函数只调用一次,而不会相互一直调用
也正是因为这样,所以我们才能放心大胆的随便 #include:
------------------------------
animal.h 头文件 这样写:
------------------------------
#ifndef _animal_H
#define _animal_H
#include "human.h"
.......
#endif |
------------------------------
human.h 头文件 这样写:
------------------------------
#ifndef _human_H
#define _human_H
#include "animal.h" //human类
要从animal类
中继承
.........
#endif |
我之所以用函数的运行来举例说明,那是因为每个#include "animal.h"实际上就是用animal.h文件的内容将其替换。#define 的作用是替换单个符号,而#include的作用是将这个#include用其include的头文件进行替换。如果将文件抽象为函数,那么本质上并没有什么太大区别。
接下来说明一下预编译过程,以及为什么#include一般放在文件开头:
我们刚开始学c++的时候,程序都是很小的,所以都写在同一个文件中:
#include "iostream.h"
class animal
{
public:
int move;
void out_put();
}
void animal :: out_put()
{
cout<<"move="<<move<<endl;
}
animal Dongwu;
//定义animal对象 Dongwu
void show();
//函数声明void main()
{
animal.out_put();
show();
}
void show()
{
cout<<"show move=
"<<Dongwu.move<<endl;
}
|
但是随着文件越来越大,这种方式是不现实的,看上去就特别乱,我们知道,调用一个函数之前,必须先能找到他的声明,所以我们将各种要调用的函数声明打包成头文件,并将其添加到main函数之前,在预编译过程中,#include将会被其文件内容替换,从而实现将函数声明放在main之前,为main函数中调用打下基础,这就是为什么#include为什么被放在cpp文件的开始部分。
另外这里对#include“animal.h”和#include < animal.h >进行说明一下区别
.
<>和“”表示编译器搜索头文件的顺序不同:
<>表示从系统目录下开始搜索,然后再搜索PATH环境变量所列出的目录,不搜索当前目录
""表示先从当前目录搜索,然后是系统目录和PATH环境变量所列出的目录下搜索
.
所以如果我们知道头文件在系统目录或者环境变量目录下时,可以用<>来加快搜索速度。
编译过程及链接
当我们点击编译按钮时,通常会出现如下提示:
Compiling...
animal.cpp
human.cpp
...
Linking...
main.exe - 0 error(s),
0 waring(s) |
这段文字输出事实上已经说明了编译的步骤了
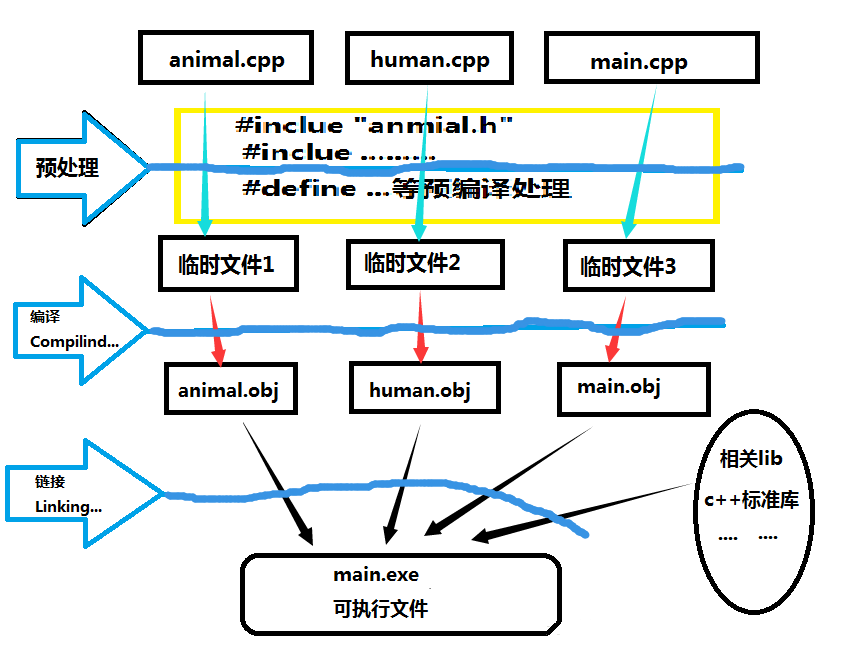
编译器先对工程中三个源文件main.cpp,animal.cpp,human.cpp进行单独编译 (Compiling...)
在编译时,由预处理器对预处理指令(#include、#define…)进行处理,在内存中输出翻译单元(就是将include等在源文件上替换了以后产生的临时文件)。
编译器接受临时文件,将其翻译成包含机器语言指令的三个目标文件(main.obj、animal.obj、human.obj)
接下去就是链接过程(Linking...),连接器将目标文件和你用到的相关库文件一起链接形成main.exe。
到此,编译也就结束了。
注意:在编译过程中头文件不参与编译,预编译时进行各种替换以后,头文件就完成了其光荣使命,不再具有任何作用
最后以一张图来结束本次内容:

|
