| 编辑推荐: |
| 本文来源CSDN,本文介绍了Zabbix
Server和Zabbix WEB GUI的安装配置,Zabbix监控客户端等相关内容。 |
|
版本
Apache2.2 + Mysql 5.5 +PHP 5.4 + Zabbix 3.2.6
Apache2.4 + Mysql 5.6 + PHP 5.6 + Zabbix 3.4.x
服务器
Zabbix Server:192.168.241.136
Zabbix agent: 192.168.241.133
安装Zabbix Server
1、下载需要版本的安装包
3.2.6版本
wget http://sourceforge.net/projects/zabbix/files/
ZABBIX%20Latest%20Stable/3.2.6/zabbix-3.2.6.tar.gz
3.4.4版本
wget http://sourceforge.net/projects/zabbix/files/
ZABBIX%20Latest%20Stable/3.4.4/zabbix-3.4.4.tar.gz
2、安装依赖包
| yum
-y install wget curl curl-devel net-snmp net-snmp-devel
perl-DBI libevent libevent-devel pcre pcre-devel |
3、创建zabbix用户
| groupadd
zabbix
useradd -g zabbix -s /sbin/nologin zabbix |
4、创建zabbix数据库
| create
database zabbix charset=utf8;
grant all on zabbix.* to zabbix@localhost
identified by '123456';
flush privileges;
|
5、解压zabbix软件包并将Zabbix基础SQL文件导入数据至Zabbix数据库:
tar zxvf zabbix-3.4.4.tar.gz
cdzabbix-3.4.4
mysql -uzabbix -p123456 zabbix < database/mysql/schema.sql
mysql -uzabbix -p123456 zabbix < database/mysql/images.sql
mysql -uzabbix -p123456 zabbix < database/mysql/data.sql |
6、编译安装
切换至Zabbix解压目录,执行如下代码,安装zabbix server
./configure --prefix=/usr/local/zabbix
--enable-server --enable-agent --with-mysql --enable-ipv6
--with-net-snmp --with-libcurl
make -j8
make -j8 install
ln -s /usr/local/zabbix/sbin/zabbix_* /usr/local/sbin/ |
7、配置
| cd
/usr/local/zabbix/etc
cp zabbix_server.conf zabbix_server.conf.bak/td>
|
在zabbix_server.conf配置文件中做如下配置:
LogFile=/tmp/zabbix_server.log
DBHost=localhost
DBName=zabbix
DBUser-=zabbix
DBPassword=zabbix |
同时cp zabbix_server启动脚本至/etc/init.d/目录,启动zabbix_server,Zabbix
Server默认监听端口为10051。
| cd
zabbix-3.4.4
cp /misc/init.d/tru64/zabbix_server /etc/init.d/zabbix_server
chmod o+x /etc/init.d/zabbix_server |
8、将zabbix Web页面发布至Apache默认发布目录
cp -a /root/zabbix-3.4.4/frontends/php/*
/usr/local/apache/htdocs/
sed -i '/;date.timezone/idate.timezone = PRC'
/usr/local/php/etc/php.ini |
9、重新启动Zabbix Server、HTTP、MYSQL服务
| /etc/init.d/zabbix_server
restart
/etc/init.d/httpd restart
/etc/init.d/mysqld restart |
PS:启动zabbix server报错
| /usr/local/sbin/zabbix_server:
error while loading shared libraries: libmysqlclient.so.18:
cannot open shared object file: No such file or
directory |
解决:ln -s /usr/local/mysql/lib/libmysqlclient.so.18
/usr/lib64/
Zabbix WEB GUI安装配置
1、通过浏览器访问http://192.168.241.136,如图所示出现Zabbix WEB安装界面:

2、单击下一步,出现如图所示,如果有错误提示,需要把错误依赖解决完,方可进行下一步操作。

如上异常错误解决方法如下,安装缺失的软件包,并修改php.ini对应参数的值即可
yum
installphp56w-mbstringphp56w-bcmath php56w-gd
php56w-xml-y
yum installgd gd-devel -y
sed -i'/post_max_size/s/8/16/g;
/max_execution_time/s/30/300/g;
/max_input_time/s/60/300/g;
s/\;date.timezone.*/date.timezone\=
PRC/g;s/\;always_populate_raw_post_data
/always_populate_raw_post_data/g'
/etc/php.ini
/etc/init.d/httpd restart |
3、单击下一步,配置数据库连接,输入数据库名、用户名、密码,单击Test
connection,显示OK,单击下一步即可。

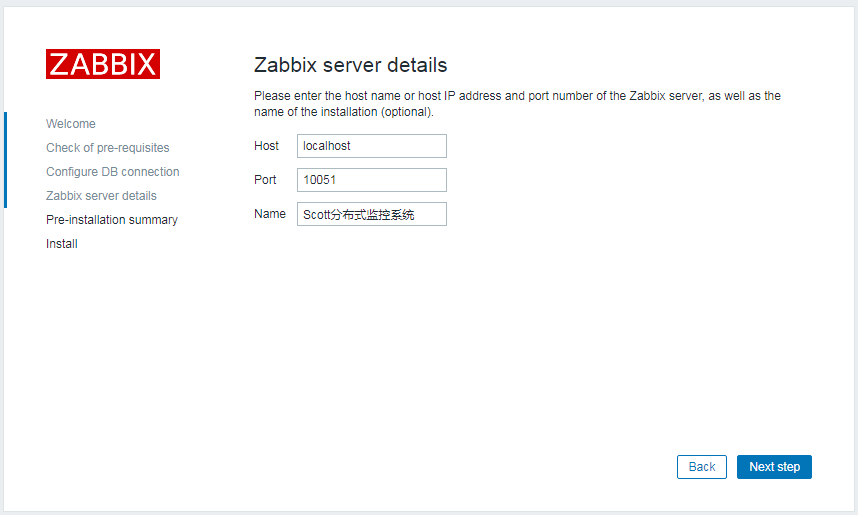
4、单击下一步,填写Zabbix Title显示,可以为空,也可以输入自定义名称。
检查配置

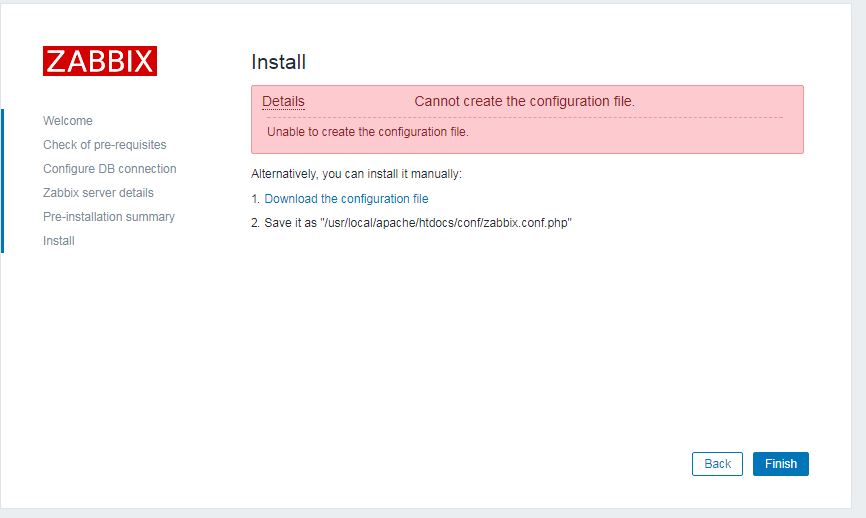
5、单击下一步,需修改、创建zabbix.conf.php文件,执行如下命令,或者单击“Download
the configuration file”下载zabbix.conf.php文件,并上传至apache发布目录/usr/local/apache/htdocs/conf,并设置可写权限,刷新WEB页面,最后单击Finish。
6、登录Zabbix WEB界面,默认用户名和密码为:admin/zabbix,如下图:


PS:手动添加Dynamic Extensions
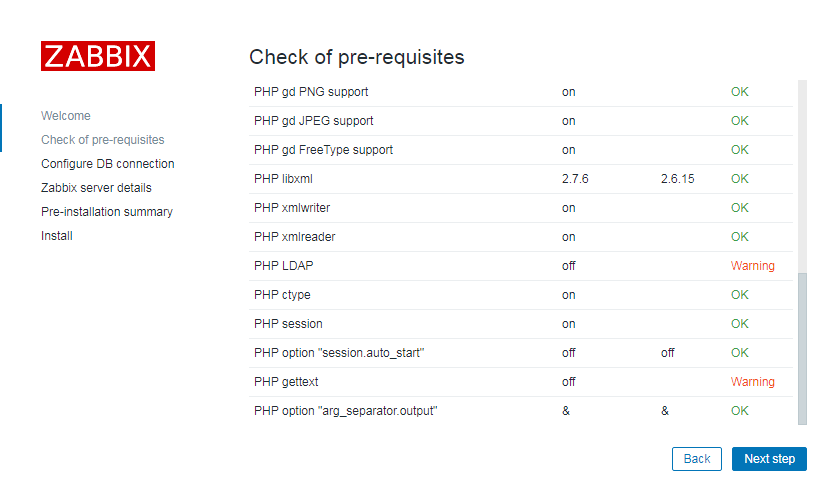
php ldap off warning/php gettext off
warning
1、首先查看源码安装的php模块中是否有ldap.so、gettext.so
| [root@centos6
~]# ll /usr/local/php/lib/php/extensions/no-debug-zts-20131226
总用量 544
-rwxr-xr-x 1 root root 555709 12月 5 06:53 opcache.so |
2、如果相应模块不存在,进入模块所在的php源码目录进行编译(其他模块缺失编译方法一样)
| [root@centos6
ldap]# cd /root/sh/php-5.6.30/ext/ldap
[root@centos6 ldap]# ll
总用量 152
-rw-r--r-- 1 1000 1000 7374 1月 19 2017 config.m4
-rw-r--r-- 1 1000 1000 1069 1月 19 2017 config.w32
-rw-r--r-- 1 1000 1000 77 1月 19 2017 CREDITS
-rw-r--r-- 1 1000 1000 96601 1月 19 2017 ldap.c
-rw-r--r-- 1 1000 1000 18762 1月 19 2017 ldap.dsp
-rw-r--r-- 1 1000 1000 4464 1月 19 2017 ldap.mak
-rw-r--r-- 1 1000 1000 1546 1月 19 2017 LDAP_Win32_HOWTO.txt
-rw-r--r-- 1 1000 1000 2243 1月 19 2017 php_ldap.h
drwxr-xr-x 2 1000 1000 4096 1月 19 2017 tests |
3、编译php扩展工具,主要是根据系统信息生成对应的configure文件
| [root@centos6
ldap]# /usr/local/php/bin/phpize
Configuring for:
PHP Api Version: 20131106
Zend Module Api No: 20131226
Zend Extension Api No: 220131226 |
4、编译
| ./configure --with-php-config=/usr/local/php/bin/php-config
--with-ldap |
问题一:configure: error: Cannot find ldap.h
解决:yum install -y openldap openldap-devel
问题二:configure: error: Cannot find ldap libraries in
/usr/lib.
解决:cp -frp /usr/lib64/libldap* /usr/lib/
5、安装
执行结果:在目录下 /usr/local/php/lib/php/extensions/no-debug-zts-20131226/
生成ldap.so
| [root@centos6
~]# ll /usr/local/php/lib/php/extensions/no-debug-zts-20131226/
总用量 720
-rwxr-xr-x 1 root root 179290 12月? 5 07:53 ldap.so
-rwxr-xr-x 1 root root 555709 12月? 5 06:53 opcache.so |
6、编辑php.ini添加新生成的ldap.so模块
7、重启httpd
安装Zabbix_agent
1、下载安装包
3.2.6版本
wget http://sourceforge.net/projects/zabbix/files/
ZABBIX%20Latest%20Stable/3.2.6/zabbix-3.2.6.tar.gz
3.4.4版本
wget http://sourceforge.net/projects/zabbix/files/
ZABBIX%20Latest%20Stable/3.4.4/zabbix-3.4.4.tar.gz
2、安装依赖包
| yum
-y install wget curl curl-devel net-snmp net-snmp-devel
perl-DBI libevent libevent-devel pcre pcre-devel |
3、创建zabbix用户
| groupadd
zabbix
useradd -g zabbix -s/sbin/nologin zabbix |
4、解压源码文件,切至解压目录,编译安装
tar zxvf?zabbix-3.4.4.tar.gz
cd?zabbix-3.4.4
./configure --prefix=/usr/local/zabbix --enable-agent
make
make install
ln -s /usr/local/zabbix/sbin/zabbix_* /usr/local/sbin/ |
5、修改zabbix_agentd.conf配置文件
| LogFile=/tmp/zabbix_agentd.log |
Server=192.168.241.136 指定Server IP地址
ServerActive=192.168.241.136 Zabbix主动监控server的ip地址
Hostname=Zabbix agent 客户端主机名
6、拷贝zabbix_agentd启动脚本至/etc/init.d/目录,启动zabbix_agentd服务即可,默认监听端口10050
cd zabbix-3.4.4
cp /misc/init.d/tru64/zabbix_agentd /etc/init.d/zabbix_agentd
chmod o+x /etc/init.d/zabbix_agentd |
7、启动zabbix_agentd
| /etc/init.d/zabbix_agentd
start |
Zabbix监控客户端
Zabbix服务端和客户端安装完成后,可通过Zabbix Server添加客户端监控,Zabbix
WEB界面添加客户端监控的操作步骤如下:
Zabbix WEB添加监控主机
Zabbix-WEB -> configuration -> hosts -> Create
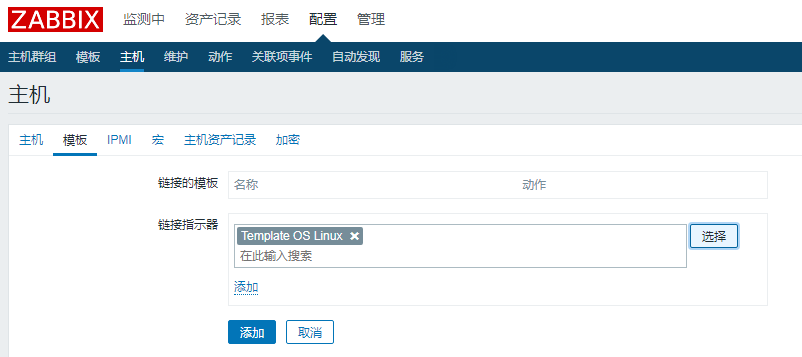
host -> Host name和Agent interfaces,同时选择添加templates模板
->选择Add -> 勾选Template OS Linux-选择Add提交;
注*此处Host name名称与zabbix_agentd.conf配置文件中Hostname保持一致,否则会报错。
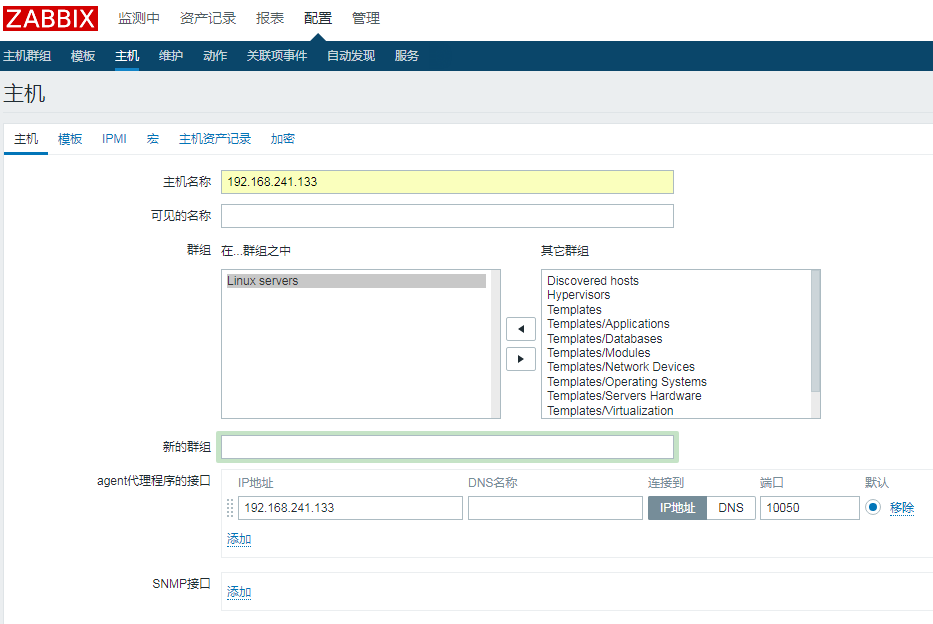
将客户端主机连接至“Template OS Linux”,启用模板完成主机默认监控,单击Add,继续单击Update即可
单击Zabbix WEB -> Monitoring ->
Graphs -> Group -> Host -> Graph,监控图像如图所示:


PS:如果无法监控到客户端,可在Zabbix Server端,执行命令获取Agent的items
Key值是否有返回,例如:system.hostname为返回客户端的hostname信息,检测命令如下:
| /usr/local/zabbix/bin/zabbix_get
-s 192.168.241.133 -k system.hostname |
执行结果:
[root@centos6
etc]# /usr/local/zabbix/bin/zabbix_get -s 192.168.241.133
-k system.hostname
mysql1 |
|
