| 之所以选择TeamCity,有以下几个原因:
这个软件对于小团队可以免费使用
安装配置比较简单,系统的要求不是很高(相比VS 2010 TFS)
使用和配置比Cc.net简单一些
包含了重复代码的检测和分析工具
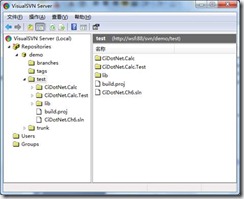
一、SVN安装
SVN服务安装 http://www.visualsvn.com/files/VisualSVN-Server-2.1.7.msi
SVN客户端
TortoiseSVN
VisualSVN-2.0.5.msi
二、TeamCity安装
http://www.jetbrains.com/teamcity/
下载 TeamCity-6.0.3.exe
三、TeamCity实战
如下把涉及到的多个方面简要汇总一下,具体的内容可以试用一下,或者从参考中下载图书的代码内容分析。一般的项目也不会全部涉及,根据项目的情况和内容裁减即可。
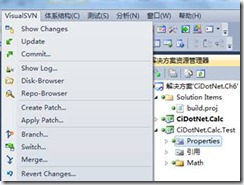
1、建立CI项目
默认的ci管理网址在 http://localhost/
按照提示建立项目即可
成功后即可建立各种类型的Build
2、NUnit、覆盖率测试
TeamCity comes with built-in functionality
for NCover and PartCover. To use PartCover, you have
to set it up on the Build Configuration page.
First, enable NUnit Tests (mark the
flag in New Unit Test Settings). Set it to run the tests
from
%system.teamcity.build.workingDir%\CiDotNet.Calc.Test\bin\Release\CiDotNet.Calc.Test.dll.
Go to the .NET Coverage section, choose
PartCover from the drop-down list, and provide the path
to the executables in the lib directory
(%system.teamcity.build.workingDir%\lib\PartCover\PartCover.exe).
Report XSLT:
C:\Program Files (x86)\PartCover\PartCover
.NET 4.0\xslt\Report By Assembly.xslt=> PartCover.Assembly.html
C:\Program Files (x86)\PartCover\PartCover
.NET 4.0\xslt\ Report By Class.xslt=> PartCover.Class.html
PartCover在64位下执行的方法
CorFlags.exe PartCover.exe /32BIT+ /Force
3、MSTest测试MSBuild形式
<Project DefaultTargets="Test"
xmlns="http://schemas.microsoft.com/developer/msbuild/2003">
<PropertyGroup>
<!--Default Configuration-->
<Configuration Condition=" '$(Configuration)'
== '' ">Debug</Configuration>
<!--Default Platform-->
<Platform Condition=" '$(Platform)'
== '' ">"Any CPU"</Platform>
<!--Visual Studio path-->
<VSPath Condition=" '$(VSPath)'
== '' ">%ProgramFiles(x86)%\Microsoft Visual
Studio 10.0\Common7\IDE</VSPath>
<!--Asseblies to test-->
<TestAssemblies>CiDotNet.Calc.Test\bin\$(Configuration)\CiDotNet.Calc.Test.dll</TestAssemblies>
</PropertyGroup>
<Target Name="Build" >
<MSBuild Targets="Clean;Rebuild"
Projects="CiDotNet.sln" ContinueOnError="false"/>
</Target>
<Target Name="Test" DependsOnTargets="Build">
<Delete Condition="Exists('MSTestReport.trx')"
Files="MSTestReport.trx"></Delete>
<Exec Command=""$(VSPath)\MSTest.exe"
/testcontainer:$(TestAssemblies) /resultsfile:MSTestReport.trx"/>
<Message Text="##teamcity[importData
type='mstest' path='MSTestReport.trx']" ></Message>
</Target>
</Project>


4、MSTest
MSTest.exe 命令行选项
http://msdn.microsoft.com/zh-cn/library/ms182489.aspx
・ Build Log
[16:26:40]: 测试设置: 本地
[16:26:42]: ##teamcity[importData id='mstest'
file='D:\pm\TeamCity\buildAgent\work\eea58b62b6f4c74d\MSTestReportX.trx']
[16:26:42]: Importing data from 'D:\pm\TeamCity\buildAgent\work\eea58b62b6f4c74d\MSTestReportX.trx'
with 'mstest' processor
[16:26:42]: MSTest
[16:26:42]: [MSTest] Found 1 test definitions.
[16:26:42]: [MSTest
找到MSTestReportX.trx文件,VS打开即可看到覆盖率
5、Integration tests
不像单元测试,尽量减少组件之间的关联,依赖的组件使用Mock框架进行模拟
此时引入相关的依赖组件,替换掉Mock
6、其他测试
参考中图书第7章的例子代码拿来用用
涉及:
White框架
CiDotNet.WinCalc.Test: WinForm的测试
CiDotNet.SilverlightCalc.Test: Silverlight的测试
Selenium框架
http://seleniumhq.org/
CiDotNet.WebCalc.Test
8、代码规范
这部分主要是修改项目文件,支持Build,然后提供信息反馈处,具体的设置参考如下
FxCop
使用Fxcop的项目进行集成, *.fxcop 是项目文件
<Target Name="Analyze">
<Delete Condition="Exists('FxCopReport.xml')"
Files="FxCopReport.xml"></Delete>
<FileUpdate Files="CiDotNet.FxCop"
Regex="bin/Debug" ReplacementText="bin/$(Configuration)"
/>
<Exec Command="tools\FxCop\FxCopCmd.exe
/project:CiDotNet.FxCop /out:FxCopReport.html /axsl"/>
<Error Condition="Exists('FxCopReport.xml')"
Text="FxCop found some broken rules!" />
define a new artifact FxCopReport.html
and a new tab server configuration.
StyleCop
<Project DefaultTargets="Analyze"
xmlns="http://schemas.microsoft.com/developer/msbuild/2003">
<UsingTask AssemblyFile="tools\MSBuildCommunityTasks\MSBuild.Community.Tasks.dll"
TaskName="MSBuild.Community.Tasks.FileUpdate"></UsingTask>
<UsingTask AssemblyFile="tools\MSBuildCommunityTasks\MSBuild.Community.Tasks.dll"
TaskName="MSBuild.Community.Tasks.Xslt"></UsingTask>
<UsingTask AssemblyFile="tools\MSBuildCommunityTasks\MSBuild.Community.Tasks.dll"
TaskName="MSBuild.Community.Tasks.XmlRead"></UsingTask>
<UsingTask AssemblyFile="tools\StyleCop\Microsoft.StyleCop.dll"
TaskName="StyleCopTask"/>
<CreateItem Include="CiDotNet.Calc\**\*.cs">
<Output TaskParameter="Include"
ItemName="StyleCopFiles"/>
</CreateItem>
<StyleCopTask
ProjectFullPath="$(MSBuildProjectFile)"
SourceFiles="@(StyleCopFiles)"
ForceFullAnalysis="true"
TreatErrorsAsWarnings="true"
OutputFile="StyleCopReport.xml"
CacheResults="true"
AdditionalAddinPaths="tools\"
/>
<Xslt Inputs="StyleCopReport.xml"
RootTag="StyleCopViolations"
Xsl="tools\StyleCop\StyleCopReport.xsl"
Output="StyleCopReport.html"
/>
<XmlRead XPath="count(//Violation)"
XmlFileName="StyleCopReport.xml">
<Output TaskParameter="Value"
PropertyName="StyleCopViolations" />
</XmlRead>
<Error Condition="$(StyleCopViolations)
> 0" Text="StyleCop found some broken rules!"
/>
add the artifact file, and a new tab
appears in the build report page
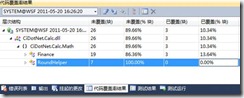
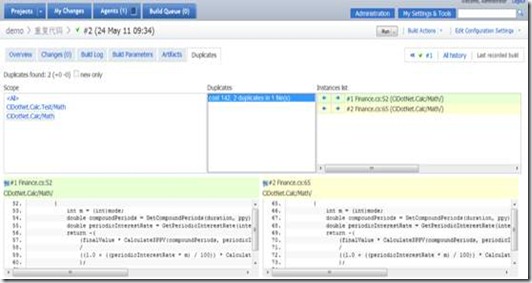
代码重复
Its purpose is to find the places in
your code where your team has duplicated the code.
The Duplicates Finder is a separate
build runner in TeamCity.
9、文档
基于Sandcastle 的形式
<Target Name="Document"
>
<MSBuild Projects="CiDotNet.shfbproj"/>
</Target>
TeamCity project’s General Settings,
and set the Artifacts path to
Help/**/* => Help
This causes all the Help folder content
from the current build to be copied to the Help artifacts
folder. To make the documentation visible on the build-report
page,add a new tab in the server configuration, pointing
to /Help/Index.html.
10、安装和部署
WIX安装
ClickOnce部署
MS Deploy部署
<Target Name="Setup" >
<Exec
Command=""$(VSPath)\devenv.exe"
CiDotNet.sln /build "$(Configuration)"
/project
CiDotNet.WinCalc.Setup\CiDotNet.WinCalc.Setup.vdproj"
ContinueOnError="false" IgnoreExitCode="true"
/>
<MSBuild Projects="CiDotNet.WinCalc.Wix\CiDotNet.WinCalc.Wix.wixproj"
Properties="WixTargetsPath=$(MSBuildProjectDirectory)\tools\Wix\Wix2010.targets;"/>
</Target>
<Target Name="Publish"
>
<MSBuild Targets="Publish"
Projects="CiDotNet.sln" ContinueOnError="false"
Properties="ApplicationVersion=$(Major).$(Minor).$(Build).$(Revision)"/>
</Target>
<Target Name="WebPublish"
>
<MSBuild Targets="Package"
Projects="CiDotNet.WebCalc\CiDotNet.WebCalc.csproj"
ContinueOnError="false"
Properties="PackageLocation=WebPublication\Package.zip;MSBuildExtensionsPath32=..\tools"/>
<Exec
Command="CiDotNet.WebCalc\WebPublication\Package.deploy.cmd
/Y /m:ci1 /u:administrator /p:Marcinq1p0w2"
ContinueOnError="false" IgnoreExitCode="true"
/>
</Target>
11、数据库集成
这个主要使用VS的数据库项目可以完成
<MSBuild
Projects = "$(SolutionRoot)\NWSandbox.dbproj"
Properties = "Configuration=Debug;
TargetDatabase=NewDBName"
Targets = "Deploy"/>
四、参考
图书Continuous Integration in .NET http://www.manning.com/kawalerowicz/
下载CIi.N_SourceCode.zip
其中包括VS的Build脚本等,在TFS的持续集成中可以参考
http://www.cnblogs.com/2018/category/300477.html
|