| 背景
随着业务需求的演进,工程的复杂度会逐渐增加,自动化的践行日益强烈。事实上,工程的自动化一直是我们努力的目标,能有效提高我们的生产效率,最大化减少人为出错的概率,实现一些复杂的业务需求应变。
场景如下,公司现在的测试人员每次需要测试新版本,都需要开发人员打包,放到ftp,测试人员然后从ftp上拷贝到本地(或者用手机的ES文件管理器),再安装。尤其临近发版的一周,几乎每天都要新版本。这样的话,有两方面的影响:第一,打断了开发人员的开发进度;第二,开发人员打包效率低下,尤其是ios,不顺的话,总是打的不对(可能是证书的问题)。
要解决这个问题,必须实现移动端应用的自动化构建。具体说来就是,使用持续集成(CI)系统jenkins,自动检测并拉取最新代码,自动打包android的apk和ios的ipa,自动上传到内测分发平台蒲公英上。(接下来,测试人员只要打开一个(或多个)固定的网址,扫描一下二维码,就能下载最新的版本了…)
环境
因为要编译ios,所以选择Mac OSX 10.11.1。
无论是哪个操作系统,jenkins的配置是一样的。
安装Jenkins
官网地址:http://jenkins-ci.org/
// 使用brew安装
brew install jenkins
// 启动,直接运行jenkins即可启动服务
jenkins |
默认访问http://localhost:8080/, 可进入jenkins配置页面。
安装Jenkins相关插件
点击系统管理>管理插件>可选插件,可搜索以下插件安装
git插件(GIT plugin)
ssh插件(SSH Credentials Plugin)
Gradle插件(Gradle plugin) – android专用
Xcode插件(Xcode integration) – ios专用
新建Job
主页面,新建 -> 构建一个自由风格的软件项目即可。
对于类似的项目,可以选择 -> 复制已有的Item,要复制的任务名称里输入其他job的首字符会有智能提示。
配置git仓库
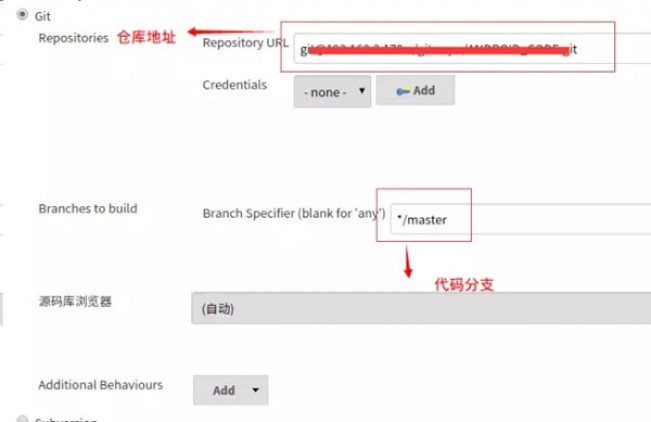
如果安装了git插件,在源码管理会出现Git,选中之后:
Repositories -> https://github.com/openproject/ganchai,
如果是ssh还要配置Credentials。
Branch -> */master,选定一个要编译的分支代码。
如下:

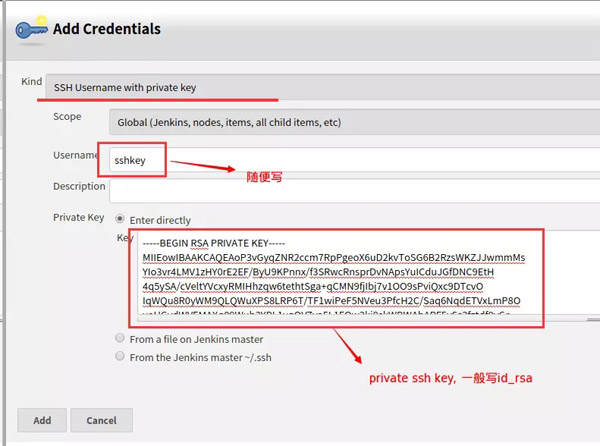
如果是私有的仓库(比如git://xxxxx.git),点击Credentials
– Add,弹出对话框,配置sshkey最简单了:

配置自动拉取最新代码
在构建触发器中,有两种自动拉取代码并编译的策略:
1. 设置Poll SCM,设置定时器,定时检查代码更新,有更新则编译,否则不编译(我暂时用的是这个)。

2.也可以设置Build periodically,周期性的执行编译任务。

关于定时器的格式,我只能从网上摘抄一段稍微靠谱一点的说明:
This field follows the syntax of cron (with minor differences).
 Specifically, each line consists of 5 fields separated by TABor whitespace:

MINUTE HOUR DOM MONTH DOW

MINUTE Minutes within the hour (0-59)
HOUR The hour of the day (0-23)
DOM The day of the month (1-31)
MONTH The month (1-12)
DOW The day of the week (0-7) where 0 and 7 are Sunday.

To specify multiple values for one field, the following
operators are available. In the order of precedence,

   * '*' can be used to specify all valid values.
   * 'M-N' can be used to specify a range, such as "1-5"
   * 'M-N/X' or '*/X' can be used to specify skips of X''s

value through the range, such as "*/15" in the MINUTE field
 for"0,15,30,45" and "1-6/2" for "1,3,5"
   * 'A,B,...,Z' can be used to specify multiple values,
 such as "0,30" or "1,3,5"

Empty lines and lines that start with '#' will be ignored
 as comments.
In addition, @yearly, @annually, @monthly, @weekly, @daily,
@midnight, @hourly are supported. |
举两个例子:
1.// every minute
2.* * * * *
3.// every 5 mins past the hour
4.5 * * * *
配置gradle – android专用
请ios的朋友们请飘过.
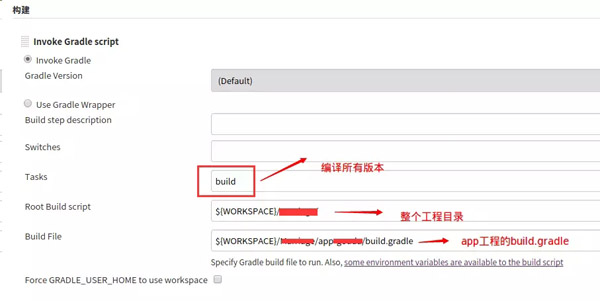
如果安装gradle插件成功的话,应该会出现下图的Invoke Gradle
script,配置一下:

${WORKSPACE}表示当前job下的workspace目录,主要是存放代码。更多的环境变量请参考文末附录。
这样,就能自动在project下的app的build/outputs/apk下生成相应的apk.
编译失败?可能要解决以下2个问题:
1.gradle没配置环境变量。
比如我在/etc/profile中配置一下GRADLE_HOME:
export GRADLE_HOME='/home/jay/.gradle/wrapper/dists/gradle-2.2.1-all/c64ydeuardnfqctvr1gm30w53/gradle-2.2.1'
export PATH=$GRADLE_HOME/bin:$PATH |
2.找不到local.properties中sdk定义。
因为一般来说local.properties不会添加到版本库。所以需要手动copy到${WORKSPACE}下的Project目录下(可参考自己Android
Studio工程结构)。
关于local.properties的定义,这里记录一下,做个备份:
sdk.dir=xx/xx/android-sdk |
再编译一般就会编译成功,当然当那些第三方库需要重新下载的话,编译可能会很慢。
配置xcode – ios专用
请android的同学们飘过。
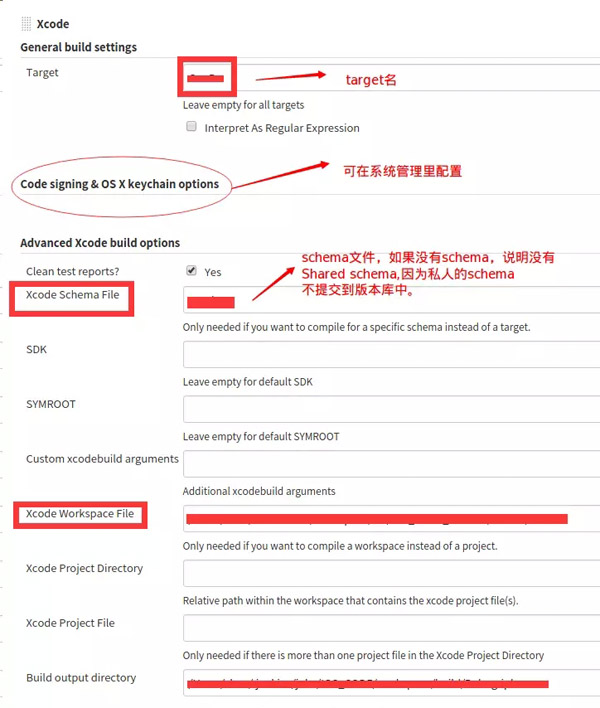
安装Xcode插件后,可看到如下图界面,并配置:

这里有两个地方需要注意。
1.签名
2.需要Shared Schema文件.
上传到蒲公英平台
在官网文档里有说明,通过linux平台上传app的关键代码
curl -F "file=@/tmp/example.ipa" -F "uKey=" -F "_api_key=" http://www.pgyer.com/apiv1/app/upload |
具体来说,
# 先把${version}看成v1.0吧
curl -F "file=@/home/xxx/release/ganchai-release-${version}-0101-dev.
apk" -F "uKey=231xxxxe6" -F"_api_key=0xxxx499" -F "publishRange=2" http://www.pgyer.com/apiv1/app/upload |
这样就完成一个app上传到蒲公英了。
实际上,我们可能会面对更复杂的场景,比如上面的${version}, 而version定义于build.gradle如下:
ext {
    compileSdkVersion = 22
    buildToolsVersion = "23.0.1"
    minSdkVersion = 10
    targetSdkVersion = 22
    versionCode = 1111
    versionName = "v1.2.0.0"
} |
得想办法读到versionName, 然后拼出最终的文件名,这样下次版本升级了之后也能动态的上传app到蒲公英了。
# 使用sed命令读取,使用cut切割,最终动态读取到versionName
version=`sed -n '21,1p' ${WORKSPACE}/xxx/build.gradle | cut -c20-27` |
这是android的apk上传过程,相应的,ios是上传ipa,方法是一样的,不再赘述。
小结
把开发人员发布版本的工作自动化之后,如此一来,方便了测试人员随时拉取并构建最新版本,更解放了开发人员自己的发版本的工作,一个字,善!
附录
jenkins中定义的那些环境变量:
The following variables are available to shell scripts

BUILD_NUMBER
The current build number, such as "153"
BUILD_ID
The current build id, such as "2005-08-22_23-59-59" (YYYY-MM-DD_hh-mm-ss)
BUILD_DISPLAY_NAME
The display name of the current build, which is something like "#153" by default.
JOB_NAME
Name of the project of this build, such as "foo" or "foo/bar". (To strip off folder
 paths from a Bourne shell script, try:${JOB_NAME##*/})
BUILD_TAG
String of "jenkins-${JOB_NAME}-${BUILD_NUMBER}". Convenient to put into a resource
 file, a jar file, etc for easier identification.
EXECUTOR_NUMBER
The unique number that identifies the current executor (among executors of the
 same machine) that’s carrying out thisbuild. This is the number you see in the
 "build executor status", except that the number starts from 0, not 1.
NODE_NAME
Name of the slave if the build is on a slave, or "master" if run on master
NODE_LABELS
Whitespace-separated list of labels that the node is assigned.
WORKSPACE
The absolute path of the directory assigned to the build as a workspace.
JENKINS_HOME
The absolute path of the directory assigned on the master node for Jenkins
 to store data.
JENKINS_URL
Full URL of Jenkins, like http://server:port/jenkins/ (note: only available
 if Jenkins URL set in system configuration)
BUILD_URL
Full URL of this build, like http://server:port/jenkins/job/foo/15/
(Jenkins URL must be set)
JOB_URL
Full URL of this job, like http://server:port/jenkins/job/foo/
(Jenkins URL must be set)
SVN_REVISION
Subversion revision number that's currently checked out to the workspace,
 such as "12345"
SVN_URL
Subversion URL that's currently checked out to the workspace. |
|

