| БОЮФЪЧЕкШ§ЦЊ,ЕквЛЦЊГжајМЏГЩжЎJenkins+GitlabМђНщ
[вЛ]ЃЌЕкЖўЦЊЪЧЃКГжајМЏГЩжЎJenkins+GitlabЪЕЯжГжајМЏГЩ
[Жў]
SonarНщЩм
Sonar ЪЧвЛИігУгкДњТыжЪСПЙмРэЕФПЊЗХЦНЬЈЁЃЭЈЙ§ВхМўЛњжЦЃЌSonar
ПЩвдМЏГЩВЛЭЌЕФВтЪдЙЄОпЃЌДњТыЗжЮіЙЄОпЃЌвдМАГжајМЏГЩЙЄОпЁЃгыГжајМЏГЩЙЄОпЃЈР§Шч Hudson/Jenkins
ЕШЃЉВЛЭЌЃЌSonar ВЂВЛЪЧМђЕЅЕиАбВЛЭЌЕФДњТыМьВщЙЄОпНсЙћЃЈР§Шч FindBugsЃЌPMD ЕШЃЉжБНгЯдЪОдк
Web вГУцЩЯЃЌЖјЪЧЭЈЙ§ВЛЭЌЕФВхМўЖдетаЉНсЙћНјаадйМгЙЄДІРэЃЌЭЈЙ§СПЛЏЕФЗНЪНЖШСПДњТыжЪСПЕФБфЛЏЃЌДгЖјПЩвдЗНБуЕиЖдВЛЭЌЙцФЃКЭжжРрЕФЙЄГЬНјааДњТыжЪСПЙмРэЁЃ
дкЖдЦфЫћЙЄОпЕФжЇГжЗНУцЃЌSonar ВЛНіЬсЙЉСЫЖд IDE ЕФжЇГжЃЌПЩвддк
EclipseКЭ IntelliJ IDEA етаЉЙЄОпРяСЊЛњВщПДНсЙћЃЛЭЌЪБ Sonar ЛЙЖдДѓСПЕФГжајМЏГЩЙЄОпЬсЙЉСЫНгПкжЇГжЃЌПЩвдКмЗНБуЕидкГжајМЏГЩжаЪЙгУ
SonarЁЃ
ДЫЭтЃЌSonar ЕФВхМўЛЙПЩвдЖд Java вдЭтЕФЦфЫћБрГЬгябдЬсЙЉжЇГжЃЌЖдЙњМЪЛЏвдМАБЈИцЮФЕЕЛЏвВгаСМКУЕФжЇГжЁЃ
SonarВПЪ№
[root@linux-node1
~]# yum install -y java-1.8.0
[root@linux-node1 ~]# c d /usr/local/src
ШэМўАќЮвУЧЭЈЙ§wgetЛђепЯТдиЃЌ rzЩЯДЋЕНЗўЮёЦї
#ШэМўАќЯТдиЃКhttps://sonarsource.bintray.com /Distribution/
sonarqube/ sonarqube-5.6.zip
[root@linux-node1 src]# unzip sonarqube -5.6.zip
[root@linux-node1 src]# mv sonarqube-5.6 /usr/local/
[root@linux-node1 src]# ln -s /usr/local/ sonarqube-5.6/
/ usr/local/sonarqube |
SonarЕФЯрЙиЯТдиКЭЮФЕЕПЩвддкЯТУцЕФСДНгжаевЕНЃКhttp://www.sonarqube.org/downloads/ЁЃашвЊзЂвтзюаТАцЕФSonarашвЊжСЩйJDK
1.8МАвдЩЯАцБОЁЃ
ЩЯЦЊЮФеТЮвУЧвбОПЩвдГЩЙІЕФЪЙгУgitНјааРШЅЃЌSonarЕФЙІФмОЭЪЧРДМьВщДњТыЪЧЗёгаBUGЁЃГ§СЫМьВщДњТыЪЧЗёгаbugЛЙгаЦфЫћЕФЙІФмЃЌБШШчЫЕЃКФуЕФДњТызЂЪЭТЪЪЧЖрЩйЃЌДњТыгавЛаЉНЈвщЃЌБраДгяЗЈЕФНЈвщЁЃЫљвдЮвУЧНажЪСПЙмРэ
SonarЛЙПЩвдИјДњТыДђЗжЃЌВЂЧвв§гУСЫММЪѕеЌЕФЙІФмЃЈИцЫпФугаКмЖрЕиЗНУЛИФЃЉ
SonarВПЪ№
[root@linux-node1
~] # yum install -y java-1.8.0
[root@linux-node1 ~] # cd /usr/local/src
ШэМўАќЮвУЧЭЈЙ§wgetЛђепЯТдиЃЌ rzЩЯДЋЕНЗўЮёЦї
#ШэМўАќЯТдиЃК https://sonarsource.bintray.com/ Distribution/
sonarqube/ sonarqube-5.6.zip
[root@linux-node1 src] # unzip sonarqube-5.6.zip
[root@linux-node1 src] # mv sonarqube-5.6 /usr/local/
[root@linux-node1 src] # ln -s /usr/local/ sonarqube-5.6/
/usr/local/sonarqube |
зМБИSonarЪ§ОнПт
ШчЙћУЛгаЪ§ОнПтЧыжДааyum install -y mariadb mariadb-server
[root@linux-node1
~] # systemctl start mariadb
[root@linux-node1 ~] # systemctl enable mariadb
Created symlink from /etc/ systemd/system/multi
-user.target.wants/ mariadb.service to /usr/ lib/systemd/
system/ mariadb.service.
[root@linux-node1 ~]# mysql_secure_installation
[root@linux-node1 ~]# mysql -uroot -p123456 |
ЬиБ№ЬсЪОЃК

image_1b4i40r9q13m916p9 jqke68au39.png-106.4kB
sonarКУЯёВЛжЇГжmysql 5.5ЃЌЫљвдШчЙћПДШежОГіЯжвдЩЯerror
ЧыАВзАmysql5.6 ЛђепИќИпАцБО
http://blog.csdn.net/ onothing12345/
article/details/49910087
жДааsqlгяОф
mysql> CREATE
DATABASE sonar CHARACTER SET utf8 COLLATE utf8_general_ci;
mysql> GRANT ALL ON sonar.* TO 'sonar'@'localhost'
IDENTIFIED BY 'sonar@pw';
mysql> GRANT ALL ON sonar.* TO 'sonar'@'%'
IDENTIFIED BY 'sonar@pw';
mysql> FLUSH PRIVILEGES; |
ХфжУSonar
[root@linux-node1
~]# cd /usr/local/sonarqube/conf/
[root@linux-node1 conf]# ls
sonar.properties wrapper.conf |
БраДХфжУЮФМўЃЌаоИФЪ§ОнПтХфжУ
[root@linux-node1
conf ] # vim sonar.properties
#ЮвУЧжЛашвЊШЅХфжУЮФМўРяУцаоИФЪ§ОнПтЕФШЯжЄМДПЩ
14 sonar.jdbc.username =sonar #Ъ§ОнПтгУЛЇ
15 sonar.jdbc.password= sonar@pw #Ъ§ОнПтУмТы
23 sonar.jdbc.url= jdbc:mysql://localhost:3306/
sonar?useUnicode= true&character Encoding
=utf8&rewriteBatchedStatements =true&useConfigs
=maxPerformance |
ХфжУJavaЗУЮЪЪ§ОнПтЧ§ЖЏ(ПЩбЁ)
ФЌШЯЧщПіSonarгаздДјЕФЧЖШыЕФЪ§ОнПтЃЌФЧУДФуШчЙћЪЙгУРрЪЧOracleЪ§ОнПтЃЌБиаыЪжЖЏИДжЦЧ§ЖЏРрЕН${SONAR_HOME}/extensions/jdbc-driver/oracle/ФПТМЯТЃЌЦфЫќжЇГжЕФЪ§ОнПтФЌШЯЬсЙЉСЫЧ§ЖЏЁЃЦфЫќЪ§ОнПтЕФХфжУПЩвдВЮПМЙйЗНЮФЕЕЃК
http://docs.sonarqube.org/ display/HOME/
SonarQube+Platform
ЦєЖЏSonar
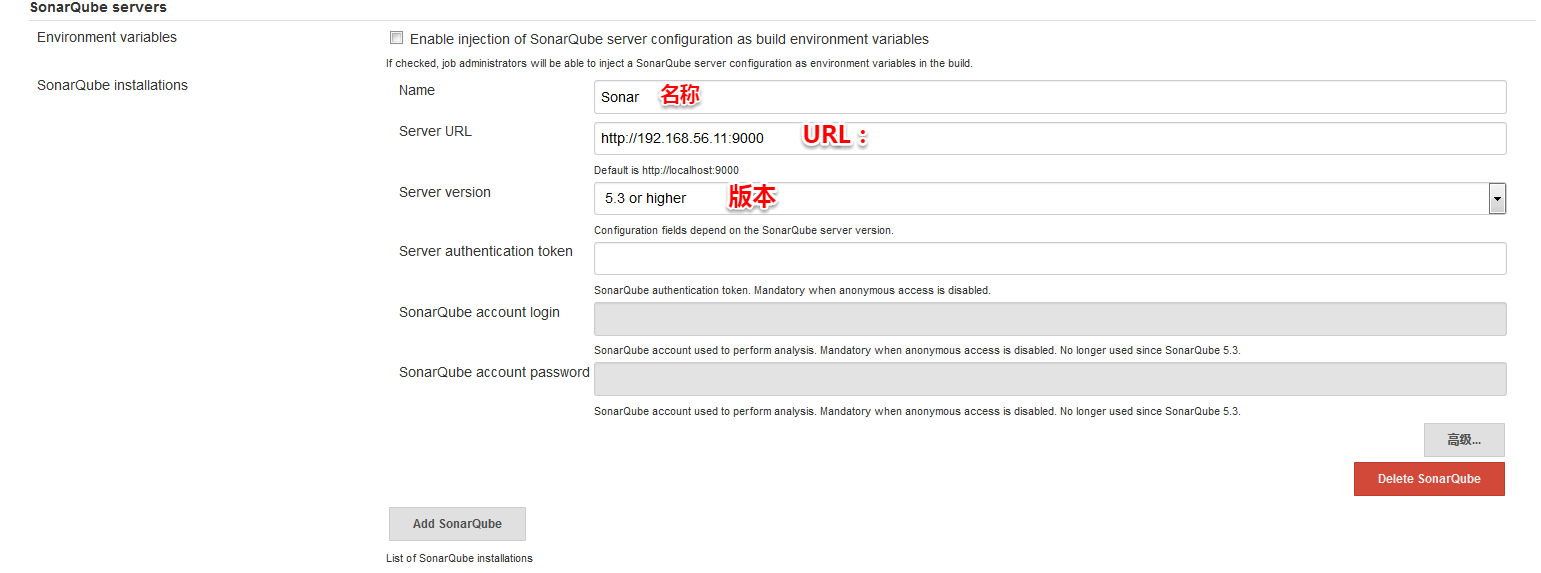
ФуПЩвддкSonarЕФХфжУЮФМўРДХфжУSonar WebМрЬ§ЕФIPЕижЗКЭЖЫПкЃЌФЌШЯЪЧ9000ЖЫПкЁЃ
[root@linux-node1
conf]# vim sonar.properties
99 #sonar.web.host=0.0.0.0
106 #sonar.web.port=9000 |
ЦєЖЏУќСюШчЯТЃК
[root@linux-node1
~]# /usr/local/sonarqube/bin/linux -x86-64/sonar.sh
start
Starting SonarQube...
Started SonarQube. |
ШчЙћгаЪВУДЮЪЬтПЩвдПДвЛЯТШежО [/usr/local/sonarqube/
logs/sonar.log]
МьВщЪЧЗёгаЯргІЕФЖЫПк
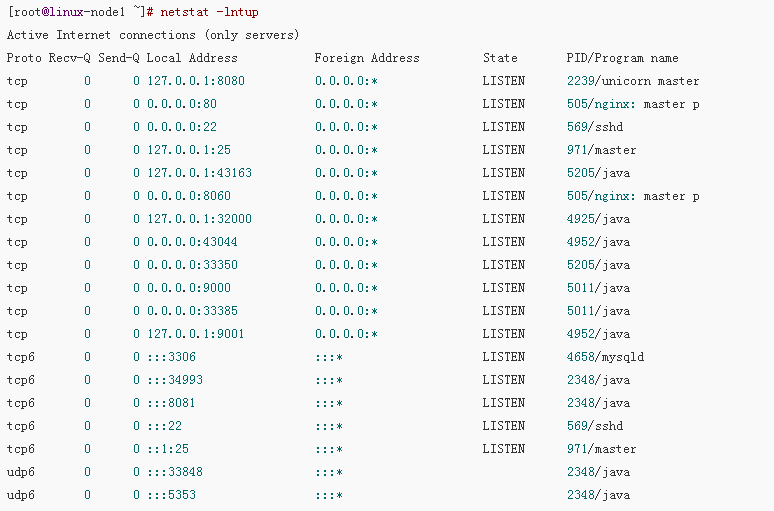
#ЖЫПкЪЧ9000ХЖЃЁ
WebЕЧТНЃКIP:9000
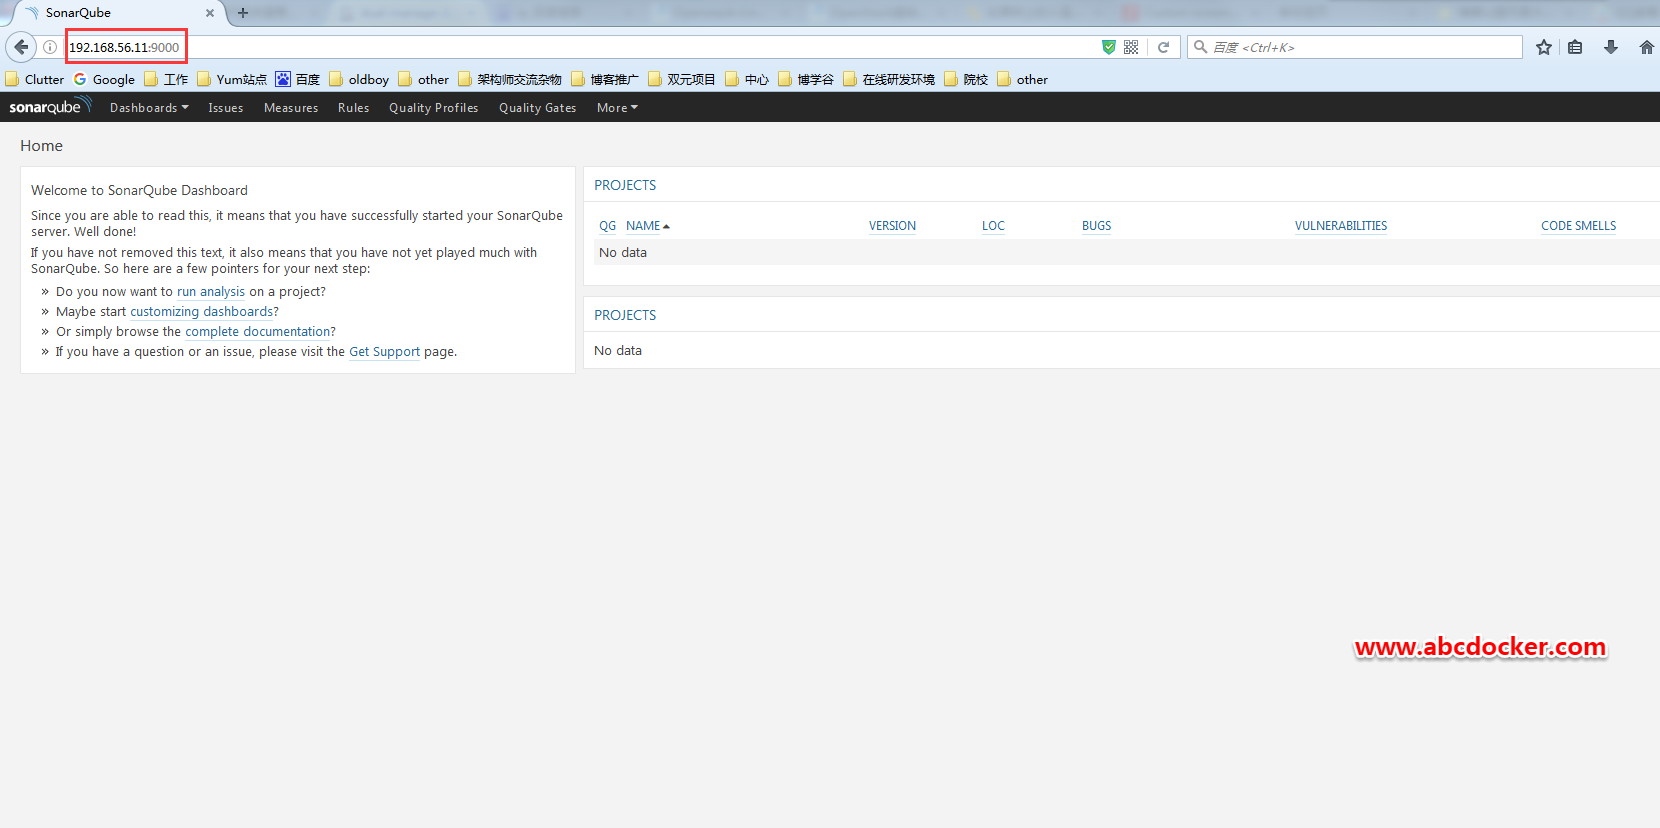
ЬсЪОЃК
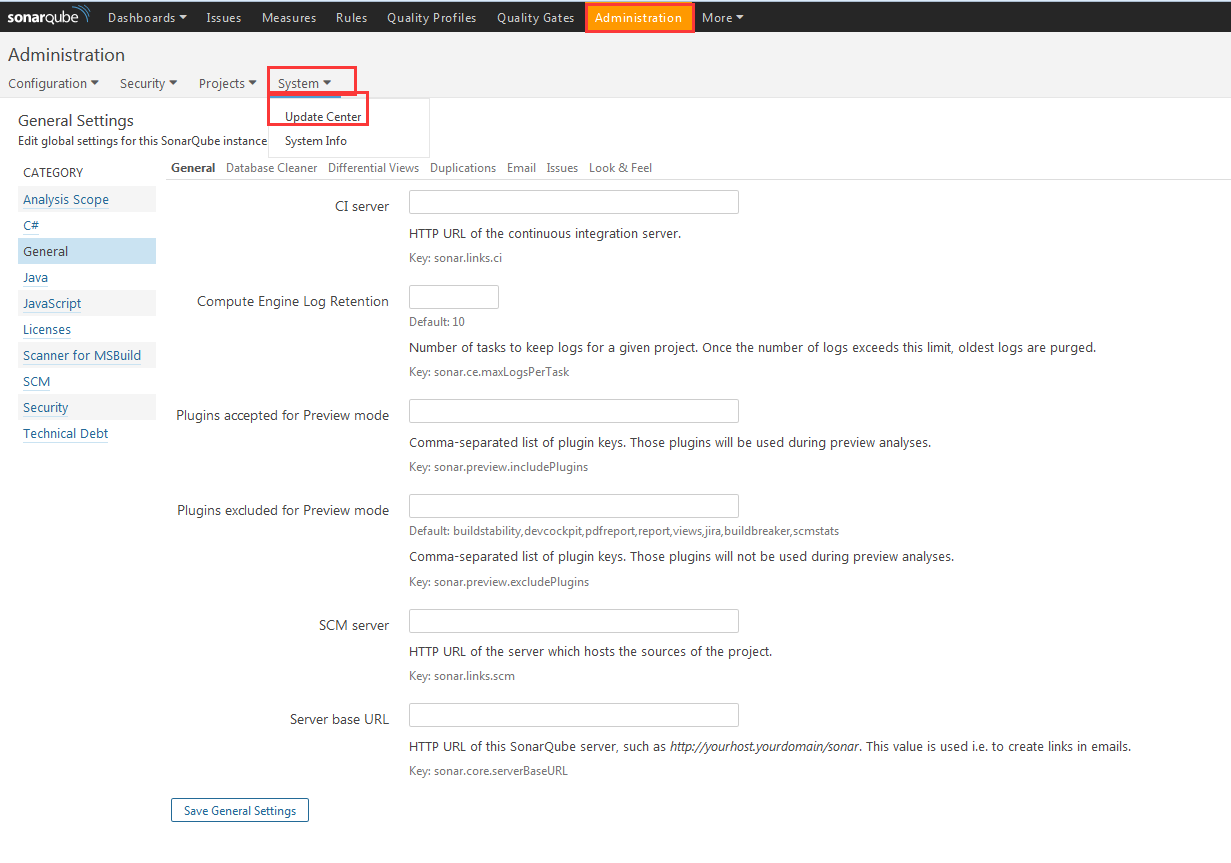
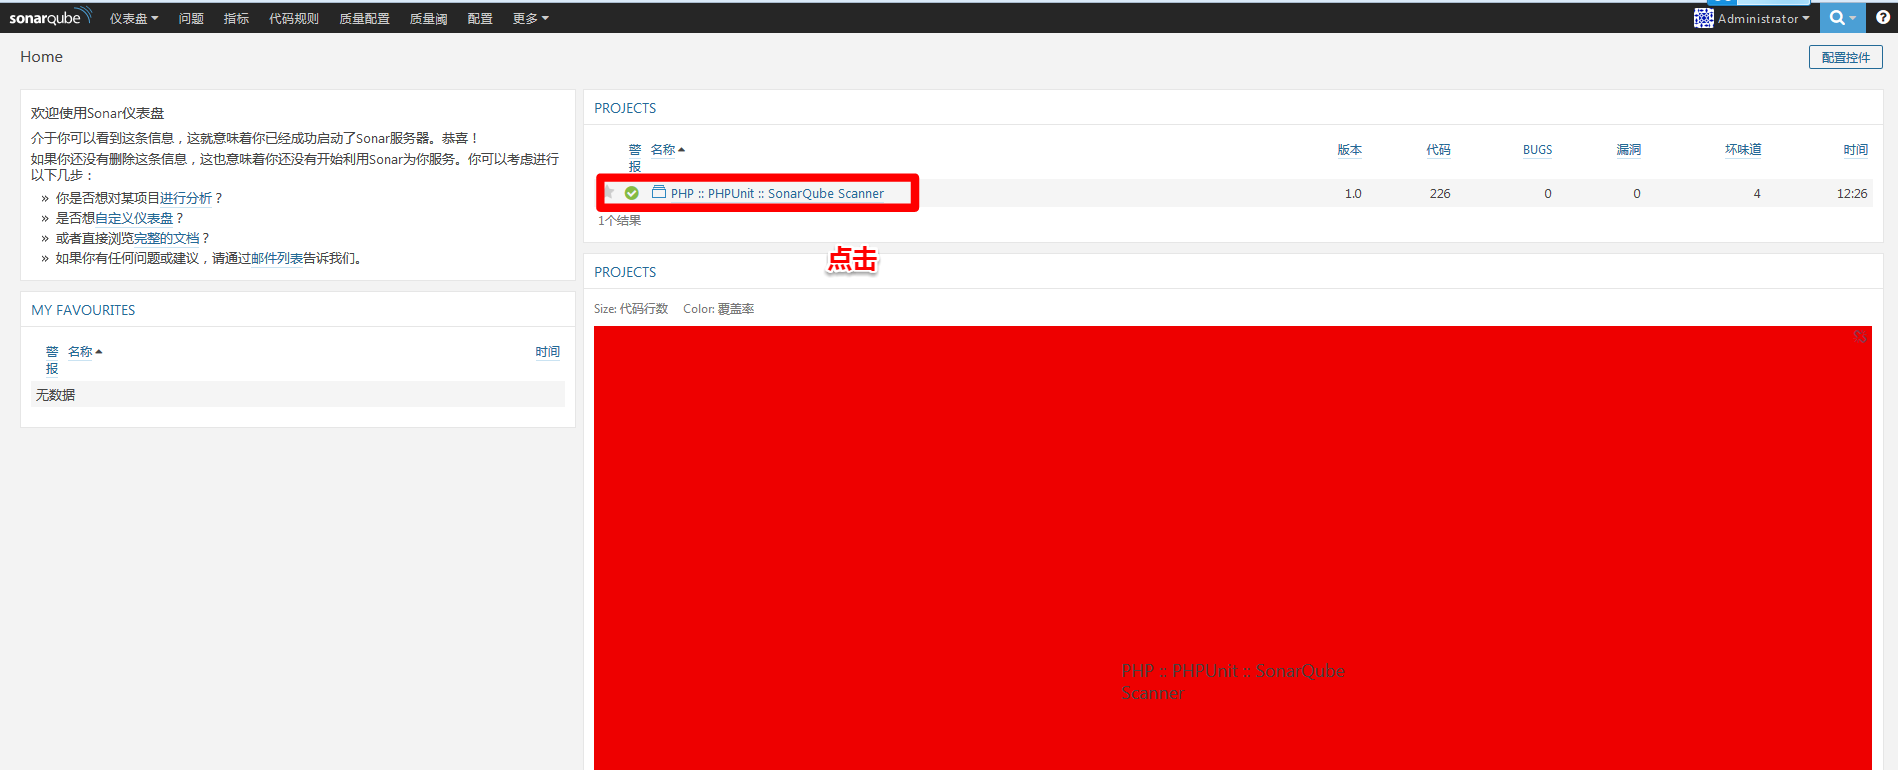
sonarИњjenkinsРрЫЦЃЌвВЪЧвдВхМўЮЊжї
sonarАВзАВхМўга2жжЗНЪНЃКЕквЛжжНЋВхМўЯТдиЭъДцЗХдкsonarЕФВхМўФПТМЃЌЕкЖўжжЪЙгУwebНчУцРДЪЙгУАВзА
ДцЗХВхМўТЗОЖ[/usr/local /sonarqube/ extensions/plugins/]
АВзАжаЮФВхМў
ЕЧТНЃКгУЛЇУћЃКadmin УмТыЃКadmin

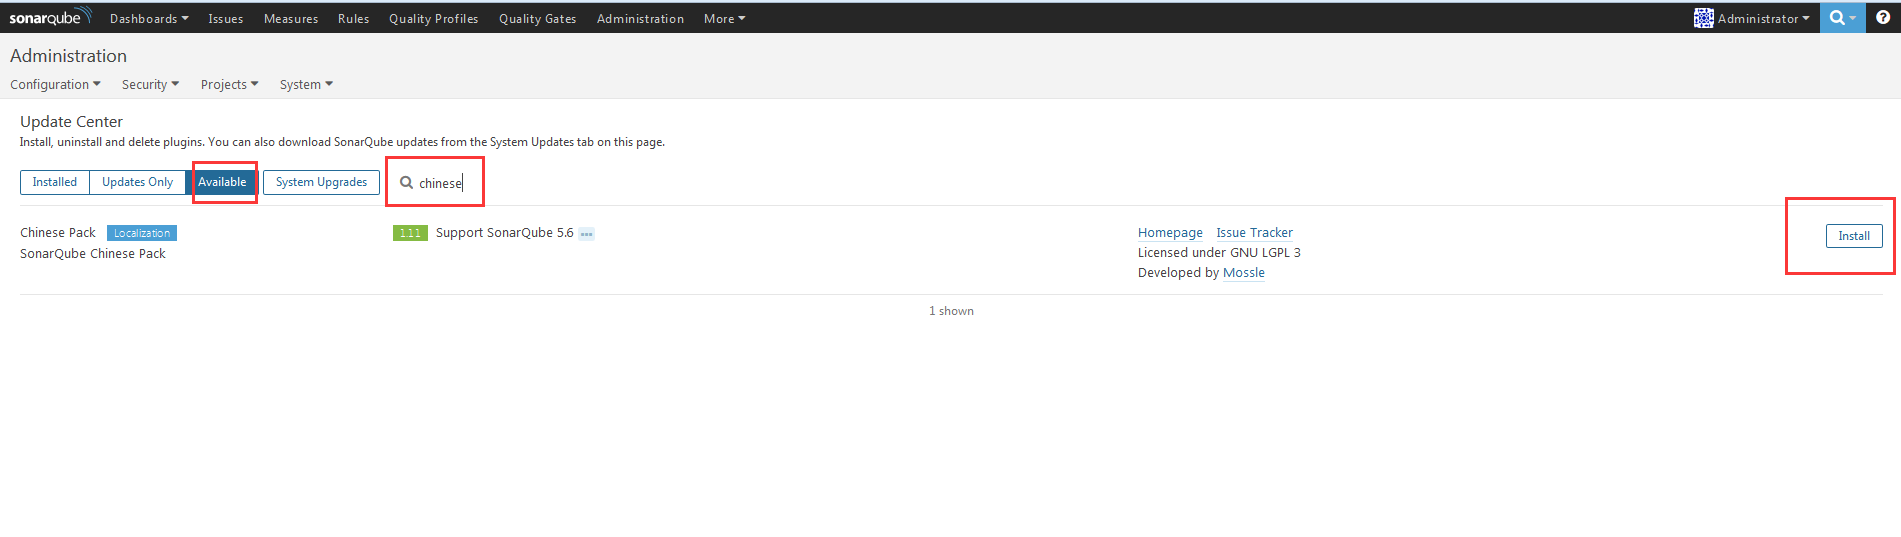
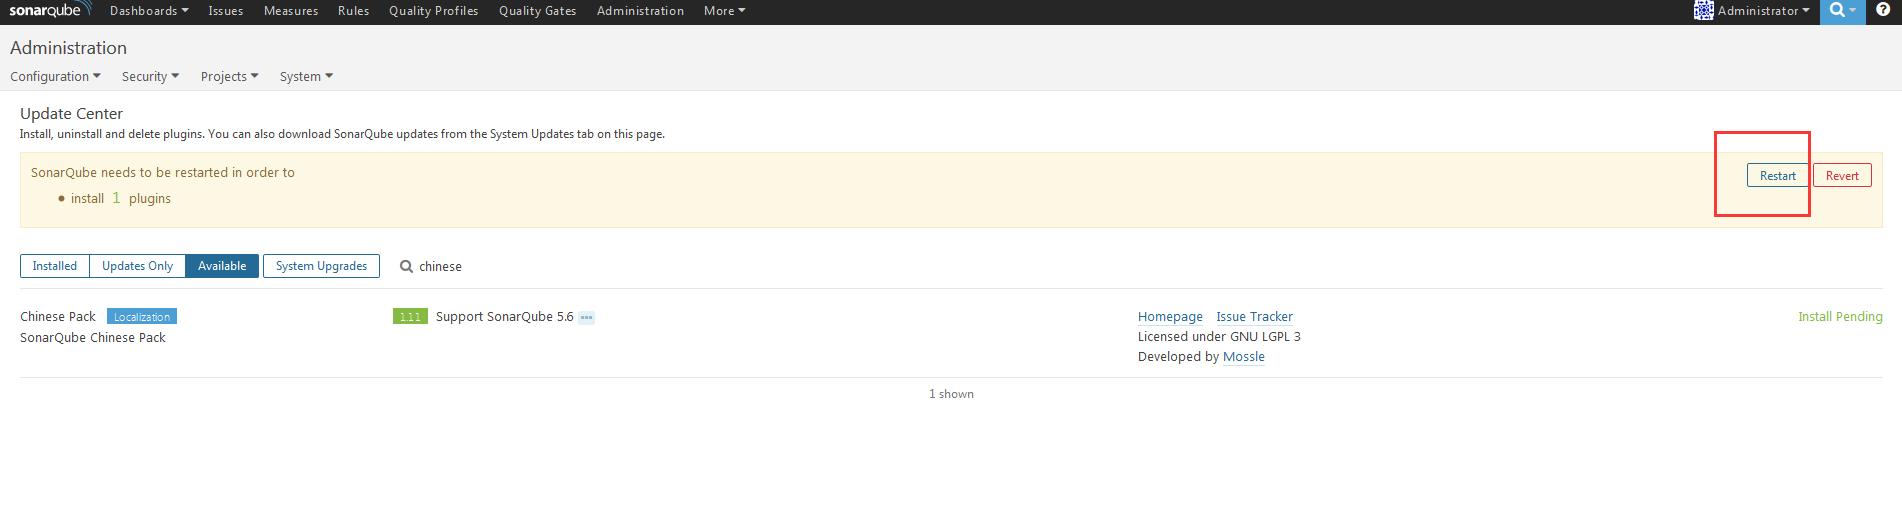
ашвЊжиЦєВХЛсЩњаЇ
ЩњаЇКѓШчЯТЭМЃК
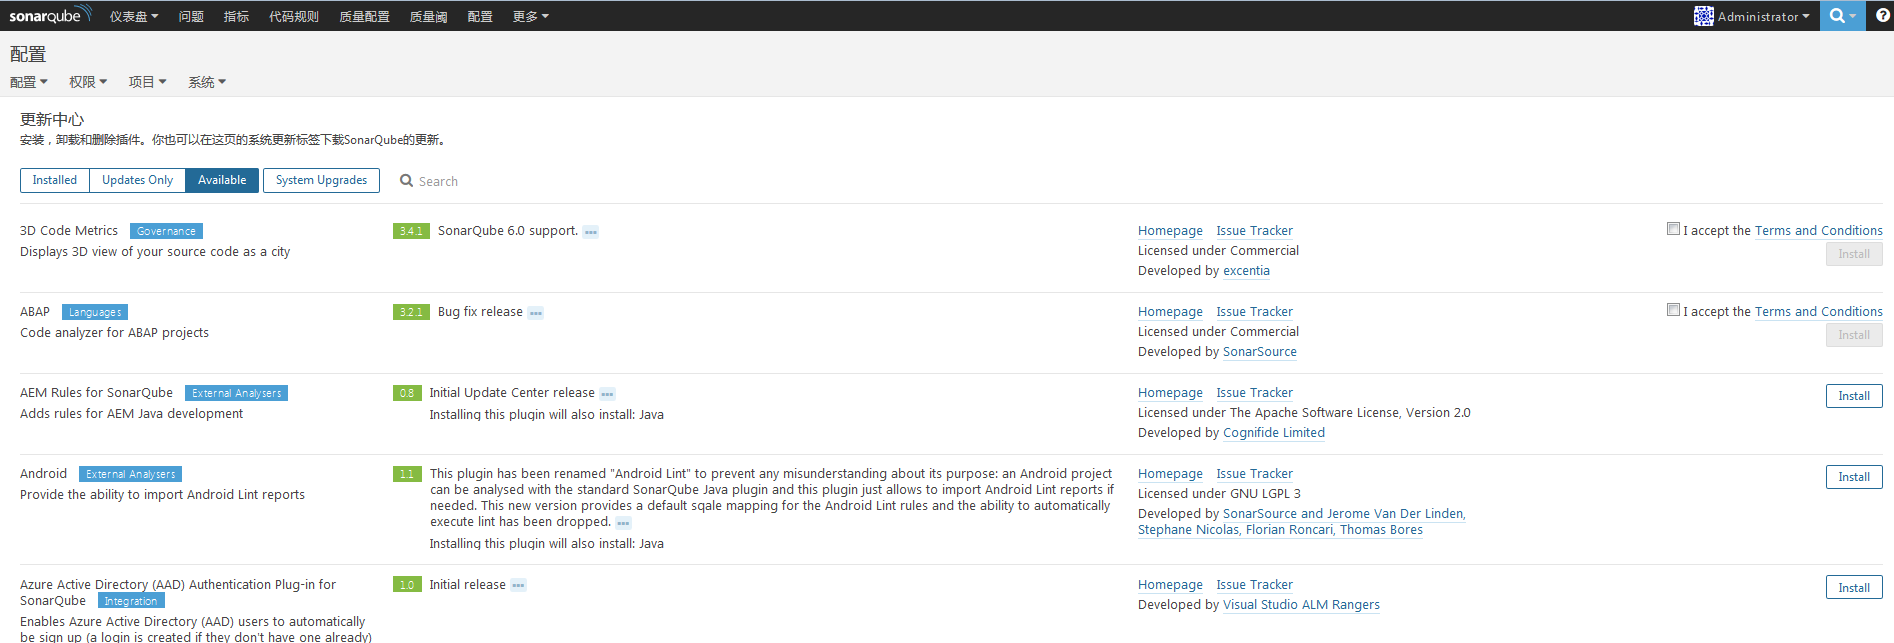
ЮвУЧдкАВзАвЛИіphpгябд
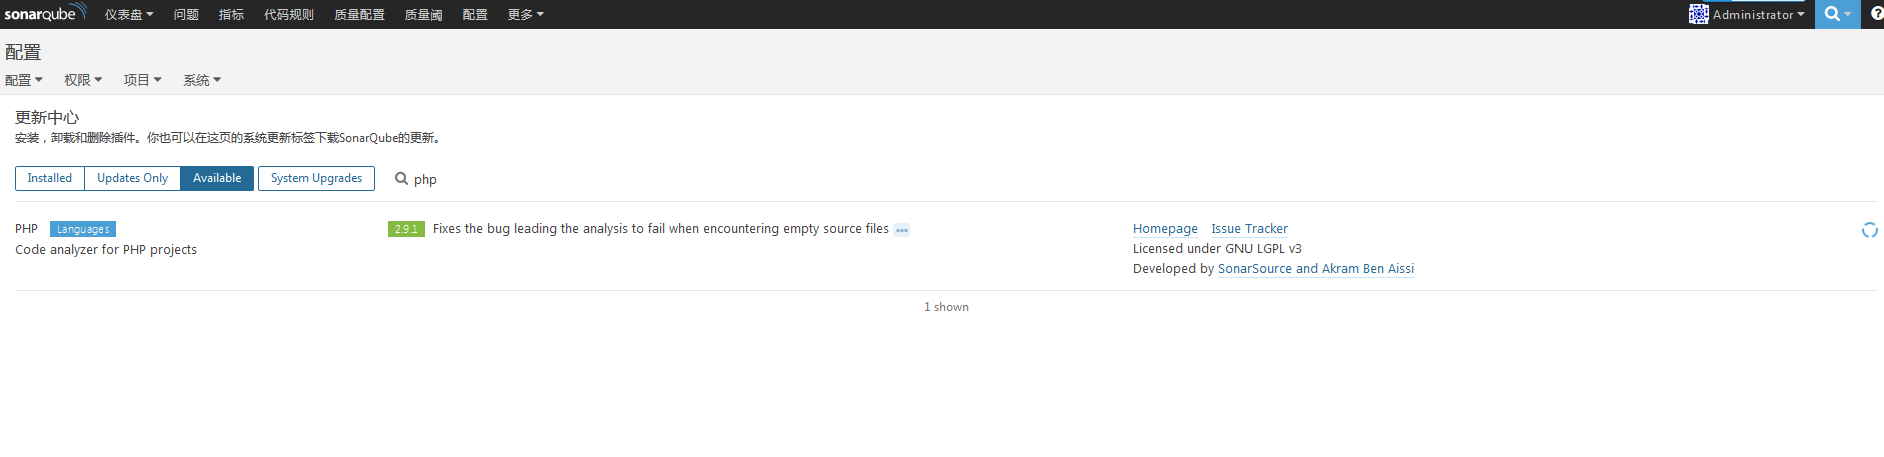
ЮТмАЬсЪОЃКШчЙћЯТдиВЛЯТРДЮвУЧжБНгШЅgithubНјааЯТдиЃЌвђЮЊЮвУЧетИіВхМўЖМЪЧЪЙгУwgetНјааЯТдиЕФ
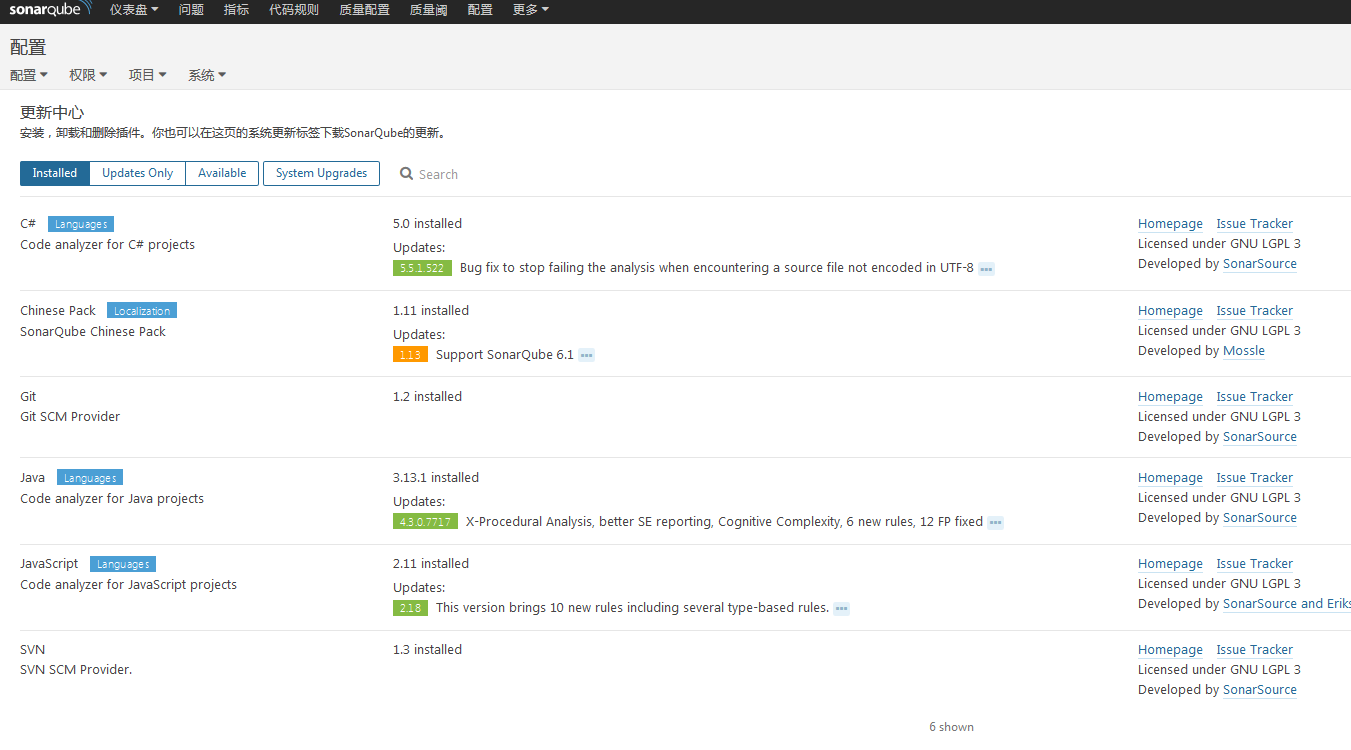
ЮвУЧЯждкжЛФмЪЙгУjavaЕФjarАќКЭphpЃЌвђЮЊЮвУЧжЛАВзАСЫjavaКЭphpЕФгябдВхМўЁЃШчЙћЯыЪЙгУPythonЕФГЬађЃЌОЭашвЊАВзАPythonЕФгябдВхМў
Sonar ВхМў--->гябдВхМў ЃЈЗжЮіЪВУДгябдЃЌФуОЭашвЊАВзАЪВУДгябдЕФВхМўЃЉ
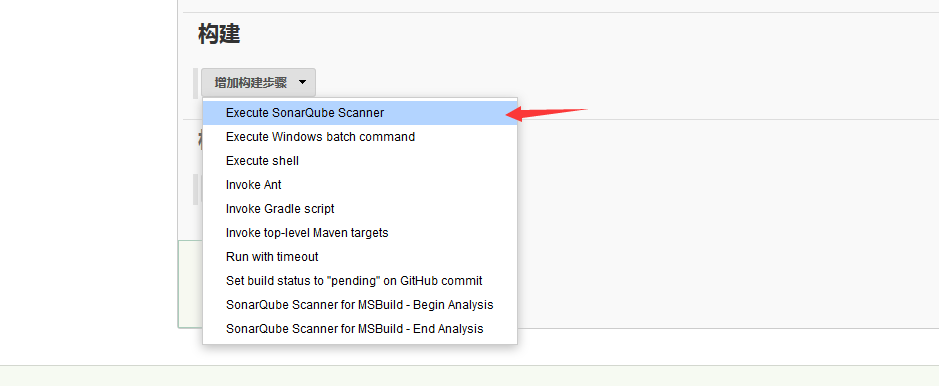
SonarЭЈЙ§SonarQube ScannerЃЈЩЈУшЦїЃЉРДЖдДњТыНјааЗжЮі
ЙйЗНЮФЕЕ ЃКhttp://docs.sonarqube.org/ display/SCAN/Analyzing
+with+SonarQube+Scanner
ЯТдиЩЈУшЦїВхМў
[root@linux-node1
~]# wget https://sonarsource.bintray.com/ Distribution/s
onar-scanner-cli/ sonar- scanner-2.8.zip
[root@linux-node1 ~]# unzip sonar-scanner -2.8.zip
[root@linux-node1 ~]# mv sonar-scanner -2.8 /usr/local/
[root@linux-node1 ~]# ln -s /usr/local/ sonar-scanner-2.8/
/usr/local/sonar-scanner |
ЮвУЧвЊНЋЩЈУшЦїКЭsonarЙиСЊЦ№РД
[root@linux-node1
~] # cd /usr/local/sonar-scanner
[root@linu x-node1 sonar-scanner] # ls
bin conf lib
[root@linux-node1 sonar-scanner] # cd conf/
[root@linux-node1 conf]# ls
sonar-scanner.properties
[root@linux-node1 conf] # vim sonar-scanner.properties
sonar.host.url = http://localhost:9000 #sonarЕижЗ
sonar.sourceEncoding= UTF-8 #зжЗћМЏ
sonar.jdbc.username= sonar #Ъ§ОнПтеЫКХ
sonar.jdbc.password= sonar@pw #Ъ§ОнПтУмТы
sonar.jdbc.url= jdbc:mysql://localhost:3306/sonar?useUnicode
=true& characterEncoding= utf8 #Ъ§ОнПтСЌНгЕижЗ
#ДђПЊзЂЪЭМДПЩ |
ЮвУЧЯждкашвЊеввЛИіДњТыНјааЗжЮіЁЃ
sonarВхМўЬсЙЉСЫвЛИіДњТыЕФПт
github:https://github.com/ SonarSource/sonar-examples
ЮвУЧЯТдиШэМўАќЃКhttps://github.com /SonarSource/
sonar-examples /archive/master.zip
НтбЙ
[root@linux-node1
src] # unzip sonar-examples-master.zip
[root@linux-node1 php] # cd sonar-examples- master/projects/languages/php
[root@linux-node1 php] # cd php-sonar-runner-unit-tests/
[root@linux-node1 php-sonar-runner -unit-tests]#
ll
total 8
-rw-r--r-- 1 root root 647 Dec 14 09:57 README.md
drwxr-xr-x 2 root root 51 Dec 14 09:57 reports
-rw-r--r-- 1 root root 346 Dec 14 09:57 sonar-
project.properties
drwxr-xr-x 3 root root 31 Dec 14 09:57 src
drwxr-xr-x 2 root root 25 Dec 14 09:57 tests
#етРяОЭЪЧPHPЕФФПТМ |
ХфжУЮФМўНтЪЭЃК
ШчЙћФуЯыШУЮвЩЈУшЃЌОЭашвЊдкДњТыТЗОЖЯТЗХвЛИіХфжУЮФМў
[root@linux-node1
php -sonar-runner-unit-tests] # cat sonar-project.
properties
sonar.projectKey =org.sonarqube: php-ut-sq-scanner
#Key
sonar.projectName= PHP :: PHPUnit :: SonarQube
Scanner #етРяЕФУћГЦЛсЯдЪОдквЛЛсЕФwebНчУцЩЯ
sonar.projectVersion=1.0 #АцБОЃЌетРяЕФАцБОвЛЛсвВЛсЯдЪОдкwebНчУцЩЯ
sonar.sources=src #ШэМўАќДцЗХТЗОЖ
sonar.tests=tests
sonar.language=php #гябд
sonar.sourceEncoding=UTF-8 #зжЬх
# Reusing PHPUnit reports
sonar.php.coverage.reportPath = reports/phpunit.coverage.xml
sonar.php.tests.reportPath =reports/phpunit.xml |
#вВОЭЪЧЫЕдкЯюФПРяУцБиаыгаетИіХфжУЮФМўВХПЩвдНјааЩЈУш
ЩЈУш
#ЬсЪОЃКашвЊдкЯюФПЮФМўРяУцНјаажДаа
[root@linux-node1
php -sonar-runner-unit-tests] # /usr/local/sonar-
scanner/bin/sonar-scanner
INFO: Scanner configuration file: /usr/local/sonar
-scanner/conf/sonar -scanner.properties
INFO: Project root configuration file: /usr/local/src/sonar-examples-
master/projects/languages /php/php-sonar-runner
-unit-tests/sonar -project.properties
INFO: SonarQube Scanner 2.8
INFO: Java 1.8.0_111 Oracle Corporation (64-bit)
INFO: Linux 3.10.0- 514.2.2.el7.x86_64 amd64
INFO: User cache: /root/ .sonar/cache
INFO: Load global repositories
INFO: Load global repositories (done) | time=211ms
WARN: Property 'sonar.jdbc.url' is not supported
any more. It will be ignored. There is no longer
any DB connection to the SQ database.
WARN: Property 'sonar.jdbc.username' is not supported
any more. It will be ignored. There is no longer
any DB connection to the SQ database.
WARN: Property 'sonar.jdbc.password' is not supported
any more. It will be ignored. There is no longer
any DB connection to the SQ database.
INFO: User cache: /root/ .sonar/cache
INFO: Load plugins index
INFO: Load plugins index (done) | time=3ms
INFO: Download sonar-csharp -plugin-5.0.jar
INFO: Download sonar-java -plugin-3.13.1.jar
INFO: Download sonar-l10n -zh-plugin-1.11.jar
INFO: Plugin [l10nzh] defines 'l10nen' as base
plugin. This metadata can be removed from manifest
of l10n plugins since version 5.2.
INFO: Download sonar-scm -git-plugin-1.2.jar
INFO: Download sonar-php -plugin-2.9.1.1705.jar
INFO: Download sonar-scm-svn -plugin-1.3.jar
INFO: Download sonar-javascript -plugin-2.11.jar
INFO: SonarQube server 5.6
INFO: Default locale: " en_US", source
code encoding: "UTF-8"
INFO: Process project properties
INFO: Load project repositories
.................................................
................................................. |
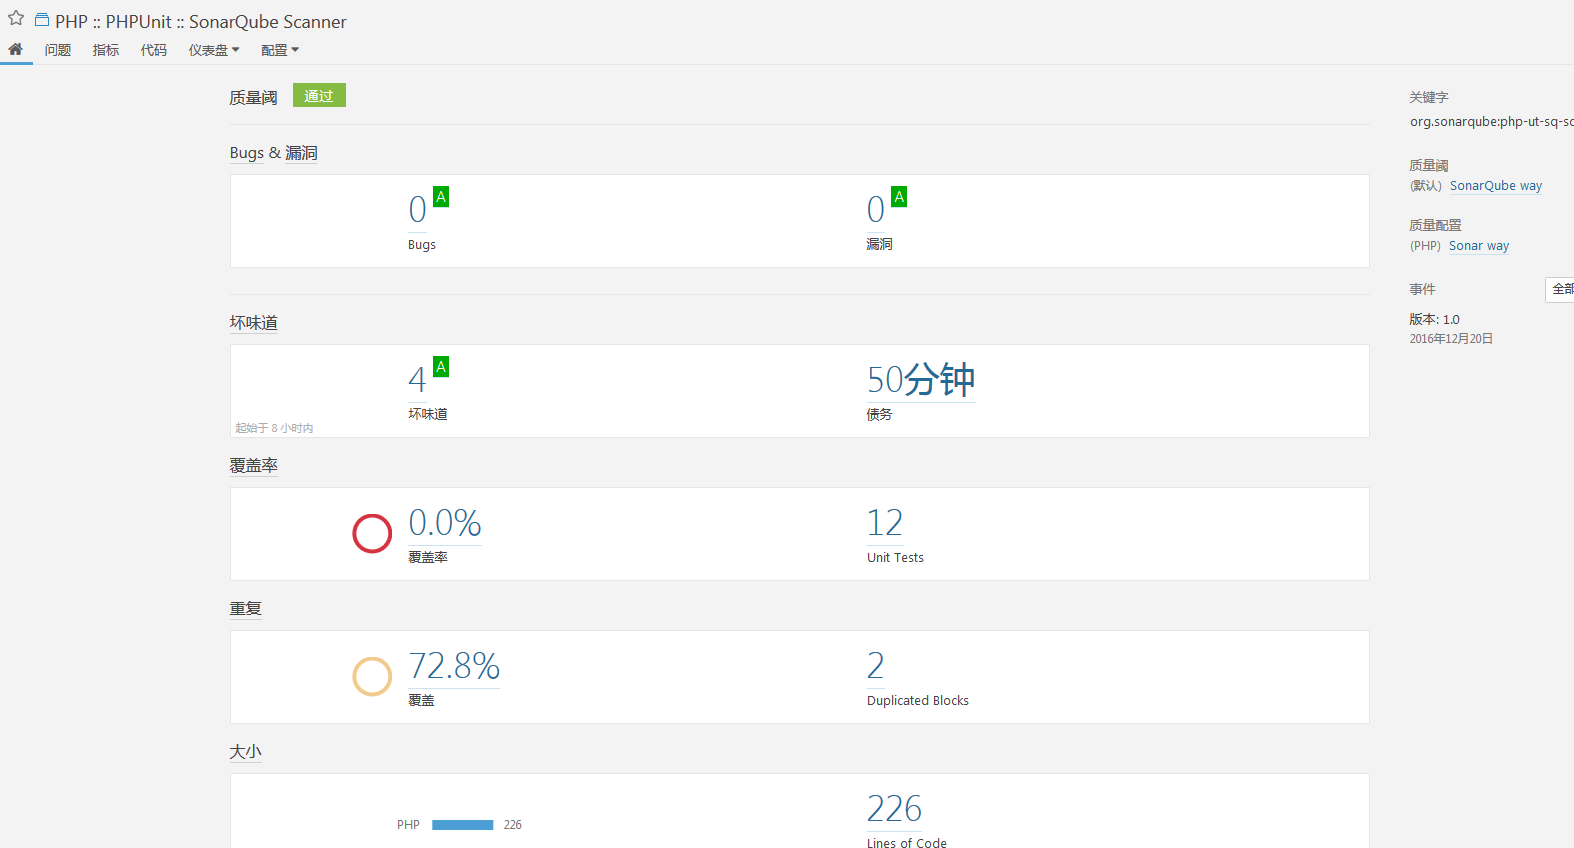
ЬсЪОЃКЮвУЧЪВУДЖМВЛжИЖЈОЭЛсдкЕБУцФПТМЯТЩЈУшsonar-project.propertiesЮФМўЃЌИљОнХфжУЮФМўНјааЩЈУшЙЄзїЁЃЩЈУшжЎКѓЮвУЧдкwebНчУцЩЯОЭПЩвдПДЕНДњТыЕФЩЈУшНсЙћ
етРяЕФУћзжЃЌАцБО ЖМЪЧдкsonar -project.propertiesЮФМўжаЖЈвхЕФ
жЪСПуаАяЮвУЧЩшЖЈКУвЛИіуажЕЃЌГЌЙ§ЯргІЕФуажЕОЭЫугаbug
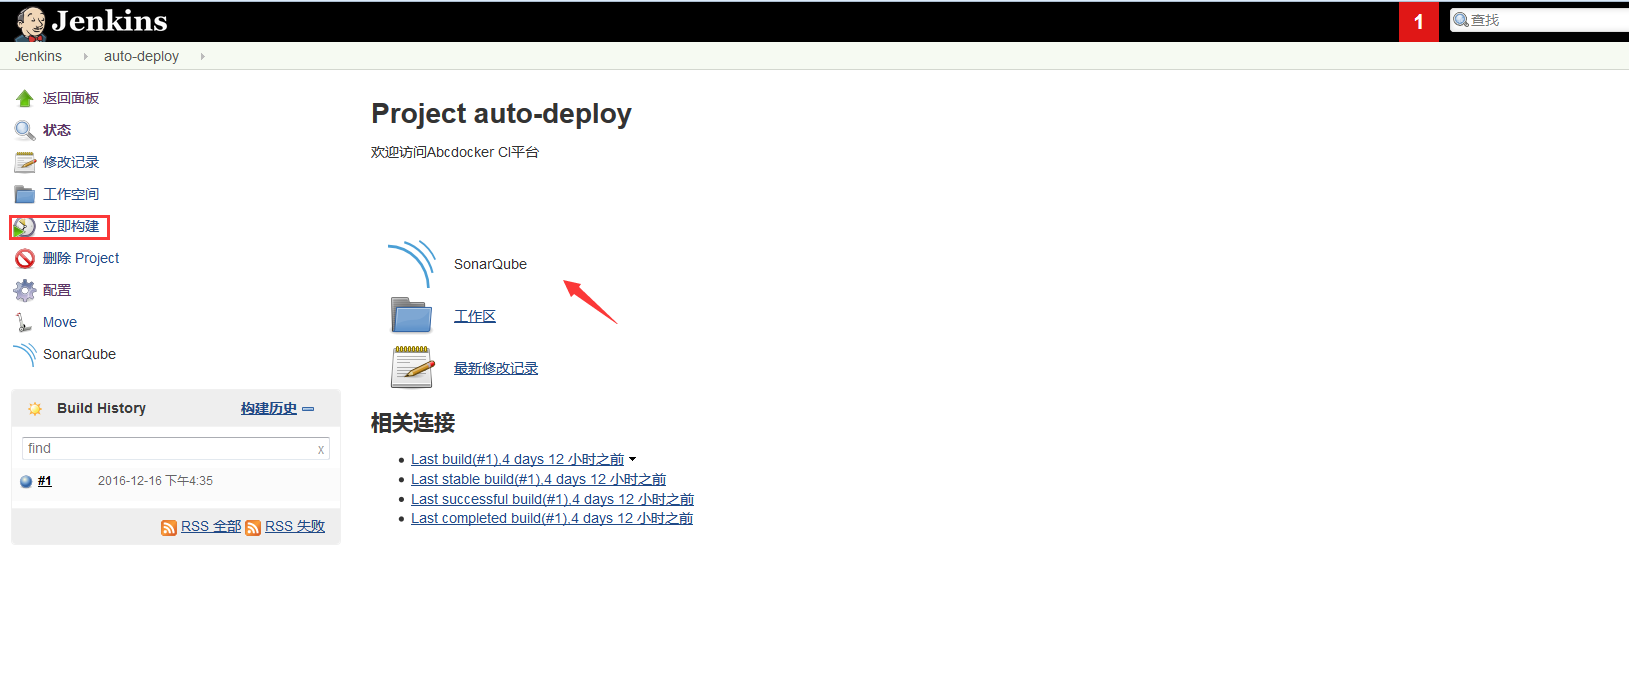
ЮЊСЫШУjenkinsПЩвддкЙЙНЈЯюФПЕФЪБКђжДааsonarЃЌЫљвдЮвУЧашвЊдкjenkinsЩЯАВзАВхМў
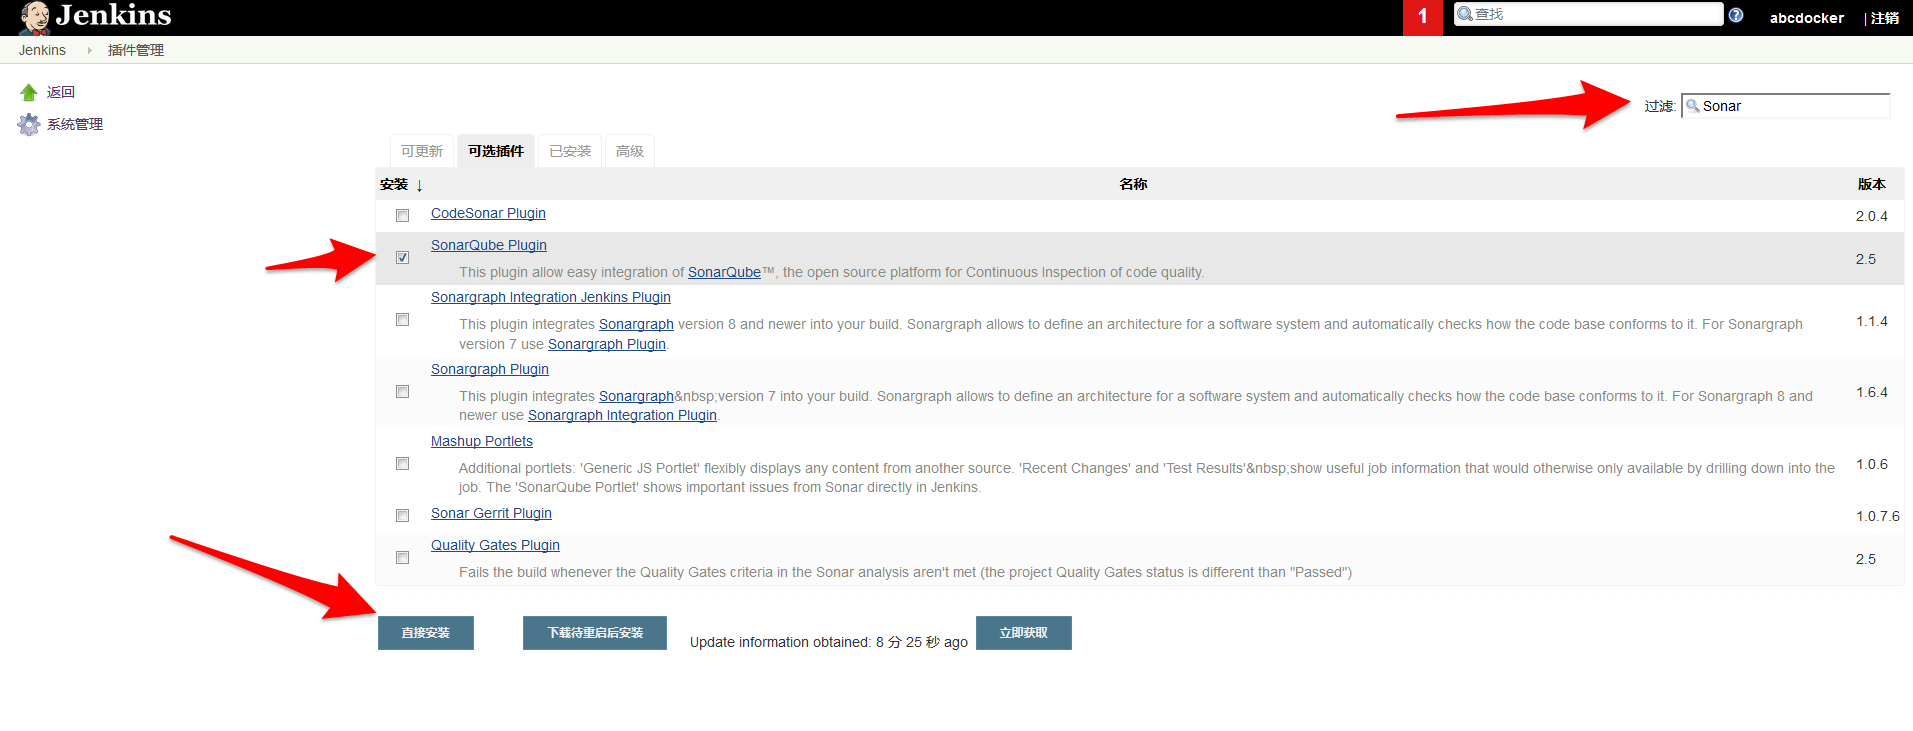
ЯждкОЭПЩвдНјааХфжУЃЌШУjenkinsКЭsonarНсКЯдквЛЦ№ЁЃетбљЮвУЧЙЙНЈЯюФПЕФЪБКђОЭЛсНјааДњТыМьВт
ЕуЛїБЃДц
ХфжУ

БрМЮвУЧЕФЯюФПЃЌбЁдёзюЯТЗХЁЃевЕНЙЙНЈ
ЖдPHPЮФМўНјааИДжЦ
[root@linux-node1
php-sonar-runner -unit-tests]# cat /usr/local/src/sonar-examples
-master/projects/languages/ php/php-sonar -runner-unit-tests/
sonar-project.properties
sonar.projectKey =org.sonarqube:php-ut -sq-scanner
sonar.projectName =PHP :: PHPUnit :: SonarQube
Scanner
sonar.projectVersion=1.0
sonar.sources=src
sonar.tests=tests
sonar.language=php
sonar.sourceEncoding =UTF-8
# Reusing PHPUnit reports
sonar.php.coverage.reportPath =reports/phpunit.coverage.xml
sonar.php.tests.reportPath =reports/phpunit.xml |
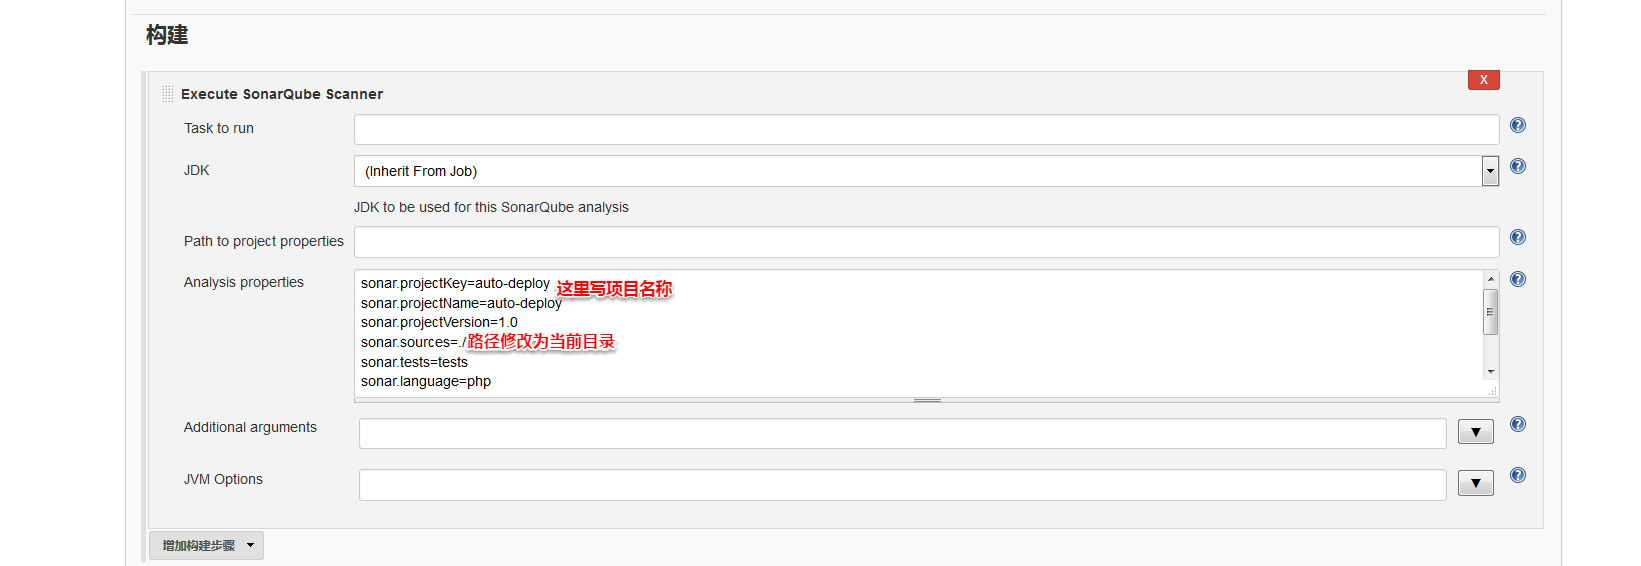
Analysis properties ЗжЮіЕФВЮЪ§
ЬюаДЭъБЯКѓЃЌЮвУЧЕуЛїБЃДц
ЮвУЧбЁдёСЂМДЙЙНЈ
ЬсЪОЃКДЫЪБЕФSonarQubeЪЧЮоЗЈЕуЛїЕФ
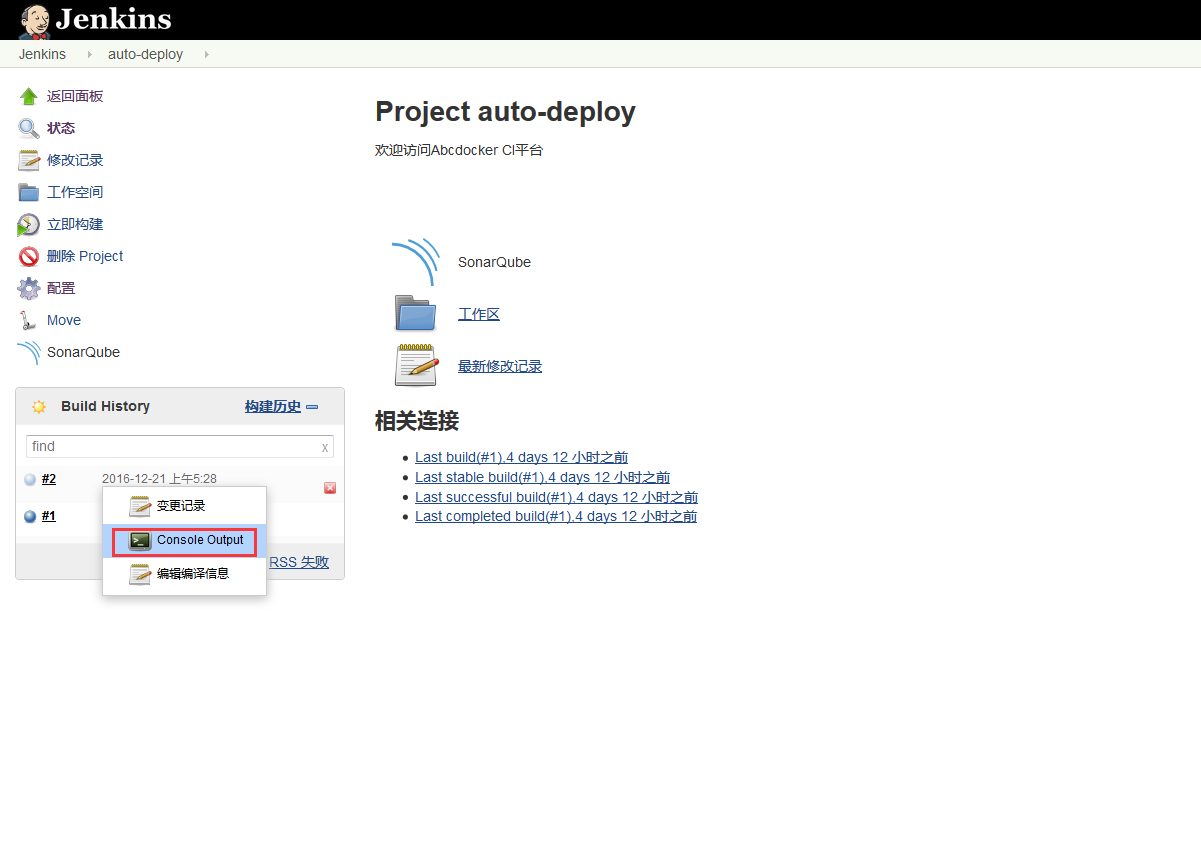
ЕуЛїConsole OutputПЩвдВщПДЙЙНЈЪфГіЕФФкШн

#ЬсЪОЃКжЛвЊУЛгаerrorОЭПЩвд
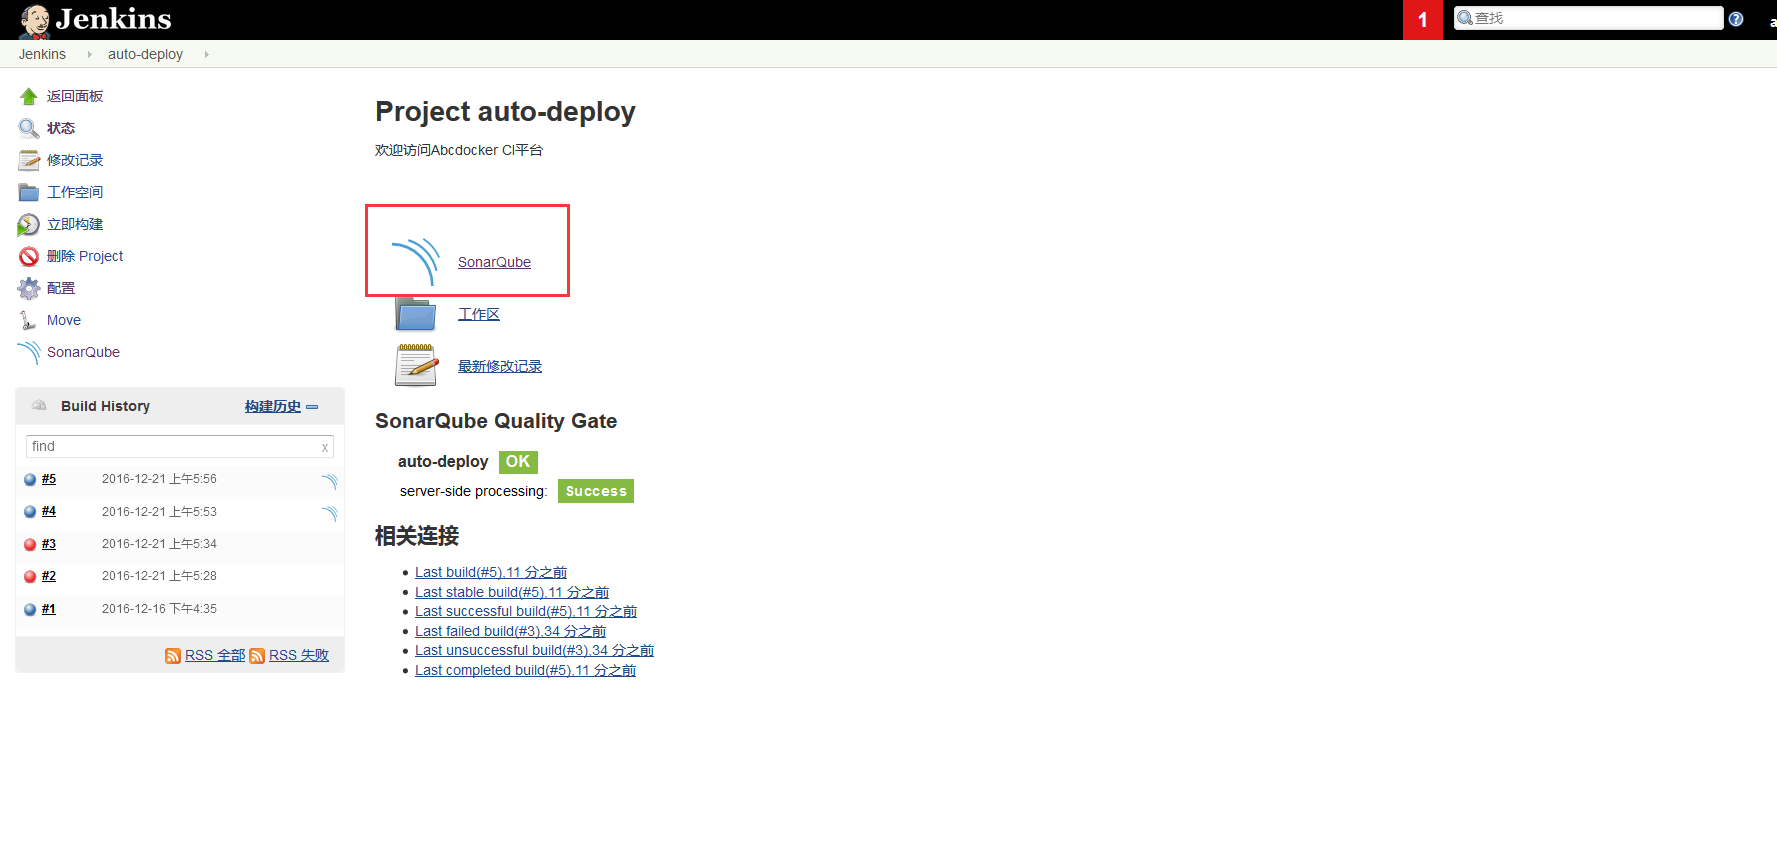
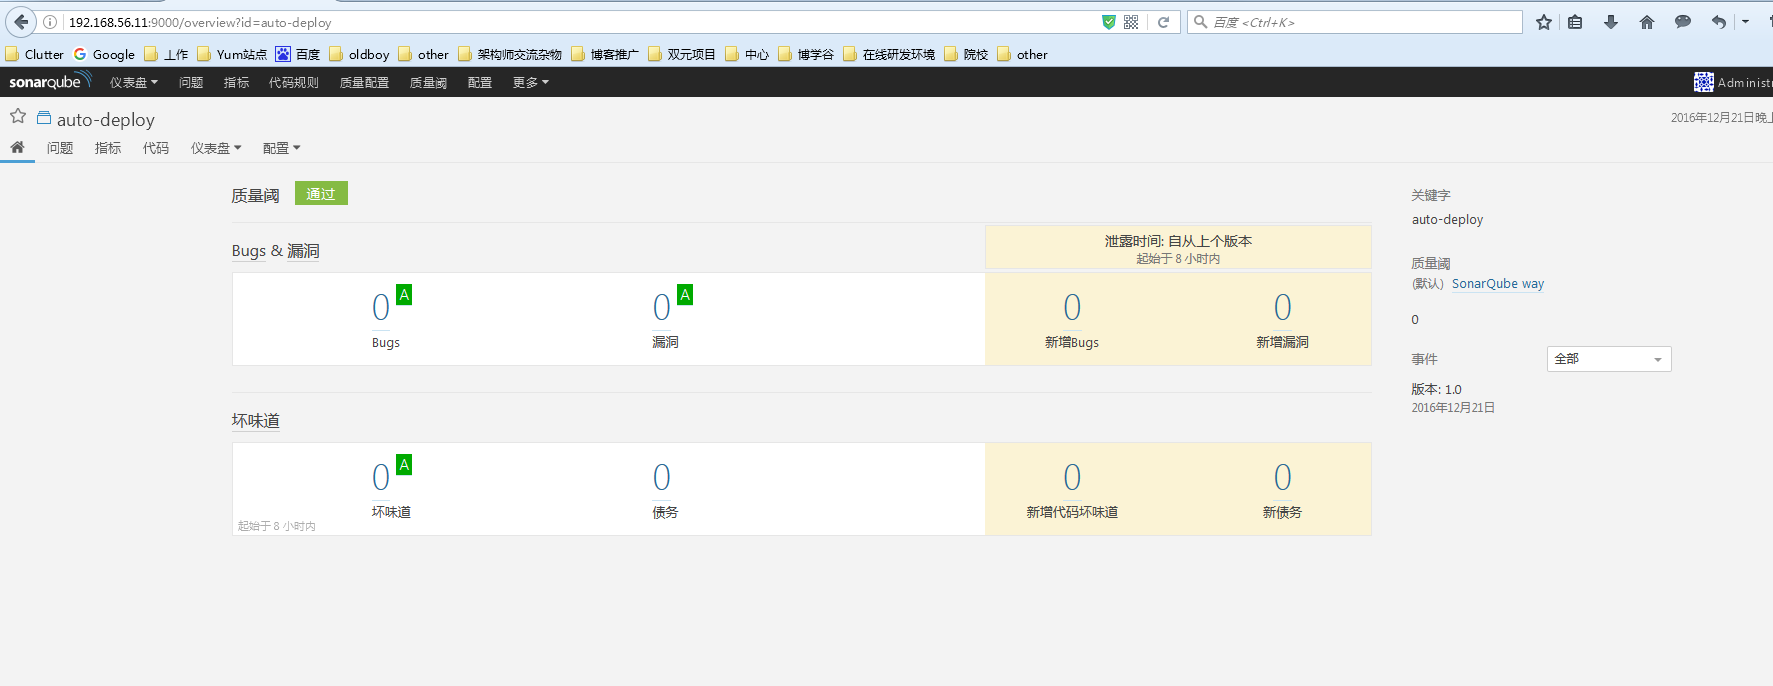
ЙЙНЈЭъГЩКѓЃЌЮвУЧЗЂЯжетРяЕФSonarQubeПЩвдЕуЛїЃЌЮвУЧЕуЛїSonarQubeОЭЛсСДНгЕН192.168.56.11:9000
ОЭЪЧДњТыВщПДЦїЕФЕижЗ
ЯждкЮвУЧвбОзіЕНСЫПЩвддкgitЩЯНјааРШЁДњТыЁЃВЂНјааМьВт
ЮвУЧЛЙПЩвдХфжУвЛИіЙЙНЈЪЇАмЗЂЫЭгЪЯфЃК
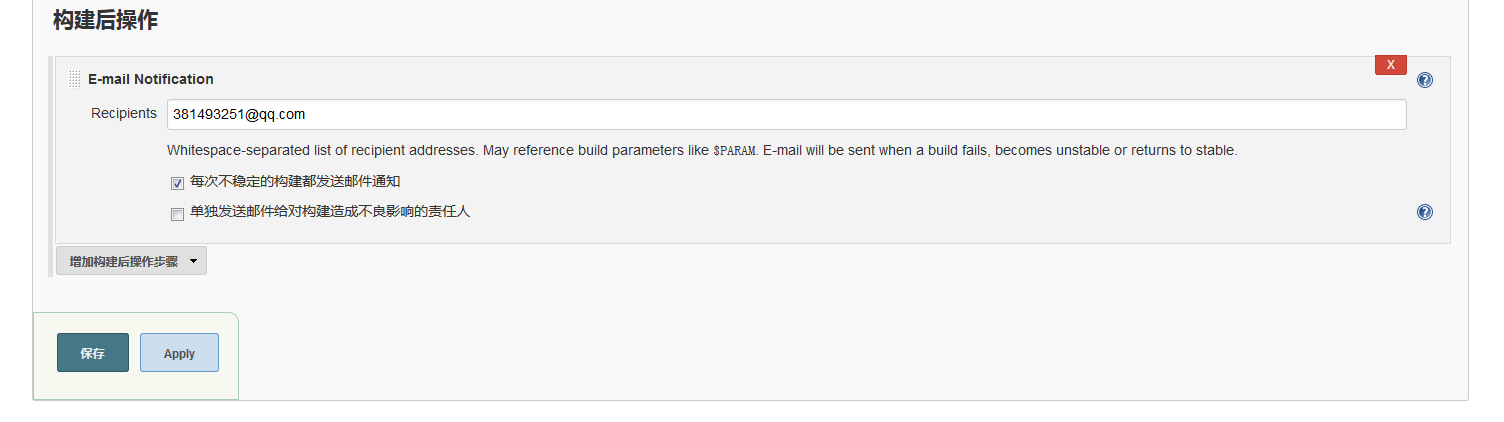
дкЮвУЧЯюФПРяУцЩшжУЙЙНЈКѓВйзїЃЌбЁдёE-mail Notification
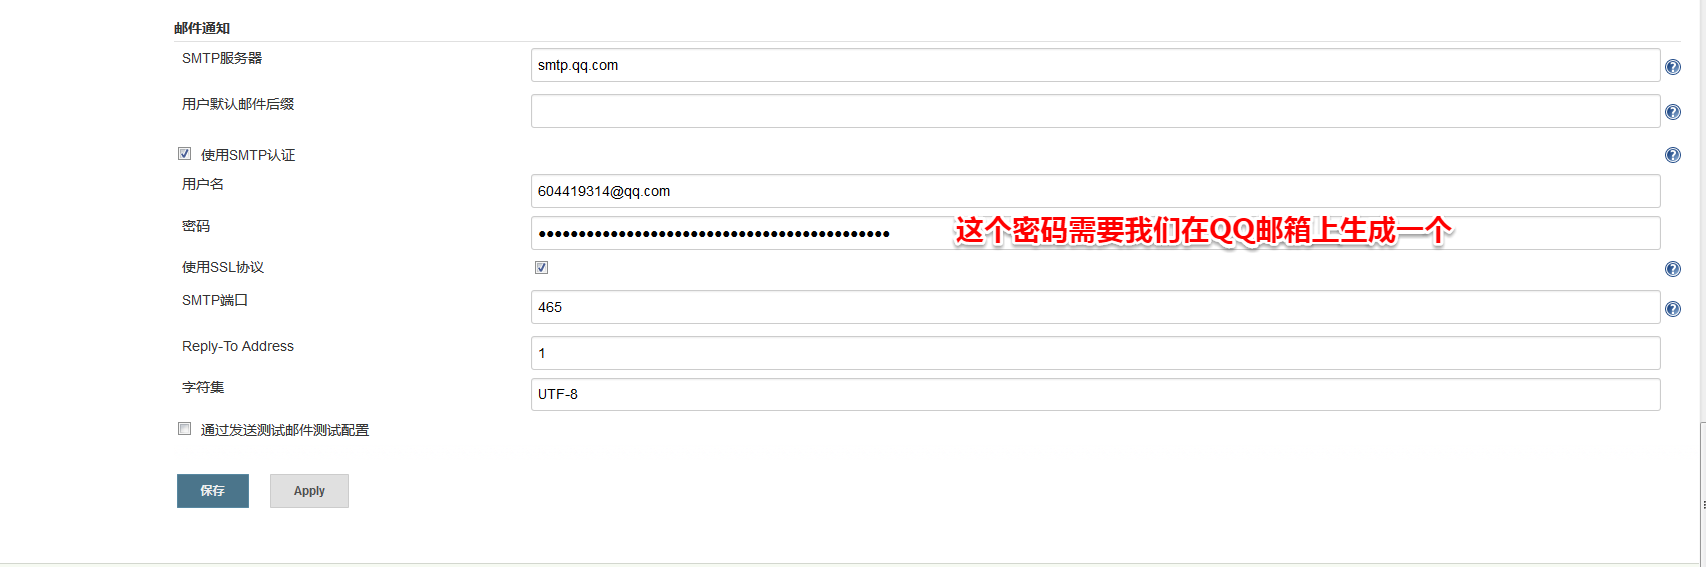
ЮТмАЬсЪОЃКЪЙгУ163гЪЯфЗЂЫЭЕФЭЈжЊБЛ163ЗўЮёЦїЭЫЛиСЫЃЌвђДЫЮвНЋЩшжУдкjenkinsЕФгЪЯфИФГЩСЫQQгЪЯф
QQЃКгЪЯфашвЊЩшжУШчЯТЃК
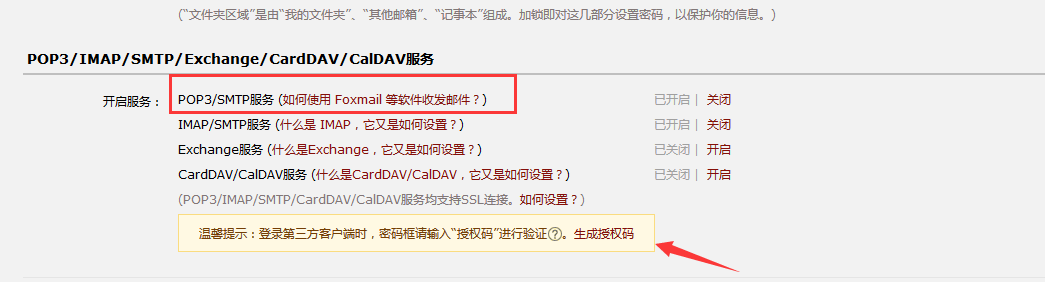
**1ЁЂашвЊПЊЦєPOPE3/SMTPЗўЮё
2ЁЂдкjenkinsЩЯХфжУЕФУмТыЮвУЧашвЊЕуЛїЩњГЩЪкШЈТыНјааЪЙгУ**
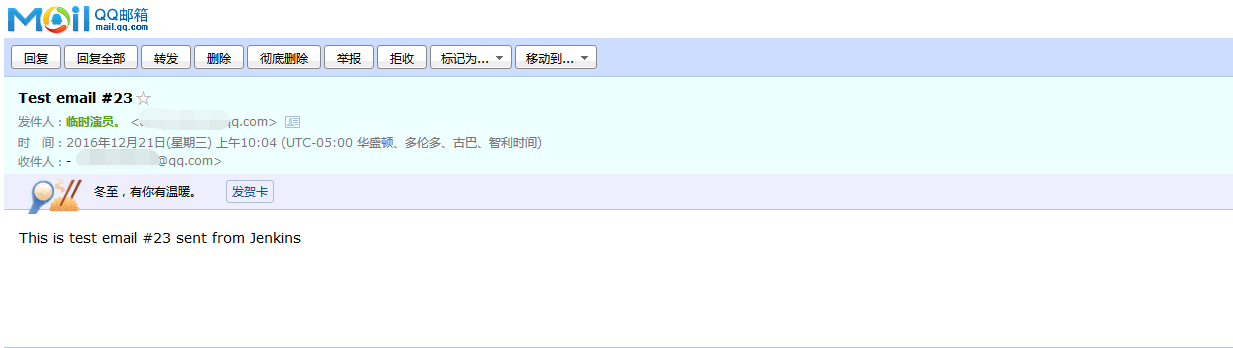
QQгЪМўФЌШЯЛсЪеЕНШчЯТЬсЪОЃК
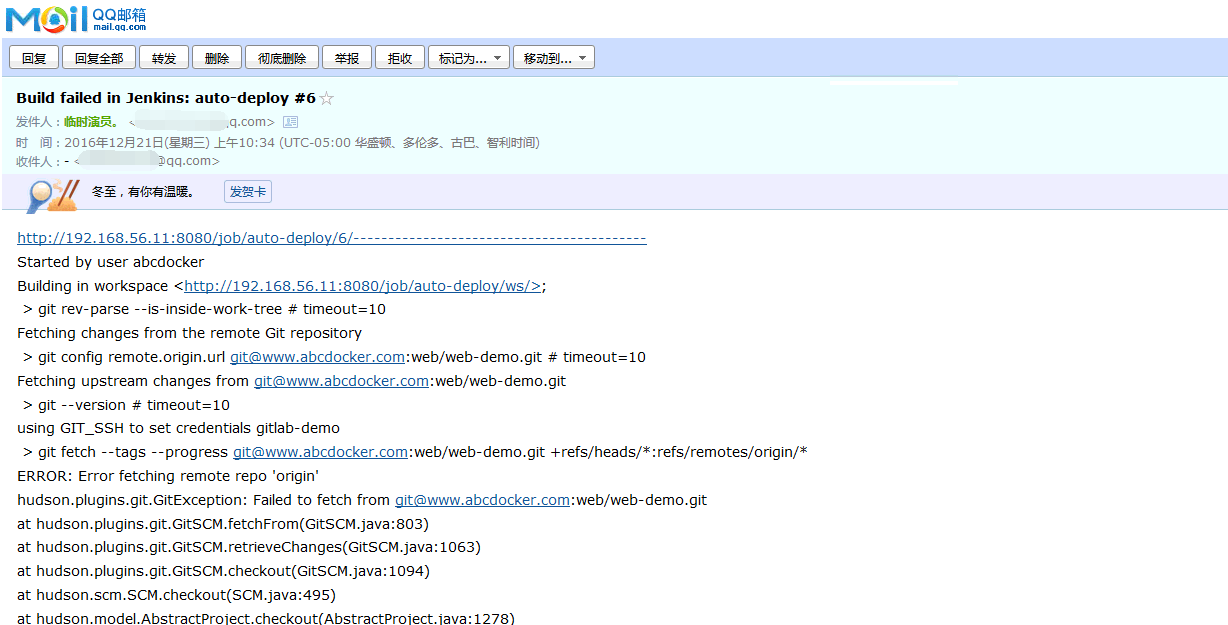
ЕБдйДЮЙЙМўГЩЙІЪБЃЌгЪМўФкШнШчЯТЃК
|