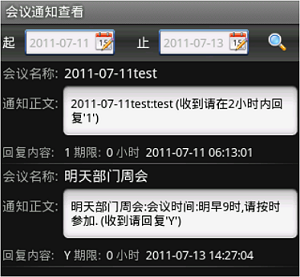
项目中使用的一个简单查询界面,如下图所示:

这个Activity主要由两部分构成,上端的工具栏,和下端的listview,布局文件retrieve_notice.xml如下所示:
<LinearLayout xmlns:android="http://schemas.android.com/apk/res/android"
android:layout_width="fill_parent"android:layout_height="fill_parent"
android:orientation="vertical">
<!-- 顶部工具栏 对齐顶部-->
<RelativeLayout
xmlns:Android="http://schemas.android.com/apk/res/android"
Android:layout_width="fill_parent"
Android:layout_height="wrap_content"
Android:layout_alignParentTop="true">
<include layout="@layout/retrieve_notice_top"
/>
</RelativeLayout>
<!-- 下部的列表 对齐到工具栏下方-->
<ListView
android:id="@+RetrieveNotice/lvList"
android:layout_width="fill_parent"
android:layout_height="fill_parent"
/>
</LinearLayout>
其中,工具栏使用了另一个包含的布局文件retrieve_notice_top.xml:
<LinearLayout xmlns:android="http://schemas.android.com/apk/res/android"
android:layout_width="fill_parent"android:layout_height="wrap_content"
android:orientation="horizontal"android:minHeight="40px"
android:layout_gravity="center_vertical"android:background="@drawable/top">
<!-- 开始日期 -->
<TextView android:text="起"
android:layout_width="wrap_content"
android:textSize="14sp"
android:layout_height="wrap_content"
android:textColor="?android:attr/textColorPrimary"
android:paddingLeft="3sp"
android:layout_gravity="center_vertical"/>
<TextView android:id="@+RetrieveNotice/tvDate1"
android:background="@drawable/box"
android:layout_width="96sp"
android:textSize="13sp"android:text="2011-07-11"
android:layout_height="wrap_content"
android:layout_marginLeft="10sp"
android:layout_gravity="center_vertical"/>
<Button android:id="@+RetrieveNotice/dp1"
android:layout_width="wrap_content" android:layout_gravity="center_vertical"
android:layout_height="wrap_content"
android:background="@drawable/date_edit_button"
android:layout_marginLeft="-22sp"/>
<!-- 截止日期 -->
<TextView android:text="止"
android:layout_width="wrap_content"
android:textSize="14sp"
android:layout_height="wrap_content"
android:textColor="?android:attr/textColorPrimary"
android:paddingLeft="23sp"
android:layout_gravity="center_vertical"/>
<TextView android:id="@+RetrieveNotice/tvDate2"
android:background="@drawable/box"
android:layout_width="96sp"
android:textSize="13sp"android:text="2011-07-11"
android:layout_height="wrap_content"
android:layout_marginLeft="10sp"
android:layout_gravity="center_vertical"/>
<Button android:id="@+RetrieveNotice/dp2"
android:layout_width="wrap_content" android:layout_gravity="center_vertical"
android:layout_height="wrap_content"
android:background="@drawable/date_edit_button"
android:layout_marginLeft="-22sp"/>
<!-- 查询按钮 -->
<Button android:id="@+RetrieveNotice/btnSearch"android:layout_width="wrap_content"
android:layout_height="wrap_content"
android:background="@drawable/search_button"
android:layout_marginLeft="20sp"
android:layout_gravity="center_vertical"/>
</LinearLayout>
其中标签文本tvDate1和tvDate2使用了9-patch背景图,使得TextView呈现出一个带阴影的蓝色边框。而日期选择按钮dp1和dp2把layout_marginLeft属性设置为负值,这样会把按钮位置移动到TextView中,这样两个按钮看起来就像被TextView包含住一样。dp1和dp2使用了自定义图形按钮,它们的background设置为drawable/date_edit_button,这实际上是一个date_edit_button.xml:
<selector xmlns:android="http://schemas.android.com/apk/res/android">
<item android:state_pressed="true"android:drawable="@drawable/date_edit_pressed"
/>
<item android:drawable="@drawable/date_edit_focused"android:state_focused="true"
/>
<item android:drawable="@drawable/date_edit_normal"/>
</selector>
分别描述了按钮在3种状态下需要显示的图片:按下、获得焦点、正常。当然我们必须分别准备这3张图片:date_edit_pressed.png、date_edit_focused、date_edit_normal.png。
在Activity代码中,我们依次要完成以下任务:
1、点击dp1和dp2要弹出日期选择对话框
首先声明几个必要的变量:
private TextView tvDate1,tvDate2;//
两个日期显示框
private Button dp1,dp2;// 两个日期选择按钮,一个查询按钮
int dpFlag=0;// 标志两个日期按钮到底是哪一个按下
private Calendar cal = Calendar.getInstance();
private SimpleDateFormat df = new SimpleDateFormat("yyyy-MM-dd");
当日期选择对话框弹出,要想把用户选择的日期记录下来,必须实现以下监听器:
// 日期选择对话框的DateSet事件监听器
privateDatePickerDialog.OnDateSetListener
listener = new DatePickerDialog.OnDateSetListener()
{ //
@Override
public void onDateSet(DatePicker arg0,
int arg1, int arg2, int arg3) {
// 把日历置回当前时间
cal.setTime(new Date());
// 所选择日期不得大于当前日期
if (arg1 <= cal.get(Calendar.YEAR))
cal.set(Calendar.YEAR, arg1);
if (arg2 <= cal.get(Calendar.MONTH))
cal.set(Calendar.MONTH, arg2);
if (arg3 <= cal.get(Calendar.DAY_OF_MONTH))
cal.set(Calendar.DAY_OF_MONTH, arg3);
updateDate(dpFlag);
}
};
该监听器中只需实现一个方法onDataSet。这个方法在用户完成日期选择/修改后,点击“设置”按钮时触发。在这个方法中,我们先根据用户的选择,修改了Calendar成员变量的值,这样当日期选择对话框关闭之后,用户的选择仍然保存在Calendar变量里。然后调用updateDate方法,更新视图上的显示。由于我们有两个日期需要用户设置,所以成员变量dpFlag被用来标记到底用户是在对哪一个日期进行修改:
// 当DatePickerDialog关闭,更新日期显示
private void updateDate(int flag) {
// 第1个日期按钮被按下
if(flag==1){
// 使用“yyyy-MM-dd”显示
tvDate1.setText(df.format(cal.getTime()));
}
// 第2个日期按钮被按下
if(flag==2){
tvDate2.setText(df.format(cal.getTime()));
}
}
接下来是Activity的onCreate方法:
public void onCreate(BundlesavedInstanceState)
{
super.onCreate(savedInstanceState);
setContentView(R.layout.retrieve_notice);
Bundle bundle = getIntent().getExtras();
if (bundle != null) {
setTitle(bundle.getString("data"));
account =bundle.getString("account");
pass = bundle.getString("pass");
}
// 设置默认日期
tvDate1 = (TextView) findViewById(R.RetrieveNotice.tvDate1);
tvDate1.setText(df.format(cal.getTime()));
tvDate2 = (TextView) findViewById(R.RetrieveNotice.tvDate2);
tvDate2.setText(df.format(cal.getTime()));
// 设置日期按钮
dp1 = (Button) findViewById(R.RetrieveNotice.dp1);
dp1.setOnClickListener(new OnClickListener()
{
@Override
public void onClick(View v) {
// 置按钮标记为1
dpFlag=1;
// 构建一个DatePickerDialog并显示
new DatePickerDialog(RetrieveNoticeActivity.this,
listener, cal
.get(Calendar.YEAR), cal.get(Calendar.MONTH),
cal
.get(Calendar.DAY_OF_MONTH)).show();
}
});
dp2 = (Button) findViewById(R.RetrieveNotice.dp2);
dp2.setOnClickListener(new OnClickListener()
{
@Override
public void onClick(View v) {
// 置按钮标记为2
dpFlag=2;
// 构建一个DatePickerDialog并显示
new ri(RetrieveNoticeActivity.this,
listener, cal
.get(Calendar.YEAR), cal.get(Calendar.MONTH),
cal
.get(Calendar.DAY_OF_MONTH)).show();
}
});
// 查询按钮
btnSearch=(Button)findViewById(R.RetrieveNotice.btnSearch);
btnSearch.setOnClickListener(new OnClickListener(){
public void onClick(View v){
btnSearch.setEnabled(false);
getNotices();
}
});
// listView
lv = (ListView) findViewById(R.RetrieveNotice.lvList);
lv.setOnItemClickListener(newOnItemClickListener()
{
@Override
public voidonItemClick(AdapterView<?>
arg0, View arg1, int arg2,
long arg3) {
Map<String, Object> map = maps.get(arg2);
if (map != null) {
Bundle b = new Bundle();
b.putString("title", "查看回执");
b.putString("account", account);
b.putString("pass", pass);
b.putString("noticeId",(String)map.get("id"));
gotoActivity(RetrieveReceiptActivity.class,
b);// 转页面
}
}
});
}
这个方法呈现了Activity的视图。我们在其中进行了控件属性的默认设置。并绑定了事件。例如,dp1和dp2按钮都调用了日期选择对话框进行显示。查询按钮调用了getNotice方法查询服务器数据并进行xml解析(详细代码略):
// 获取行数据,绑定ListView
private void getNotices() {
// 以下代码略
maps = ??
SimpleAdapteradapter = ??
lv.setAdapter(adapter);
??
}
这样,当用户设定查询条件(起止日期)后点击查询按钮,ListView中就会显示查询的结果。 | 

