| 
1.PreferenceActivity 介绍
PreferenceActivity 继承ListActivity 它是以一个列表的形式在展现内容,它最主要的特点是添加Preference可以让控件的状态持久化储存,举个例子
比如用户选中checkbox后 退出应用然后在进入应用,这时用户希望看到的是checkbox被选中,所以软件须要记录用户每次操作的过程并且持久储存,在进入应用的时候须要判断这些久储存的数据然后将系统控件的状态呈现在UI中。
尤其是软件开发肯定会有一堆设置选项选项,每次进入Activity都去手动的去取储存的数据,这样代码会变得很复杂很麻烦。
这个时候Preference就出来了,它就是专门解决这些特殊的选项保存与读取的显示。用户每次操作事件它会及时的以键值对的形式记录在SharedPreferences中,Activity每次启动它会自动帮我们完成数据的读取以及UI的显示。
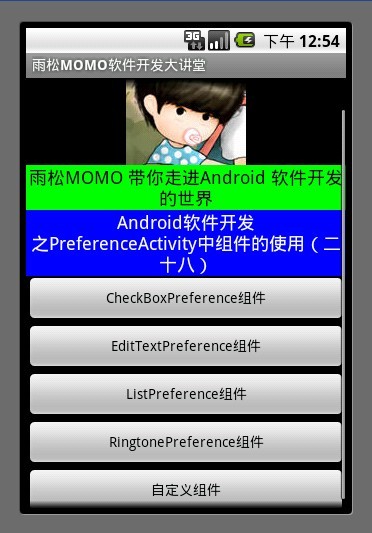
android开发中一共为我们提供了4个组件,分别是CheckBoxPreference组件、EditTextPreference组件、ListPreference组件、RingtonePreference组件,下面我用一个例子一一向同学们介绍一下。
2.CheckBoxPreference组件
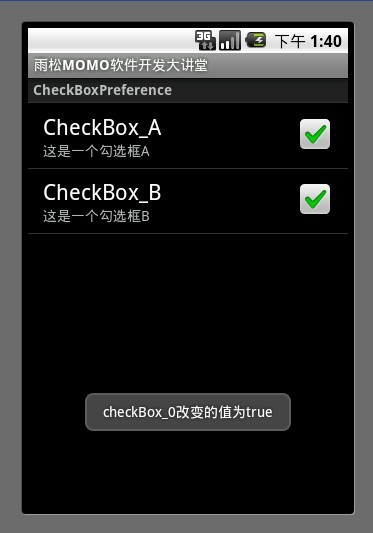
CheckBoxPreference 选中为true 取消选中为false
它的值会以boolean的形式储存在SharedPreferences中。
<?xml version="1.0" encoding="utf-8"?>
<PreferenceScreen
xmlns:android="http://schemas.android.com/apk/res/android">
<PreferenceCategory android:title="CheckBoxPreference">
<CheckBoxPreference android:key="checkbox_0"
android:title="CheckBox_A"
android:summary="这是一个勾选框A" >
</CheckBoxPreference>
<CheckBoxPreference android:key="checkbox_1"
android:title="CheckBox_B"
android:summary="这是一个勾选框B" >
</CheckBoxPreference>
</PreferenceCategory>
</PreferenceScreen>
import android.content.Context;
import android.os.Bundle;
import android.preference.CheckBoxPreference;
import android.preference.Preference;
import android.preference.PreferenceActivity;
import android.preference.Preference.OnPreferenceChangeListener;
import android.preference.Preference.OnPreferenceClickListener;
import android.widget.Toast;
public class CheckBoxActivity extends PreferenceActivity {
Context mContext = null;
@Override
protected void onCreate(Bundle savedInstanceState) {
super.onCreate(savedInstanceState);
// 从资源文件中添Preferences ,选择的值将会自动保存到SharePreferences
addPreferencesFromResource(R.xml.checkbox);
mContext = this;
//CheckBoxPreference组件
CheckBoxPreference mCheckbox0 = (CheckBoxPreference) findPreference("checkbox_0");
mCheckbox0.setOnPreferenceClickListener(new OnPreferenceClickListener() {
@Override
public boolean onPreferenceClick(Preference preference) {
//这里可以监听到这个CheckBox 的点击事件
return true;
}
});
mCheckbox0.setOnPreferenceChangeListener(new OnPreferenceChangeListener() {
@Override
public boolean onPreferenceChange(Preference arg0, Object newValue) {
//这里可以监听到checkBox中值是否改变了
//并且可以拿到新改变的值
Toast.makeText(mContext, "checkBox_0改变的值为" + (Boolean)newValue, Toast.LENGTH_LONG).show();
return true;
}
});
CheckBoxPreference mCheckbox1 = (CheckBoxPreference) findPreference("checkbox_1");
mCheckbox1.setOnPreferenceClickListener(new OnPreferenceClickListener() {
@Override
public boolean onPreferenceClick(Preference preference) {
//这里可以监听到这个CheckBox 的点击事件
return true;
}
});
mCheckbox1.setOnPreferenceChangeListener(new OnPreferenceChangeListener() {
@Override
public boolean onPreferenceChange(Preference arg0, Object newValue) {
//这里可以监听到checkBox中值是否改变了
//并且可以拿到新改变的值
Toast.makeText(mContext, "checkBox_1改变的值为" + (Boolean)newValue, Toast.LENGTH_LONG).show();
return true;
}
});
}
}
3.EditTextPreference组件
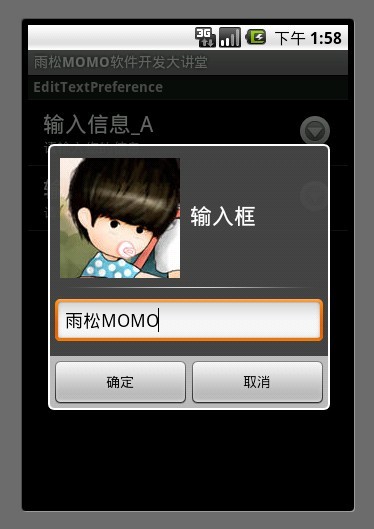
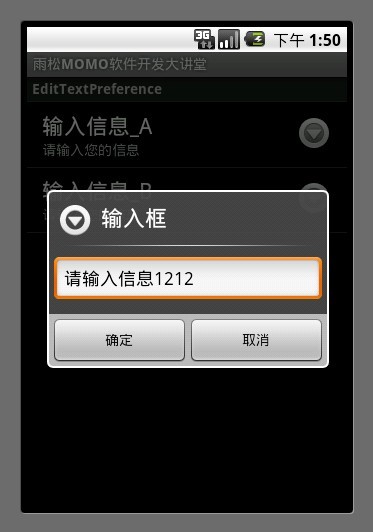
EditTextPreference 点击后会弹出一个输入框,输入的内容会以字符串的的形式储存在SharedPreferences中。
<?xml version="1.0" encoding="utf-8"?>
<PreferenceScreen
xmlns:android="http://schemas.android.com/apk/res/android">
<PreferenceCategory android:title="EditTextPreference">
<EditTextPreference android:key="edit_0"
android:title="输入信息_A"
android:summary="请输入您的信息"
android:defaultValue="请输入信息"
android:dialogTitle="输入框">
</EditTextPreference>
<EditTextPreference android:key="edit_1"
android:title="输入信息_B"
android:summary="请输入您的信息"
android:defaultValue="请输入信息"
android:dialogTitle="输入框">
</EditTextPreference>
</PreferenceCategory>
</PreferenceScreen>
import android.content.Context;
import android.os.Bundle;
import android.preference.EditTextPreference;
import android.preference.PreferenceActivity;
public class EditTextActivity extends PreferenceActivity {
Context mContext = null;
@Override
protected void onCreate(Bundle savedInstanceState) {
super.onCreate(savedInstanceState);
// 从资源文件中添Preferences ,选择的值将会自动保存到SharePreferences
addPreferencesFromResource(R.xml.edittext);
mContext = this;
// EditTextPreference组件
EditTextPreference mEditText = (EditTextPreference) findPreference("edit_0");
//设置dialog按钮信息
mEditText.setPositiveButtonText("确定");
mEditText.setNegativeButtonText("取消");
//设置按钮图标
mEditText.setDialogIcon(R.drawable.jay);
}
}
4.ListPreference组件
在res/array中先写两个数组,一个用与list的显示内容,一个用户list的选中数值。
<?xml version="1.0" encoding="utf-8"?>
<resources>
<string-array name="auto_logout_time_key">
<item>10 mins.</item>
<item>20 mins.</item>
<item>30 mins.</item>
<item>60 mins.</item>
</string-array>
<string-array name="auto_logout_time_value">
<item>600000</item>
<item>1200000</item>
<item>1800000</item>
<item>3600000</item>
</string-array>
</resources>
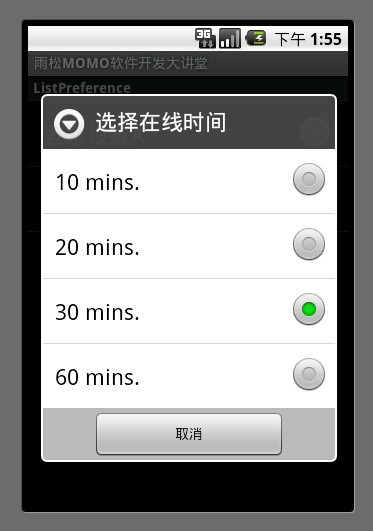
ListPreference点击后会弹出一个列表框,选中后会将选中的内容(上面数组中的值)会以字符串的的形式储存在SharedPreferences中。
<?xml version="1.0" encoding="utf-8"?>
<PreferenceScreen
xmlns:android="http://schemas.android.com/apk/res/android">
<PreferenceCategory android:title="ListPreference">
<ListPreference
android:key="list_0"
android:title="登录设置A"
android:dialogTitle="选择在线时间"
android:entries="@array/auto_logout_time_key"
android:entryValues="@array/auto_logout_time_value" >
</ListPreference>
<ListPreference
android:key="list_0"
android:title="登录设置A"
android:dialogTitle="选择在线时间"
android:entries="@array/auto_logout_time_key"
android:entryValues="@array/auto_logout_time_value" >
</ListPreference>
</PreferenceCategory>
</PreferenceScreen>
import android.os.Bundle;
import android.preference.PreferenceActivity;
public class ListActivity extends PreferenceActivity {
@Override
protected void onCreate(Bundle savedInstanceState) {
super.onCreate(savedInstanceState);
// 从资源文件中添Preferences ,选择的值将会自动保存到SharePreferences
addPreferencesFromResource(R.xml.list);
}
}
5.RingtonePreference组件
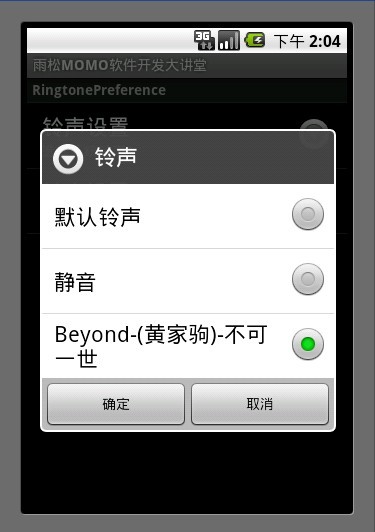
RingtonePreference点击后会弹出一个系统铃声的列表框,选中后会将选中的内容(uri字符集)会以字符串的的形式储存在SharedPreferences中。
<?xml version="1.0" encoding="utf-8"?>
<PreferenceScreen
xmlns:android="http://schemas.android.com/apk/res/android">
<PreferenceCategory android:title="RingtonePreference">
<RingtonePreference
android:key="ringtone_0"
android:summary="选择系统铃声A"
android:title="铃声设置"
android:ringtoneType="all"
android:showSilent="true" ></RingtonePreference>
<RingtonePreference
android:key="ringtone_!"
android:summary="选择系统铃声B"
android:title="铃声设置"
android:ringtoneType="all"
android:showSilent="true" ></RingtonePreference>
</PreferenceCategory>
</PreferenceScreen>
android:ringtoneType 系统一共提供了4中响铃模式的类型分别为
铃声(ringtone) 通知( notification) 警告(alarm) 全部(all)
模拟器默认是没有铃声的,下图中的铃声我是将歌曲文件拷贝到SD卡中,设置铃声后才会出现的。如果觉得拷贝麻烦可以使用豌豆荚或者91助手将歌曲文件放入手机SD卡中,在铃声设置那里设置一下在这里就会出现。
import android.os.Bundle;
import android.preference.PreferenceActivity;
public class RingtoneActivity extends PreferenceActivity {
@Override
protected void onCreate(Bundle savedInstanceState) {
super.onCreate(savedInstanceState);
// 从资源文件中添Preferences ,选择的值将会自动保存到SharePreferences
addPreferencesFromResource(R.xml.ringtone);
}
}
5.自定义控件
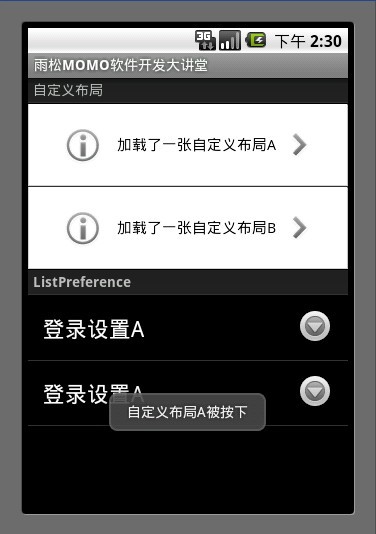
使用系统的控件在显示方面难免会有些单一,如果想做一个好看的界面就需要使用自定义Preference。下面我简单说明一下如何编写自定义Preference。首先在res/layout中添加preferences文件
<?xml version="1.0" encoding="utf-8"?>
<LinearLayout xmlns:android="http://schemas.android.com/apk/res/android"
android:layout_width="fill_parent"
android:layout_height="fill_parent"
android:background="#00000000">
<LinearLayout
android:gravity="center_vertical"
android:background="@drawable/preference_mid_background"
android:layout_width="fill_parent"
android:layout_height="wrap_content"
>
<ImageView
android:focusable="false"
android:layout_width="wrap_content"
android:layout_height="wrap_content" android:src="@drawable/setting_about_us">
</ImageView>
<RelativeLayout
android:layout_width="wrap_content"
android:layout_height="wrap_content"
android:layout_marginLeft="15dip"
android:layout_marginTop="6dip"
android:layout_marginRight="6dip"
android:layout_marginBottom="6dip"
android:layout_weight="1"
>
<TextView
android:textSize="15dip"
android:textColor="#000000"
android:ellipsize="marquee"
android:id="@+android:id/title"
android:fadingEdge="horizontal"
android:layout_width="wrap_content"
android:layout_height="wrap_content"
android:singleLine="true"
>
</TextView>
<TextView
android:textAppearance="?android:attr/textAppearanceSmall"
android:textColor="#565656"
android:id="@+android:id/summary"
android:layout_width="wrap_content"
android:layout_height="wrap_content"
android:maxLines="4"
android:layout_below="@+android:id/title"
android:layout_alignLeft="@+android:id/title"
>
</TextView>
</RelativeLayout>
<ImageView
android:focusable="false"
android:layout_width="wrap_content"
android:layout_height="wrap_content"
android:background="@drawable/preference_arrows"/>
</LinearLayout>
</LinearLayout>
android:background="@drawable/preference_mid_background"
通过这一行可以设置这个按钮的点击、选中默认的显示状态,这样可以让你的按钮更加好看。须要在res/drawable中添加xml文件
android:state_facused :为控件选中显示
android:state_pressed:为控件按下显示
最后一个为默认显示
<?xml version="1.0" encoding="utf-8"?>
<selector
xmlns:android="http://schemas.android.com/apk/res/android">
<item
android:state_focused="true"
android:drawable="@drawable/preference_mid_pressed"
>
</item>
<item
android:state_pressed="true"
android:drawable="@drawable/preference_mid_pressed"
>
</item>
<item
android:drawable="@drawable/preference_mid"
>
</item>
</selector>
import android.content.Context;
import android.os.Bundle;
import android.preference.Preference;
import android.preference.PreferenceActivity;
import android.preference.Preference.OnPreferenceClickListener;
import android.widget.Toast;
public class AllActivity extends PreferenceActivity {
/**自定义布局A**/
Preference preference0 = null;
/**自定义布局B**/
Preference preference1 = null;
Context mContext = null;
@Override
protected void onCreate(Bundle savedInstanceState) {
super.onCreate(savedInstanceState);
// 从资源文件中添Preferences ,选择的值将会自动保存到SharePreferences
addPreferencesFromResource(R.xml.all);
mContext = this;
preference0 = findPreference("pref_key_0");
preference0.setOnPreferenceClickListener(new OnPreferenceClickListener() {
@Override
public boolean onPreferenceClick(Preference preference) {
Toast.makeText(mContext, "自定义布局A被按下", Toast.LENGTH_LONG).show();
return false;
}
});
preference1 = findPreference("pref_key_1");
preference1.setOnPreferenceClickListener(new OnPreferenceClickListener() {
@Override
public boolean onPreferenceClick(Preference preference) {
Toast.makeText(mContext, "自定义布局B被按下", Toast.LENGTH_LONG).show();
return false;
}
});
}
读取数据
在PreferenceActivity中可以用下面这种方式拿到SharedPreferences中储存的数值,通过PreferenceManager.getDefaultSharedPreferences(this)
方法拿到控件默认储存的sharedPreferences对象。
SharedPreferences prefs =PreferenceManager.getDefaultSharedPreferences(this)
;
boolean something = prefs.getBoolean("something",false);
在模拟起中将SharedPreferences储存内容拷贝出来后,可以清楚的看到通过点击系统控件储存的数值。这里我说一下铃声的储存,它是以一个字符串形式的uri字符集,它所指向的是系统铃声储存的路径。所以根据这个字符集就可以找到这个铃声。
<?xml version='1.0' encoding='utf-8' standalone='yes' ?>
<map>
<string name="ringtone_!">content://media/external/audio/media/1</string>
<string name="ringtone_0">content://media/external/audio/media/1</string>
<string name="list_0">1800000</string>
<string name="edit_1">请输入信息1212</string>
<string name="list">1200000</string>
<string name="ringtone">content://settings/system/ringtone</string>
<boolean name="checkbox_0" value="true" />
<boolean name="checkbox_1" value="true" />
<string name="edit_0">请输入信息</string>
</map>
| 

