| 第
1 步. 创建 Bluemix 服务
按照这些步骤来创建需要的 Bluemix 服务。
Liberty for Java
1.登录到 Bluemix。
2.在菜单中单击 CATALOG 并向下滚动到 Runtimes 部分。
3.单击 Liberty for Java。
4.在 Start with a runtime 下,输入一个不同于
DBStat(它已被使用)的惟一名称。
5.域 (mybluemix.net) 将自动填充。
6.对于 Leave Selected Plan:Default。
7.单击 CREATE。
等到在 APP HEALTH 下看到 “Your app is running”。
备注:如果看到一条消息表明应用程序需要重新呈现,单击 OK。
Mobile Data
1.在菜单中单击 CATALOG 并向下滚动到 Mobile 部分。
2.选择 Mobile Data。
3.在 App 下拉菜单中,选择您的应用程序。
4.对于 Leave Selected Plan:Shared。
5.单击 CREATE。
等到在 APP HEALTH 下看到 “Your app is running”。
Mobile Application Security
1.在菜单中单击 CATALOG 并向下滚动到 Mobile 部分。
2.Select Mobile Application Security.
3.在 App 下拉菜单中,选择您的应用程序。
4.对于 Leave Selected Plan:Standard。
5.单击 CREATE。
等到在 APP HEALTH 下看到 “Your app is running”。
Push
1.在菜单中单击 CATALOG 并向下滚动到 Mobile 部分。
2.选择 Push。
3.在 App 下拉菜单中,选择您的应用程序。
4.对于 Leave Selected Plan:Standard。
5.单击 CREATE。
等到在 APP HEALTH 下看到 “Your app is running”。
Cloud Integration
1.在菜单中单击 CATALOG 并向下滚动到 Integration
部分。
2.选择 Cloud Integration。
3.在 App 下拉菜单中,选择您的应用程序。
4.对于 Leave Selected Plan:Cloud Integration
Plan。
5.单击 CREATE。
等到在 APP HEALTH 下看到 “Your app is running”。
第 2 步. 记下您的应用程序信息
创建 Bluemix 服务后,按照以下步骤记录您应用程序的关键信息。以后会用在
DBStat 示例代码中用到此信息。
备注:本教程以我的应用程序信息作为示例。一定要使用为您生成的应用程序信息,而不是您在教程示例中看到的信息。
登录到 Bluemix 后:
1.单击菜单中的 DASHBOARD,在 Applications 下选择您的应用程序。
2.单击 MOBILE OPTIONS 并找到选项 3。
3.记下您的应用程序 ID。
示例: 6e18da73-08e9-4d35-9190-a422541ffe07
4.记下您的应用程序密钥。
示例: 322212ee2e2ad64636791bb2fb03b0f4760ebfa8
5.记下您的应用程序路由。
示例: DBStat.mybluemix.net
第 3 步. 安装 Cloud Integration Secure
Connection
将 Cloud Integration Secure Connection 软件安装在能够访问您的内部数据库的机器上。对于本教程,我使用了一个安装了我的
IBM Content Manager Library Server 数据库的 Windows 机器。
登录到 Bluemix 后:
1.单击 DASHBOARD,选择您的应用程序,选择 Cloud Integration,然后单击
SECURE CONNECTIONS。您会看到 “Manage Secure Connections”
页面。
2.在字段 “Name your connection” 中,输入 W520。
3.在 Standard 下,单击 Add。
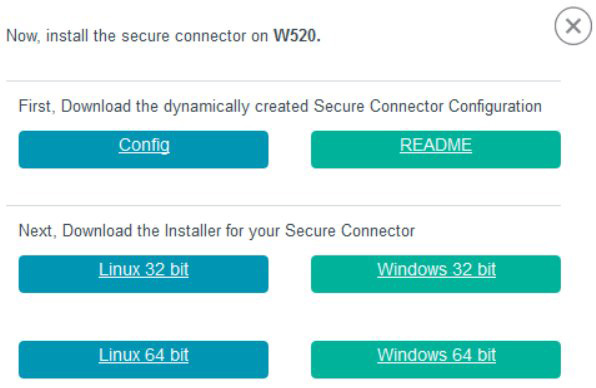
4.在 Driver 下,单击 INSTALL。您然后将看到一个弹出窗口:

Bluemix Manage Secure
Connections 面板上的提示
5.在第一个提示下,单击 Config。
6.下载专门为您生成的配置文件。在我的示例中,配置文件名为:f5bg64b8-e8ee-458f-9b1d-eb1dda8fea15_W520-config_file。
7.在第二个提示下,单击 Windows 64 bit。
8.下载 windows-secure-connector-installer_64.exe
文件。
在 Windows 机器上,运行 windows-secure-connector-installer_64.exe
来安装 Cast Iron Secure Connector:
1.Install(安装)> Next。
2.接受许可 > Next。
3.Installation path(安装路径):C:\Program
Files (x86)\IBM\Secure_Connector_1.7.0.0.1 > Next。
4.Target directory(安装目录)> OK。
5.Shortcuts(快捷方式)> Next。
6.Finished(结束)> Next。
7.Secure Connector Configuration File(安全连接器配置文件):<找到
f5bg64b8-e8ee-458f-9b1d-eb1dda8fea15_W520-config_file
的位置 > > Next。
8.Secure Connector Configuration(安全连接器配置文件)>
Next。
9.Proxy Configuration(代理配置) > Next。
10.单击 “Install and run Secure Connector
as a Windows service” > Next。
11.Processing(处理)> Next。
12.Create Third Party Jar(创建第三方 Jar)>
Next。
13.Update changes(更新变更)> NO。
14.Installation completed(安装已完成)>
Done。
在 Windows 服务面板中启动 Cast Iron Secure Connector 服务。
在 Bluemix Manage Secure Connections 面板上:
1.单击 X 关闭弹出窗口。
2.在 Action 下,单击刷新图标。状态从 Not Connected
更改为 Connected。
3.单击 Done。 Bluemix Manage Secure Connections
面板上的结果

第 4 步. 创建 Cloud Integration Enterprise
API
登录到 Bluemix 时:
1.单击 DASHBOARD,选择您的应用程序,选择 Cloud Integration,然后单击
APIS。然后单击 Create API。
2.您会看到一条消息显示 “How can others in this
organization find your API?”
3.命名您的 API:W520。
4.描述您的 API:W520 API。
5.单击 Generate from an Enterprise Endpoint。
6.在 Resource 下,单击 Connect to your first
Enterprise Endpoint。
7.为 Connect to an Enterprise Endpoint
选择 DB2。
8.您会看到一条消息显示 “Where is the database
or SAP?W520 (Connected)”。如果使用自己的数据库,那么在接下来的步骤中输入您自己的数据库信息。数据库名称:icmnlsdb。
9.主机名或 IP 地址:localhost。
10.端口:50000。
11.用户名:icmadmin。
12.密码:<密码>。
13.单击 Connect。
成功连接后,按照以下步骤来构建您的 API。
1.在 Resources 下,您会看到一条消息显示 “Next, build
your API by connecting to the Enterprise Endpoint you
want to use”。如果使用自己的数据库,那么在接下来的步骤中输入您自己的数据库信息。选择您的企业端点:icmnlsdb-localhost
W520。
2.选择模式:ICMADMIN。
3.选择您想要为其创建 API 的表:ICMSTRESOURCEMGR。您会看到一条消息显示
“Now you can choose which resources you want to make
available”。
4.确保对于所有方法,在右侧都显示了 Include(GET、POST、PUT、DELETE)。
5.单击 Create API。
第 5 步. 记下您的 Enterprise API 信息
创建 Cloud Integration Enterprise API 后,记下密钥信息和您的 API
的 URL。以后会在 DBStat Web 示例代码中用到此信息。
登录到 Bluemix 后:
1.转到 DASHBOARD,选择您的应用程序,选择 Cloud Integration,然后选择
W520 API。
2.记下秘密 API 密钥。
示例:'API_SECRET' : 33d3f0b16e765e8d0c4d3b428abcdb4f18cfaa4cd38f6d1065093e512b32e9afe1aced892e42c59aea3082441e3c63f5
3.记下 GET URL(直到模式名称)。
示例:https://provide.castiron.com/env/DatabaseEP/database/8e48ebd5-cc0c-4a96-a904-3e29609d737e

秘密 API 密钥和获取 URL
第 6 步. 创建一个 Google 项目并记下该信息
从 Google 项目获取的信息会在以后用于配置 Bluemix Push 服务。
1.转到 https://cloud.google.com/console/project。
2.单击 Create Project。
3.Project Name:DBStat。
4.勾选 “I have read and agree to the
Google Cloud Platform Terms of Service.”
5.单击 Create。
6.记下页面顶部的项目编号。
示例:62537192145
7.单击左侧的 APIs & auth。
8.当 APIs 和 auth 部分出现在左侧时,单击 APIs。
9.打开 Google Cloud Messaging for Android(在列表中向下滚动以看到它)。
Google Cloud Messaging for Android,已打开
10.单击左侧的 Credentials。
11.单击 Create new key。
12.单击 Server key。
13.单击 Create。
14.记下您的 API 密钥。
示例:BJabSyDQagRuBHscjVMz0VdO-Uxyrtm86dsMY3Y
第 7 步. 配置 Bluemix Push 服务
使用来自 Google 项目的信息配置 Push 服务。
登录到 Bluemix 后:
1.单击菜单中的 DASHBOARD,并在 Services 下单击
Push。
2.您会看到 “Configuration" 和 "Google
Cloud Messaging”。在 Google Cloud Messaging 下,单击 EDIT。
3.在 Sandbox Configuration 和 Production
Configuration 中都输入您的 GCM API 密钥和 Google API 项目编号。
4.单击 SAVE。

Sandbox Configuration
和 Production Configuration
第 8 步. 下载并配置示例 Web 应用程序代码
按照这些步骤下载 DBStat 示例 Web 应用程序的源代码。
1.转到 DevOps Services project,并单击菜单中的
EDIT CODE。 然后下载代码:
git clone https://hub.jazz.net/git/bluebrain/DBStatWebApp
2.编辑 dbstat.properties 文件,如下所示,使之与您的信息相匹配。
3.此代码依赖于 org.json-20120521.jar 文件,它依据
GPL Version 2 获得授权,可在 https://code.google.com/p/org-json-java/downloads/list
上找到。将这个 jar 文件添加到 DBStat 代码 WEB-INF/lib 文件夹中。此 jar 用于解析
JSON 对象。
备注:您需要更改 WEB-INF/classes/dbstat.properties 文件中的以下值,以与您的信息匹配。
在上面的示例中,ICMSTRESOURCEMGR 是 IBM Content Manager 中的一个
Library Server 表,它包含资源管理器的状态信息。资源管理器名为 rmdb,这是表列 RMNAME
中的值。状态是 RMFLAGS 表列中的值。
DBStat Web 应用程序代码
该 DBStat Web 应用程序使用 REST_API_URL 在 DB_TABLE_NAME 表中查询在
DB_ROW_COLUMN_NAME 列中包含 DB_ROW_COLUMN_VALUE 值的行。
REST_API_URL = props.getProperty(REST_API_URL)+"/"+
					DB_SCHEMA_NAME+
					"/Tables/"+
					DB_TABLE_NAME+"?"+
					DB_ROW_COLUMN_NAME+"="+
					DB_ROW_COLUMN_VALUE;

//rest api url to read a DB table row
String Url_value  = REST_API_URL;
String serverURL = new URL(Url_value);
//bluemix app secret key
String API_SECRET_key = "API_SECRET";
String API_SECRET_value = API_SECRET;
httpConnection = (HttpURLConnection) serverURL.openConnection();
httpConnection.setRequestProperty(API_SECRET_key, API_SECRET_value); |
查询响应以 JSON 格式返回,如这个示例所示:
{"rows":{"row":{"RMCODE":1,"RMPLATFORM":"0","USERID":"ICMADMIN                        ",
 "CHANGED":"2014-06-10 03:35:16.311","RMFLAGS":2,"TOKENDURATION":172800,"DOMAINID":2,
 "RMUSERID":"RMADMIN                         ","RMNAME":"rmdb",
 "INETADDR":"W520.svl.ibm.com","CURRENTVERSION":8.4.03.300,"CACHEOBJSIZELIMIT":"0.0",
"RMPASSWORD2":"[B@abcd2a9b"}}} |
在上面的示例中,"RMNAME":"rmdb"
查询返回了一个包含数据库状态 "RMFLAGS":2 的行。我们需要解析这个 JSON
对象,从数据库状态 "RMFLAGS":2 中获取值 2。
//parse json object for db status value in "DB_STATUS_COLUMN_NAME:dbStatus"
int dbStatus = -1;
JSONObject jsonObject = new JSONObject(builder.toString());
System.out.println("json object : "+jsonObject.toString());
System.out.println("rows : "+jsonObject.get("rows"));
if (jsonObject.get("rows").toString().length()>0) {
	jsonObject = (JSONObject) jsonObject.get("rows");
    	jsonObject = (JSONObject) jsonObject.get("row");
    	System.out.println("row : "+jsonObject.toString());
       	dbStatus = jsonObject.getInt(DB_STATUS_COLUMN_NAME);
       	System.out.println(DB_STATUS_COLUMN_NAME+" : "+dbStatus);
} |
随后,最初的数据库状态值被放在另一个 JSON 对象中。
而且它使用 Data REST API 存储在 Mobile Data
中。
//rest api url to write new mobile data object
String Url_value = "https://mobile.ng.bluemix.net:443/data/rest/v1/apps/"+APP_ID+"/uploads"; |
每隔一分钟,会针对之前存储在 Mobile Data 中的值来检查当前的数据库状态。Data
REST API 用于在 Mobile Data 中查询以前存储的状态。
//rest api url to read mobile data object with object id of DB_ROW_COLUMN_VALUE
String Url_value  =
"https://mobile.ng.bluemix.net:443/data/rest/v1/apps/"+APP_ID+"/objects/"+DB_ROW_COLUMN_VALUE |
来自 Mobile Data 的响应也将以 JSON 格式返回,并获得解析,以便获取之前存储的数据库状态。
//parse "name" attribute in json object to get db status value in "DB_ROW_COLUMN_VALUE:dbStatus"
int dbStatus = -3;
if (jsonArray.length()==0) {
      	System.out.println("dbStatus="+dbStatus);
} else {
        String name = null;
        jsonObject = (JSONObject) jsonArray.get(0);
        System.out.println("object : "+jsonObject.toString());
        System.out.println("attributes : "+jsonObject.get("attributes"));
        jsonObject = (JSONObject) jsonObject.get("attributes");
        System.out.println("object : "+jsonObject.get("name"));
        name = (String) jsonObject.get("name");
        System.out.println("name="+name);
        dbStatus = Integer.parseInt(name.substring(name.indexOf(':')+1));
	System.out.println("dbStatus="+dbStatus);
} |
如果数据库状态已更改,Mobile Data 会得到更新,使用我们的推送消息形成一个
JSON 对象,使用 Push REST API 发送该对象作为推送通知。
//use json object format for push message with message content of "DB_ROW_COLUMN_VALUE:dbStatus"
String message = "{ \"message\": { \"alert\": \""+DB_ROW_COLUMN_VALUE+":"+dbStatus+"\" },
\"target\": { \"platforms\":
[\"G\"] } }";
//rest api url to send push notification
String Url_value = "https://mobile.ng.bluemix.net:443/push/v1/apps/"+APP_ID+"/messages"; |
您可以编辑 DBStatListener.java 文件中的代码来更改一分钟间隔时间表。
publicvoid contextInitialized(ServletContextEvent event) {
    scheduler = Executors.newSingleThreadScheduledExecutor();
    scheduler.scheduleAtFixedRate(new DBStatRunner(),// run DBStatRunner()
    		0, // run after 0 minutes
    		1, // repeat every 1 minute
    		TimeUnit.MINUTES); // use minutes for the units
} |
第 9 步. 下载并安装 Push 移动应用程序
我使用来自 quickstart-push 的 quickstart-push-android 应用程序向
DBStat 推送服务注册我的 Android 设备。您需要安装 Google Play Services
库并为它创建一个 Eclipse 项目,然后在 Eclipse 项目中使用 quickstart-push-android
应用程序。
Google Play 服务
1.运行 Android SDK Manager(从 Eclipse
或命令行)。
2.从 Extras packages 部分安装 Google Play
服务。
3.在您机器上安装的 Google Play 服务文件中找到 google-play-services_lib
文件夹。在我的机器中,此文件夹的路径为:sdk\extras\google\google_play_services\libproject\google-play-services_lib。
4.在 Eclipse 中,选择 Import > Android
> Existing Android Code Into Workspace > Next。
5.Root Directory:<找到并选择 google-play-services_lib
文件夹>。
6.勾选 “Copy projects into workspace”。
7.单击 Finish。
如果新创建的 Eclipse 项目没有编译,请检查 .classpath
和 project.properties 文件的内容。
.classpath 看起来应类似于:
<classpath>
	<classpathentry kind="con" path="com.android.ide.eclipse.adt.ANDROID_FRAMEWORK"/>
	<classpathentry exported="true" kind="con" path="com.android.ide.eclipse.adt.LIBRARIES"/>
	<classpathentry kind="src" path="src"/>
	<classpathentry kind="src" path="gen"/>
	<classpathentry exported="true" kind="con" path="com.android.ide.eclipse.adt.DEPENDENCIES"/>
	<classpathentry kind="output" path="bin/classes"/>
</classpath> |
project.properties 文件看起来应类似于:
target=Google Inc.:Google APIs (x86 System Image):19
android.library=true |
在 Eclipse 中刷新该项目。您现在会看到在 Eclipse 项目的 google-play-services_lib\bin
目录中生成了 google-play-services_lib.jar 文件。
现在我们可继续下载 Push 应用程序并为它创建一个 Eclipse 项目。
Push 移动应用程序
1.下载 quickstart-push。
2.找到 quickstart-push 目录中的 quickstart-push-android
文件夹。
3.在 Eclipse 中,选择 Import > Android
> Existing Android Code Into Workspace > Next。
4.Root Directory:<找到并选择 google-play-services_lib
文件夹>。
5.勾选 “Copy projects into workspace”。
6.单击 Finish。
如果 .classpath 文件中包含以下两个额外的项目行,删除它们:
<classpathentry combineaccessrules="false" kind="src" path="/IBMBluemix_AndroidSDK"/>
<classpathentry combineaccessrules="false" kind="src" path="/PushWorks_AndroidSDK"/> |
从 Bluemix SDK ibm-bluemix-sdk-android.zip
文件获取以下两个 jar 文件,并将它们添加到 Eclipse 新创建的项目的 libs 文件夹中:
ibmbluemix.jar
ibmpush.jar |
编辑 assets\bluelist.properties 文件并输入您的信息:
applicationID=6e18da73-08e9-4d35-9190-a422541ffe07
applicationSecret=322212ee2e2ad64636791bb2fb03b0f4760ebfa8
applicationRoute=DBStat.mybluemix.net |
如果新创建的 Eclipse 项目没有编译,请检查 .classpath 和 project.properties
文件的内容。
.classpath 文件看起来应类似于:
<classpath>
	<classpathentry kind="con" path="com.android.ide.eclipse.adt.ANDROID_FRAMEWORK"/>
	<classpathentry exported="true" kind="con" path="com.android.ide.eclipse.adt.LIBRARIES"/>
	<classpathentry exported="true" kind="con" path="com.android.ide.eclipse.adt.DEPENDENCIES"/>
	<classpathentry kind="src" path="src"/>
	<classpathentry kind="src" path="gen"/>
	<classpathentry kind="output" path="bin/classes"/>
</classpath> |
project.properties 文件看起来应类似于:
target=Google Inc.:Google APIs:19
android.library.reference.1=..\\google-play-services_lib |
在 Eclipse 中刷新该项目。您现在应能将Push 应用程序安装在您的 Android 设备上。
右键单击 <项目名称> > Run As > Android Application
来安装 QuickStartPushDemo_Android.apk。
请注意,在 Android 设备上,安装的应用程序名为 PushServiceQuickStart。首次运行该应用程序后,您会在屏幕上看到您的设备已注册。
示例:
设备已向 Push 服务注册
设备 Id:6515ed621fde007c807c4130
第 10 步. 下载并安装示例 Android 移动应用程序代码
我使用了 bluelist-mobiledata 应用程序源代码作为 DBStat 示例移动应用程序的基础。bluelist
移动数据应用程序的源代码已更改,以简化屏幕元素,添加了一个刷新按钮供本教程使用。下载代码并为它创建一个
Eclipse 项目。
DBStat 移动应用程序
1.Get DBStat 移动应用程序:git clone https://hub.jazz.net/git/bluebrain/DBStatMobileApp。
2.在 Eclipse 中,选择 Import > Android
> Existing Android Code Into Workspace > Next。
3.Root Directory:<找到并选择 DBStatMobileApp
文件夹>。
4.勾选 “Copy projects into workspace”。
5.单击 Finish。
从 Bluemix SDK ibm-bluemix-sdk-android.zip
文件获取以下 4 个 jar 文件,并将它们添加到 Eclipse 新创建的项目的 libs 文件夹中:
ibmbluemix.jar
ibmcloudcode.jar
ibmdata.jar
ibmfilesync.jar |
编辑 assets\bluelist.properties 文件并输入您的信息:
applicationID=6e18da73-08e9-4d35-9190-a422541ffe07
applicationSecret=322212ee2e2ad64636791bb2fb03b0f4760ebfa8
applicationRoute=DBStat.mybluemix.net |
在 Eclipse 中刷新该项目。如果新创建的 Eclipse 项目没有编译,请检查 .classpath
和 project.properties 文件的内容。
.classpath 文件看起来应类似于:
<classpath>
	<classpathentry kind="src" path="src"/>
	<classpathentry kind="src" path="gen"/>
	<classpathentry kind="con" path="com.android.ide.eclipse.adt.ANDROID_FRAMEWORK"/>
	<classpathentry exported="true" kind="con" path="com.android.ide.eclipse.adt.LIBRARIES"/>
	<classpathentry exported="true" kind="con" path="com.android.ide.eclipse.adt.DEPENDENCIES"/>
	<classpathentry kind="output" path="bin/classes"/>
</classpath> |
project.properties 文件看起来应类似于:
target=android-19
android.library=false |
在 Eclipse 中刷新该项目。您现在应能将 DBStat 应用程序安装在您的 Android 设备上。
右键单击 <DBStat 项目名称> > Run As > Android Application
来安装 DBStat.apk
第 11 步. 下载并安装 CF 命令行
从 https://github.com/cloudfoundry/cli/releases 获取 CF
命令行并安装它。下一节会使用 CF 命令行将 DBStat Web 应用程序推送到 Bluemix。
第 12 步. 将示例 Web 应用程序部署到 Bluemix
您需要使用 cf 命令将 DBStat Web 应用程序推送到 Bluemix。执行以下步骤:
1.cd <DBStatWebApp 文件所在的目录>
2.cf login
3.输入您用于登录到 Bluemix 的 IBM id:
<电子邮件>
4.<密码>
您会看到一个类似下图的屏幕:
cf login
API endpoint: https://api.ng.bluemix.net

Email>
Password>
Authenticating...
OK
Targeted org
Targeted space dev
API endpoint: https://api.ng.bluemix.net (API version: 2.4.0)
User:
Org:
Space: dev |
测试结果
在 Bluemix 中成功安装并启动 DBStat Web 应用程序后,您需要在浏览器中通过 http://DBStat.mybluemix.net
地址访问该 Web 应用程序一次,以便启动 Liberty 应用程序初始化。您应等待约 30 秒,第一次初始化才会完成。第一次初始化之后,可以在您的
Android 设备上运行 DBStat 移动应用程序,并检查您的内部数据库中检查您的表值的当前状态。
如果使用了本教程中的表和数据库示例来获取 IBM Content Manager
中的 Resource Manager 状态,那么您应在 DBStat 移动应用程序中看到状态 <RM_DB_name>:<single_digit>。对于我安装的
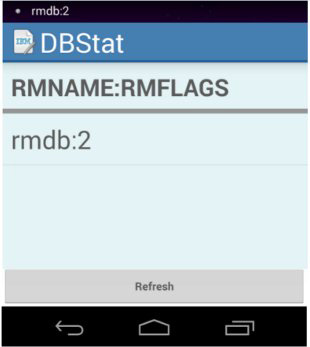
IBM Content Manager,在 Resource Manager 运行时我看到了 rmdb:2
状态。如果 Resource Manager 已关闭,那么在一分钟后,我会获得一条推送通知并看到状态 rmdb:6。

DBStat 移动应用程序显示监视的资源正在运行
结束语
您现在已知道如何使用 Liberty for Java 运行时创建一个 Web 应用程序,以便检查一个内部数据库中的表列值,在该表值更改时会获取推送通知,而且可以从一个
Android 移动应用程序查看最新的表值。希望您能成功地构建一个类似应用程序来监视您的内部数据库。 |

