| 摘要:Nickel是一个用Rust编写的Web应用服务器,本文介绍了用Nickel写一个简单的Web应用程序,再把它部署到Heroku。
偶尔会有一些人咨询Nickel项目,想要在深入之前看一些真实的Nickel代码,简单说,Nickel是一个用Rust编写的Web应用服务器。我们觉得用Nickel写一个简单的Web应用程序,把它部署到Heroku,然后记录下来是一个很好的学习机会。
定义应用的使用范围
还有什么比现学现用更好的学习方式呢?立即拿两个项目练手吧!在优秀贡献者的帮助下,我们开发了Clog,它是一个根据Git历史提交生成美观的更新日志(changelog)的小工具。Clog按照Angular的约定格式来解析提交信息,这种约定格式用于大量流行项目,诸如:Angular、angular-translate 、Hoodie 、Nickel 、Clap.rs等等。Clog分支于Node.js,开始以传统的更新日志项目为基础,后来有了些自己的理念。
让我们开发一个网站,从浏览器就能为任何GitHub公共仓库生成格式良好的更新日志,我们要在尽可能保持简单的同时专注于重要的部分。
- 使用Nickel构建一个能被前端使用的JSON API
-
用Nickel为静态HTML的Angular应用提供服务,使前端和后端能很好的分离。
-
将应用部署到Heroku
开始我们的Nickel应用
本文假定你对Rust有基本的了解,如果你之前从未用Rust编写任何东西,官方《Rust Book》的入门 部分能回答所有的基本问题。
启动一个Rust项目最简单的方式就是使用官方的包管理器Cargo。
cargo new clog-website --bin |
这条命令会创建一个新的目录clog-website,里面包含一个“Hello World”应用,我们可以通过以下的命令编译和运行这个应用:
为了使用Nickel,首先我们需要在Cargo.toml将其添为依赖项,此时Cargo.toml应该是这样的:
[package]
name = "clog-website"
version = "0.1.0"
authors = ["Your Name <your@name.com>"]
[dependencies]
nickel = "*" |
现在,Nickel已经添加为一个依赖项,我们尝试让服务器对于任何请求都返回一个“Hello World”,使用下面的代码替换main.rs中的内容:
#[macro_use]
extern crate nickel;
use nickel::Nickel;
fn main() {
let mut server = Nickel::new();
server.get("**", middleware!("Hello from Nickel"));
server.listen("127.0.0.1:6767");
} |
然而,当我们尝试使用“Cargo run”命令运行应用程序的时候,出现了下面的错误:
$ cargo run
   Compiling clog-website v0.1.0
(file:///Users/cburgdorf/Documents/hacking/clog-website)
src/main.rs:9:12: 9:55 error: no method named `get`
found for type `nickel::nickel::Nickel` in the current scope
src/main.rs:9     server.get("**", middleware!
("Hello from Nickel"));
src/main.rs:9:12: 9:55 help: items from traits can
only be used if the trait is in scope;
the following trait is implemented but not in scope,
perhaps add a `use` for it:
src/main.rs:9:12: 9:55 help: candidate #1:
use `nickel::router::http_router::HttpRouter` |
其中的原因很简单,虽然HTTP动词处理器(HTTP Verb handler)已经注册了get,、put、 post、 delete这些处理方法,且似乎直接存在于Nickel::()new返回的Nickel对象中,但实际上,这些方法都是HttpRouter特性(trait)在Nickel对象中的实现。
特性 (traits) 是Rust语言中一个非常强大的概念,详细解释它超出了本文的范围,如果你还没有完全领会它们,我建议你从头读一遍官方《Rust Book》的特性 (traits) 章节。
幸运的是Rust的编译器足够智能,这里给了我们正确的提示,我们需要把HttpRouter特性引用进当前作用域,因为Nickel在顶层模块中暴露出HttpRouter特性,所以我们只需简单更改,就能将其引入作用域。
use nickel::{ Nickel, HttpRouter }; |
一旦我们将其引进作用域,Nickel对象的方法就变得可用,你可以认为它是扩展方法。
我们修复这个问题以后,再通过“Cargo run”命令运行我们的服务器,在浏览器中打开http://127.0.0.1:6767就可以看到“Hello from Nickel”。这不会太惊奇,对吗?
生成更新日志
为了生成我们的第一份更新日志,需要做三件事:
- 克隆我们要生成更新日志的库
-
使用Clog生成更新日志
-
删除库来清理服务器的文件系统
为了实现下载部分,我们创建一个名为git.rs的文件,包含以下的内容:
use std::process::Command;
use std::io::{Error, ErrorKind};
pub fn clone (repo_url: &str, into_directory: &str) -> Result<String, Error> {
let output = try!(Command::new("git")
.arg("clone")
.arg(repo_url)
.arg(into_directory)
.output());
match output.status.success() {
true => Ok(String::from_utf8_lossy(&output.stdout).into_owned()),
false => Err(Error::new(ErrorKind::Other, format!("{}", String::from_utf8_lossy(&output.stderr))))
}
} |
我们不会逐行讲解代码,通过方法标记,我们就可以清楚的理解,第一个参数指定要克隆Git仓库的URI,第二个参数指定存放路径。返回一个Result<String, Error>,要么是一个发送到标准输出(stdout)的携带信息的字符串(String),要么是一个发送到标准错误(stderr)的携带信息的字符串错误(Error)。
在我们使用之前,需要编写与Clog交互的代码,我们创建一个名为clog_interop.rs的文件,包含以下内容:
use std::fs::{self, File};
use std::path::Path;
use std::io::{Read};
use clog::Clog;
pub fn generate_changelog (repository:
&str, repo_url: &str) -> String {
let mut clog = Clog::with_dir(repository).unwrap_or_else(|e| {
fs::remove_dir_all(repository).ok();
panic!("Failed to clone repository: {}", e);
});
let changelog_file_name = format!("changelog_{}.md", repository);
clog.repository(repo_url);
clog.write_changelog_to(Path::new(repository)
.join(&changelog_file_name));
let mut contents = String::new();
File::open(&Path::new(repository).join(&changelog_file_name))
.map(|mut f| f.read_to_string(&mut contents).ok()).ok();
fs::remove_dir_all(repository).ok();
contents
} |
用这个方法获取一个&str类型的本地Git仓库路径和一个GitHub的URL,Clog生成链接时需要知道GitHub的URL,这个方法会生产markdown格式的更新日志,通过String类型返回,并且会在生成更新日志后马上删除本地Git库。
直到现在,我们构建了基本代码块来生成我们的第一个更新日志,main.rs文件看起来像这样:
#[macro_use]
extern crate nickel;
extern crate clog;
use nickel::{ Nickel, HttpRouter };
mod git;
mod clog_interop;
fn main() {
let mut server = Nickel::new();
let repo_name = "some-unique-id";
let repo_uri = "https://github.com/angular/angular";
git::clone(repo_uri, repo_name).ok();
let changelog = clog_interop::generate_changelog(repo_name, repo_uri);
server.get("**", middleware!(&changelog as &str));
server.listen("127.0.0.1:6767");
} |
此处对代码做一些说明,为了使用Clog,我们需要像之前添加Nickel一样将Clog添加到Cargo.toml,然后添加“extern crate clog”语句。我们还需要添加git模块和clog_interop模块,为了让编译器能包含这些模块,我们需要把这两个Rust文件放进我们的工程目录中。
其余的相当明了,我们硬编码(hardcode)repo_uri来获取Angular 2的储存库,克隆到本地“some-uniqe-id”目录。这些下一步做好准备。
最有趣的部分是使用middleware!对每次请求都把&changelog转换为&str然后返回。
很多新人在这里会有共同的疑惑,但Nickel团队的Ryman在此 做了一个很好的解释。
大意是程序会在每一个请求到来时被调用,而你不能转移(所有权)String,因为只能被转移一次。
如果我们重新运行服务器,并在浏览器中打开网页,将看到这个样子: 
万岁!这是Angular 2项目markdown格式的更新日志。
使用JSON数据
现在我们已经用服务器克隆代码库,生成markdown格式的更新日志,然后返回给我们的浏览器,目前还不错。为了使其更好更灵活,我们需要创建合适的JSON API让前端使用。
我们勾勒一下JSON请求和响应的样子:
Request Object
{
    "respository": "https://github.com/angular/angular"
} |
目前,我们除了repository之外不需要其他任何东西。然而,我们以后可能添加诸如version_name和subtitle来为前端暴露其他功能。
Response Object
{
    "changelog": "the formatted markdown string",
    "error": "foo"
} |
同样也让响应保持简单,除了changelog之外和防止非正常工作的error信息之外,不再需要其他东西。
为了接受和返回JSON对象,首先需要创建新的structs,命名为ClogConfig和ClogResult,并且分别创建文件clog_config.rs和clog_result.rs。
clog_config.rs
#[derive(RustcDecodable, RustcEncodable)]
pub struct ClogConfig {
    pub repository: String,
} |
clog_result.rs
#[derive(RustcDecodable, RustcEncodable)]
pub struct ClogResult {
    pub changelog: String,
    pub error: String
} |
为了避免进行手动JSON解析和格式化代码,可以让Rust为我们自动实现RustcDecodable 和 RustcEncodable特性。
有了这两个结构,我们来编写能接受和返回JSON结构的POST处理器。
server.post("/generate", middleware! { |request, response|
let clog_config = request.json_as::<ClogConfig>().unwrap();
let result = if let Err(err) = git::clone(&clog_config.repository, &repo_name) {
ClogResult {
changelog: "".to_owned(),
error: err.description().to_owned(),
}
} else {
let changelog = clog_interop::generate_changelog(&repo_name, &clog_config.repository);
ClogResult {
changelog: changelog,
error: "".to_owned()
}
};
json::encode(&result).unwrap()
}); |
我们来看看这个代码,使用server.post注册一个处理器来应答/generate路由下的POST请求。之前我们用一个简单的字符串来使用middleware宏,现在我们使用的是块语法的形式,让处理器能访问request和response对象。
Nickel支持使用json_as方法来解析JSON体。美中不足的是,和HttpRouter一样,使用它的功能时需要将JsonBody特性引入作用域目前还不要分心,稍后再看需要引入的所有模块。
我们将JSON解析为ClogConfig对象的实例,由clog_config持有这个实例,进一步尝试克隆这个给定的repository。现在没有再将一个库硬编码进去,我们需要规划因为拼写错误或其他原因导致克隆一个库失败之后的解决方法。如果克隆失败,我们简单的设置changelog为空字符串,并将error设置为返回的错误信息。
如果克隆成功,我们如之前那样生成更新日志从而设置changelog和error,注意Rust中if/else结构也是基于表达式,所以我们才可以使用如此简洁的写法,将let result = 置于if之前。
同样重要的是,在返回给调用者之前,我们需要使用json::encode将ClogResult对象转换成JSON格式。
这组新代码还少了很重要的一部分,我们必须调整导入的模块和Cargo.toml中的依赖项。
#[macro_use]
extern crate nickel;
extern crate clog;
extern crate rustc_serialize;
use nickel::{ Nickel, JsonBody, HttpRouter };
use clog_config::ClogConfig;
use clog_result::ClogResult;
use rustc_serialize::json;
use std::error::Error;
mod git;
mod clog_interop;
mod clog_config;
mod clog_result; |
最让人诧异的是目前对JSON的支持没有放到标准库,而是被拉取到rustc-serialize库。另外,在Rust代码中使用下划线时,还要在Cargo.toml中增加rustc-serialize = “*”。
现在可以用curl尝试我们的API了。
curl 'http://127.0.0.1:6767/generate' -H '
Cache-Control: no-cache' -H '
Content-Type: application/json;charset=UTF-8'
 --data-binary {\n  "repository": "https://github.com/
thoughtram/clog"\n}' --compressed |
目前还是有一个很大的缺陷,对于每一个请求,我们克隆到一个叫some-uniqe-id的目录中去,但如果API同时接受两个请求,程序就会出问题。为了让我们克隆的目录使用到真正唯一的名字,我们来修改代码,添加一个名为uuid的包(crate)。
uuid包添加以后,修复这个问题变得非常简单,只需要将处理器内部的repo_name设置一下。
let repo_name = Uuid::new_v4().to_string(); |
我们先不管这里引入的改变,如果你有什么问题,请随意跳转到最终方案 。
随着这个变化,我们的API已经准备好投入使用。我们可以向提高工效的方向做一步改进,通过解析器分析库名而避免键入整个URL。这将是最终的解决办法,但我不打算在这里涉及,毕竟它是一个非常简单的步骤。
为前端服务
现在我们有了API,只需要一个简单的前端提供最基本的使用。如果我们的目标是合适的可拓展方案,我们服务的前端可能不会和提供API服务的服务器是同一个。我们这篇博文的目的是展示Nickel的功能,这里仅仅为了保证项目的完整性。
对于前端,我们不会涉及得像后端那么深,跳转到GItHub的库 , 这个库 包含了这篇文章的所有代码。
让我们姑且认为我们正在建设一个简单的Web应用程序,一个为用户输入GitHub上仓库网址的文本框,和一个从我们构建的API请求变更的按钮。
为了服务于前端,我们创建一个assets目录,其中包含css、js、templates子目录,将index.html放置在templates目录,其中包含的Javascript文件和CSS文件分别放置js和css目录。
为了能为前端服务,我们还必须告诉Nickel那些静态服务器文件。
server.utilize(StaticFilesHandler::new("assets"));
server.utilize(StaticFilesHandler::new("assets/templates")); |
我们分别挂载assets和assets/templates,以便在顶层目录中访问index.html,但是Javascript和CSS还是通过子目录访问。

现在有一个可以运行的网站了。
把应用部署到Heroku
但是现在我们的应用仅仅很好的运行在我们的开发机上,如果能给世界看看不是更棒吗?我们把他托管到Heroku上,托管一个Nickel应用到Heroku非常简单,如果你之前从未用过Heroku,你需要在他们的网站上注册,并下载下一步将用到的Heroku CLI tool。
一旦你安装了Heroku CLI并登录,你可以通过下面的命令从现有资源库创建应用程序。
heroku create demo-clog-website --buildpack <A href="
https://github.com/emk/heroku-buildpack-rust.gi">
https://github.com/emk/heroku-buildpack-rust.gi</A> |
注意:Heroku将会使用heroku create命令的第一个参数作为站点的子域名。这里是http://demo-clog-website.herokuapp.com.
这将为你的库增加一个叫做heroku的Git远程分支。部署站点仅仅是运行git push heroku master命令那么简单。
$ git push heroku master
Counting objects: 28, done.
Delta compression using up to 8 threads.
Compressing objects: 100% (24/24), done.
Writing objects: 100% (28/28), 5.73 KiB | 0 bytes/s, done.
Total 28 (delta 5), reused 0 (delta 0)
remote: Compressing source files... done.
remote: Building source:
remote:
remote: -----> Fetching custom git buildpack... done
remote:
remote:  !     Push rejected, no Cedar-supported app detected
remote: HINT: This occurs when Heroku cannot detect the buildpack
remote:       to use for this application automatically.
remote: See <a href="https://devcenter.heroku.com/articles/buildpacks">
https://devcenter.heroku.com/articles/buildpacks</a>
remote:
remote: Verifying deploy....
remote:
remote: !   Push rejected to demo-clog-website.
remote:
To <a href="https://git.heroku.com/demo-clog-website.git">
https://git.heroku.com/demo-clog-website.git</a>
 ! [remote rejected] master -> master (pre-receive hook declined)
error: failed to push some refs to '
https://git.heroku.com/demo-clog-website.git' |
噢!我们的应用好像缺少东西,Heroku拒绝构建这个应用。Heroku能托管各种不同技术栈的应用,通过指定构建包(buildpack)来配置服务器,使其工作。我们创建应用的时候,设置的是一个非官方的Rust构建包(但是可用),但是还缺少两种重要的文件,用来提示Heroku应该如何对待我们的程序。
RustConfig
RustConfig文件告诉构建包我们想用哪个版本的Rust编译器构建我们的应用。
Procfile
web: ./target/release/clog-website |
Procfile告诉Heroku调用哪个命令来开始这个进程,因为Cargo把可执行文件放在target/release/our-app-name,所以我们进行对应的设置。
创建并提交这两个文件到我们的库之后,再次通过git push heroku master部署站点,这次部署能正常运行,因此我们来检查一下在线站点。

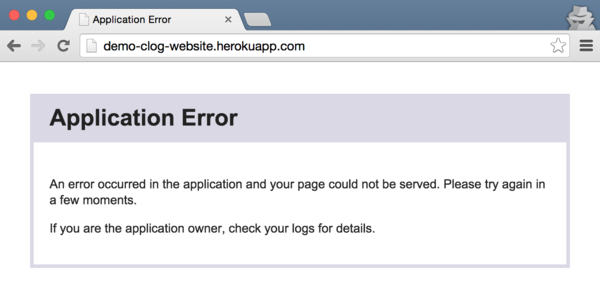
站点只给出一个Heroku通用的错误页面,我们使用heroku logs命令检查一下输出。
heroku[web.1]: Starting process with
command `./target/release/clog-website`
app[web.1]: Listening on <a href="http://127.0.0.1:6767">
http://127.0.0.1:6767</a>
app[web.1]: Ctrl-C to shutdown server
heroku[web.1]: Error R10 (Boot timeout) ->
 Web process failed to bind to $PORT within 60 seconds of launch
heroku[web.1]: Stopping process with SIGKILL
heroku[web.1]: State changed from starting to crashed
heroku[web.1]: State changed from crashed to starting
heroku[web.1]: Process exited with status 137 |
从日志中,可以清晰的看到,服务器成功启动,但是在60秒后因为绑定到$PORT端口不成功,超时而关闭。
Heroku希望我们绑定他们在环境变量中指定的随机端口号,然而我们可以使用硬编码的6767端口。
修复这个问题,只需要简单的从环境变量中读取PORT,如果PORT不存在,再默认绑定到6767。
fn get_server_port() -> u16 {
    env::var("PORT").unwrap_or("6767".to_string()).parse().unwrap()
}
server.listen(("0.0.0.0", get_server_port())); |
修复好这个问题后,网站就可以正常运行了。

你可以到 demo-clog-website.herokuapp.com 进行一些尝试。网站包含前面提到的URL解析器改善,因此输入库(repository)可以使用user/repo的形式。你可以在 这里(GitHub) 找到这个演示项目的全部代码。
现在,是不是为你的首个Nickel项目开了一个好头? |

