Table
of contents
You must perform key software installation and configuration
tasks before you set up your environment.
Prerequisites
The following software must be installed on client
workstations:
- Rational Software Architect 6.0
- ClearCase LT 6.0 Client
Setting up the ClearCase LT 6.0 environment
The ClearCase LT 6.0 environment should be set up as
follows:
- Rational ClearCase LT Server is installed. This
is the shared server where your team stores the source
code control repositories.
- The ClearCase Getting Started wizard has not been
run on the ClearCase LT Server.
- All ClearCase LT Clients are configured to point
to the ClearCase LT Server.
Using ClearCase
2003
You can also use ClearCase 2003 for this exercise.
Some initial steps are different, but the ClearCase
setup environment, including versioned object bases
(VOBs), views, and so on, is the same.
Setting up
the user community
ClearCase uses an integrated user identity based on
the identity of the user that is logged in. In this
scenario, a special account, called ucm_admin, performs
the administrative operations in the source control
system. You set this account to use a special group,
called development, as its primary group. The users
dev1 and dev2, also set the group development as their
primary group.
If you cannot arrange to set this group as the primary
group for users in the domain, you can do one of the
following things instead:
- Use the default group Domain Users as the ClearCase
group.
- Ensure that all users set their local user environment
variable CLEARCASE_PRIMARY_GROUP to development.
If you use the default domain group called Domain Users,
it requires less work and you do not need to use the
environment variable; however, all users in the domain
can read and potentially modify the ClearCase data.
If you use a special group, you can hide information
and restrict access to the ClearCase repositories (VOBs)
to users in this group.
Configuring ClearCase groups and environment variables
In this exercise, you configure your ClearCase group
as development and set the environment variable on your
workstation.
If you use local accounts, create the local users and
the group and add the users to the group. Otherwise,
arrange for your network administrator to perform these
tasks in the domain.
To configure your ClearCase group locally:
- Log in with the ucm_admin account.
- Add ucm_admin to the development group on your workstation.
To set a user environment variable on Windows XP:
- Click Start > Settings > Control Panel.
- In the Control Panel, double-click System.
- In the System Properties window, click the Advanced
tab.
- On the Advanced page, click Environment Variables.
- Under User variables for user, click
New.
- In the New User Variable window, in the Variable
name field, type
CLEARCASE_PRIMARY_GROUP.
- In the Variable value field, type
development.
- Click OK.
To set up the ClearCase environment, the administrative
user ucm_admin completes these high-level steps, which
are described in detail in the following procedures.
The administrator typically performs this setup once.
- Create an initial project VOB and Unified Change
Management (UCM) project.
- Create a UCM component VOB.
- Create a new UCM project.
- Create ClearCase work areas:
- Create a development stream.
- Create a development view.
- Create an integration view.
- Load the new VOB into your work areas.
Creating
the initial project VOB and UCM project
ClearCase stores file elements, directory elements,
derived objects, and metadata in a repository called
a VOB. Each UCM project must have a project VOB (PVOB).
A PVOB is a special type of VOB that stores UCM objects,
such as projects, activities, and change sets. A PVOB
must exist before you can create a UCM project.
As the administrative user, create a PVOB called projects
and a UCM project called InitialProject_1 through the
ClearCase Getting Started wizard.
To create a PVOB and UCM project:
- On the ClearCase LT server, log in as ucm_admin.
- Click Start > Programs > Rational Software
> Rational ClearCase > Administration > Getting
Started wizard.
- In the Rational ClearCase LT Getting Started wizard,
click Next.
- On the Create the ClearCase LT Storage Directory
page, accept the default names for the source VOB
and initial component and click Next.
- On the Create ClearCase source VOB page, accept
the default directory for storing the ClearCase LT
database and click Next.
- On the Create an Initial ClearCase LT Project page,
in the Starting UCM Project Name field, type
InitialProject_1.
- Under Type of Project, click Parallel stream
project.
Figure 1. Getting started wizard

- Click Next.
- On the Summary of ClearCase LT System Configuration
page, click Next.
- Click Close.
Note: The Import Source Files option is not
appropriate for IDE projects because the IDEs contain
the logic that determines which file types should be
placed under source control. You do not use this initial
repository called sources.
Planning
UCM components
As the number of files and directories in your system
increases, you need a way to reduce the complexity of
managing them. Components are the UCM mechanism for
simplifying the organization of your files and directories.
The elements that you group into a component typically
implement a reusable piece of your system architecture.
By organizing related files and directories into components,
you can view your system as a small number of identifiable
components, instead of as one large set of directories
and files.
Within a component, you organize directory and file
elements into a directory tree. You can convert existing
VOBs or directory trees within VOBs into components,
or you can create a component from scratch.
Note: The directory and file elements of a component
reside physically in a VOB. The component object resides
in a PVOB.
Creating
a VOB
To create a VOB for your IDE project:
- Click Start > Programs > Rational Software
> Rational ClearCase > Administration > Create
VOB.
- On the Name and Major Parameters page, in the
What would you like the new VOB to be named field,
type
test_vob and click Next.
- On the Components page, click the Create VOB
as a single VOB-level component and click
Finish.
- In the Confirmation window, click OK.
Creating
a new UCM project
In this exercise, you do not use the UCM project that
you originally created, called InitialProject_1. Instead,
you create a new UCM project called InitialProject.
After you complete this procedure, your new UCM project
contains a foundation baseline and the UCM component
that is associated with your project is modifiable.
To create a UCM project:
- While logged in as ucm_admin, in the ClearCase Project
Explorer, right-click projects; then click
New > Project.
Figure 2. Creating a new UCM project

- On the Step 1 page, in the Project Name field,
type
InitialProject.
- Click Traditional parallel development and
click Next.
- On the Step 2 page, click No and click
Next.
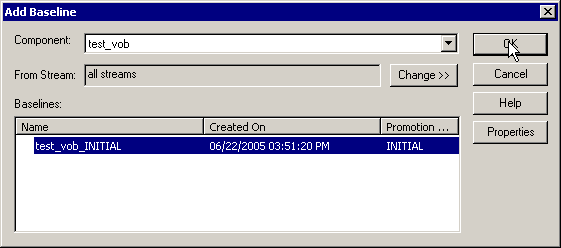
- On the Step 3 page, click Add.
- In the Add Baseline window, click Change >
All Streams.
- In the Component list, select test_vob.
- In the Baselines pane, click test_vob_INITIAL
and click OK.
Figure 3. Adding a baseline
- Click Next
- On the Step 4 page, in the Make the following components
modifiable pane, click test_vob and click Next.
- On the Step 5 page, click No and click
Finish.
- In the Confirmation window, click OK.
The following figure illustrates how a new UCM
project is displayed in the ClearCase Project Explorer.
Figure 4. New UCM project

Creating
ClearCase work areas
With UCM, a work area is the user work environment
that is implemented with two objects: a stream and a
view. A stream defines the working configuration for
the view,or views, associated with it. A UCM project
has one integration stream, which is part of the shared
work area, and multiple development streams, each of
which is part of a developer’s private
work area.
You typically work with a development stream and then
deliver your work to the integration stream. The development
stream tracks the activities that are assigned to you
and enables you to work in isolation from the rest of
the UCM project team.
A view selects the appropriate versions of files and
directories, as defined by a set of configuration rules,
from all available versions in the VOB. ClearCase provides
two types of views: snapshot and dynamic. With snapshot
views, files are copied from the VOB to the local disk.
Dynamic views reference files directly in the VOB.
Note: ClearCase LT uses snapshot views only.
Create work areas to populate the initial project framework
and file artifacts.
To create a ClearCase work area:
- While logged in as ucm_admin, in the ClearCase Project
Explorer, right-click InitialProject; then
click Join Project.
- On the Choose a Project page, ensure that InitialProject
is selected and click Next.
- On the Create a Development Stream page, accept
the default stream names and click Next.
- On the Choose Location for a Snapshot View page,
in the Where would you like the root of this view
field, specify the development view location (for
example C:\views\ucm_admin_InitialProject) and click
Next.
- On the Choose Location for a Snapshot View page,
in the Where would you like the root of this view
field, specify the integration view location (for
example C:\views\ucm_admin_InitialProject_int) and
click Next.
- On the Choose Components page, ensure that test_vob
is selected and click Finish.
- In the Confirm window, click OK.
The following figure illustrates how a ClearCase
work area is displayed in the ClearCase Project
Explorer.
Figure 5. Creating a ClearCase
work area

Your work area is rooted under ucm_admin_InitialProject
(for example C:\views\ucm_admin_InitialProject). In
ClearCase, each VOB appears as a subdirectory under
the view root. UCM components can exist either as an
entire VOB, or as first-level subdirectories underneath
a VOB. In this exercise, your component is located in
a separate VOB.
You share a modeling project, so that other team members
can also work on it. In this section, you log into Rational
Software Architect as ucm_admin, import a modeling project
and share it in ClearCase.
Starting
Rational Software Architect
Start Rational Software Architect and create an initial
workspace.
To start Rational Software Architect:
- Click Start > Programs > IBM Rational >
IBM Rational Software Architect V6.0 > Rational
Software Architect.
- In the Workspace Launcher window, in the Workspace
field, select a workspace and click OK.
- If you are prompted to change the auto launch configuration
to your workspace path, click Yes.
Note: Your snapshot view location and your workspace
location should always be separate.
Enabling the
ClearCase SCM adapter and starting ClearCase
Enable the ClearCase SCM adapter and start ClearCase.
To enable the ClearCase SCM adapter and start ClearCase:
- Click Window > Preferences.
- In the Preferences window, expand Workbench >
Capabilities.
- In the right pane, click Team.
- Click OK.
- Click ClearCase > Connect to Rational ClearCase.
Set the preference to automatically connect to ClearCase
when Rational Software Architect starts.
To automatically connect to ClearCase when Rational
Software Architect starts:
- Click Window > Preferences.
- In the Preferences window, expand Team and
click ClearCase SCM Adapter.
- Select the Automatically connect to ClearCase
on startup check box.
- Click OK.
Importing
an existing modeling project
In this exercise, you import an existing modeling project
called Piggy Bank. In accordance with the Rational Unified
Process (RUP), the Piggy Bank sample UML model is divided
into three models that each describes a different aspect
of the system: the use-case model, analysis model, and
design model.
To import the Piggy Bank modeling project:
- Click Help > Samples Gallery.
- In the Contents pane, navigate to Application
samples > Piggy Bank Application > Piggy Bank
Models.
- In the right pane, click Import the sample.
- In the Sample Banking Models wizard, on the Piggy
Bank Models page, accept the default project name
and click Finish.
- Close the Samples Gallery.
The following figure illustrates how the Piggy
Bank modeling project is displayed in the Model
Explorer view.
Figure 6. Piggy Bank modeling
project

Sharing a
project
Share your project to allow other team members to access
it.
To share your project:
- In the Model Explorer view, right-click Piggy
Bank Models; then click Team > Share Project.
- In the Share Project wizard, on the Share Project
page, click ClearCase SCM Adapter and click
Next.
- On the Rational ClearCase page, browse to the VOB
location within your view (for example C:\views\ucm_admin_InitialProject\test_vob)
and click Finish.
Figure 7. Sharing a project

- In the Add Element(s) to Source Control window,
click OK.
- In the ClearCase-Select Activity window, click New.
- In the ClearCase-New Activity window, in the
New Activity field, type
Share project
and click OK.
Figure 8. Creating a new activity

- In the ClearCase-Select Activity window, click OK.
The following figure illustrates how a shared project
is displayed in the Model Explorer view.
Figure 9. A shared project

Adding to
the modeling project
Make changes to your models and store them in ClearCase,
so that other team members can view them. Open a diagram
and update a use-case diagram with an action.
To update a use-case diagram:
- In the Model Explorer view, double-click Use
Case Model.emx.
- Navigate to Use Case Model > Account Operations
> Display Balance > Display Balance and
double-click Display Balance Activity Diagram.
Figure 10. Opening the Display
Balance Activity Diagram

- In the Palette, click Action.
- In the diagram editor, click above Display Accounts
with balance.
- In the Check Out Element(s) window, click OK.
- In the ClearCase - Select Activity window, create
a new activity and click OK.
- In the diagram editor, rename Action to
Select
                            Account
.
- In the Palette, click Control Flow.
- In the diagram editor, click Select Account
and drag the cursor to Display Accounts with balance.
- In the guard condition, type
[true].
- Click the end of the guard condition that points
to Display Accounts with balance and drag the
cursor to Select Account.
The following figure illustrates how a new action
is displayed in the diagram editor.
Figure 11. Creating an action

Saving your
work and checking it in
Save your work, and then check your changes into ClearCase.
To save and check in your files:
- Click File > Save All.
- In the Model Explorer view, right-click Use Case
Model.emx; then click Team > Check In.
- In the Check In Element(s) window, click OK.
Delivering
to the integration stream
The ClearCase deliver operation makes the work in one
stream available to another stream.
Work is delivered in the form of activities or baselines.
Differences between versions that are already part of
the target stream of the delivery operation and versions
that are being delivered are resolved through merging.
Versions associated with an activity or baseline must
be checked in to be delivered. Only activities that
were modified after the last deliver operation from
the development stream are considered for delivery.
Deliver your files to the integration stream so that
other users can work with the shared model. Until you
deliver to the integration stream, users who join the
UCM project see empty work areas.
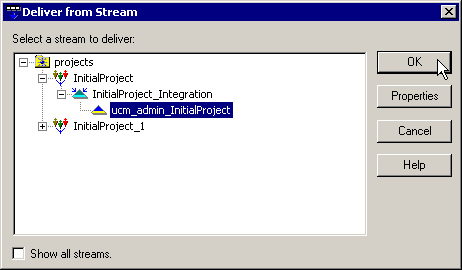
To deliver the activities to the integration stream:
- Click ClearCase > Deliver Stream.
- In the Deliver from Stream window, click ucm_admin_InitialProject
and click OK.
Figure 12. Delivering to the integration
stream
- In the Deliver from Stream Preview window, view
which file versions are associated with a UCM activity:
- Click an activity and click Properties.
- In the Properties window, click the Change
Set tab to view all the files that are associated
with that activity.
- To return to the Deliver from Stream Preview
window, click OK.
- To begin the delivery, ensure that all activities
are selected and click OK.
- In the Deliver from Stream - Merges Complete window,
clear the Open a ClearCase Explorer window to the
root of the view check box and click OK.
Note: Do not complete the delivery now. Leave
the Delivering to View window open. You will complete
the delivery later after you test files in the integration
view.
You have merged and checked out all of the files onto
the integration stream and left these files checked
out in the integration view.
Viewing the
ClearCase branch structure
Each time that you revise and check in an element,
ClearCase creates a new version of the element in the
VOB.
ClearCase can organize the different versions of an
element in a VOB into a version tree. Like any tree,
a version tree has branches. Each branch represents
an independent line of development. Changes to one branch
do not affect other branches until you merge.
In UCM projects, the stream maintains a record of which
branch or set of branches you use in a project; you
typically do not work directly with branches.
You can view the underlying ClearCase branch structure
that is associated with the streams by looking at the
version tree.
To view the ClearCase branch structure:
- In the Model Explorer view, right-click Use Case
Model.emx; then click Team > Show Version
Tree.
The following figure illustrates how a version
tree is displayed.
Figure 13. Version tree

- To exit the Version Tree Browser, click File
> Exit.
- To exit Rational Software Architect, click File
> Exit.
Testing the
delivery in the integration view
At this stage, you typically verify that the application
works as expected by testing the delivery and confirming
that all merges are resolved correctly and that all
changes are delivered. However, because no one else
is currently working on the project, you do not need
to perform this verification now.
Completing
the delivery to the integration stream
You should still have an incomplete delivery to your
integration stream.
To complete the delivery to the integration stream:
- In the Delivering to View window, which should still
be open from the incomplete delivery, click Complete.
- Click Close.
Creating and recommending a baseline
With UCM, at certain points in the development cycle
as dictated by your development process, your integrator
or project leader creates a new baseline based on the
activities that you and your team members delivered.
A baseline identifies one version of every element that
is visible in a component. Typically, baselines go through
a cycle of testing and defect fixing until they reach
a satisfactory level of stability. When a baseline reaches
this level, you designate it as a recommended baseline.
When developers join the UCM project, they populate
their work areas with the versions of directory and
file elements from the UCM project’s
recommended baseline. Alternatively, developers can
join the UCM project at a feature-specific development
stream level, in which case they populate their work
areas with the development stream’s
recommended baseline. This practice ensures that all
members of the UCM project team start with the same
set of files.
In the integration stream, create a baseline and then
recommend the baseline so that users can gain access
to the latest UCM components.
Creating a baseline
In the integration stream, create a baseline for your
UCM component.
Note: You can also create a separate baseline
for individual UCM components.
To create a baseline:
- In the ClearCase Project Explorer, right-click InitialProject_Integration;
then click Make Baseline.
Figure 14. Recommending a baseline

- To create a baseline for the UCM component, in the
Make Baseline window, click OK.
Recommending a baseline
Recommend the baseline that users access when they
rebase their development streams or join the project.
To recommend a baseline:
- In the ClearCase Project Explorer, right-click InitialProject_Integration;
then click Recommend Baselines.
- In the Recommended Baselines window, click Seed
List.
When you seed the list for the new baseline at
the INITIAL promotion level, you see the new baseline
that you just created.
- Click OK.
After you recommend a new baseline for the first time,
you typically inform your team to join the UCM project
and begin work.
Rebasing
your development stream
The ClearCase rebase operation provides a way for you
to update work areas with work that has been integrated,
tested, and approved for general use. This work is represented
by baselines.
To work with the set of versions in the recommended
baseline, you rebase your work area. To minimize the
amount of merging necessary while you deliver activities,
you rebase your work area with each new recommended
baseline as it becomes available.
After you rebase, you typically build and then test
the source files in your development view to verify
that your undelivered activities build successfully
with the versions in the baseline.
Update your work area with the latest UCM project changes
by rebasing your development stream to the recommended
baseline for the integration stream.
To rebase the development stream:
- In the ClearCase Project Explorer, right-click ucm_admin_InitialProject;
then click Rebase Stream.
- In the Rebase Stream Preview window, click OK.
- In the Rebase Stream - Merges Complete window, click
OK.
- In the Rebasing in View window, click Complete.
- Click Close.
- To exit ClearCase Project Explorer, click File
> Exit.
- Log out as ucm_admin.
Before you start this exercise, ensure that you performed
the initial setup for each new user, as described in
Before you begin:
installing and configuring software.
Setting up
work areas for the developers
This exercise refers to two users: dev1 and dev2. Set
up each user’s work area by joining
the UCM project and importing the shared Piggy Bank
modeling project.
To join the UCM project and import the Piggy Bank modeling
project:
- Log in as dev1 and start Rational Software Architect.
- If prompted, select your workspace or create a new
one.
- Enable the ClearCase SCM adapter and start ClearCase.
For more information, see Enabling
the ClearCase SCM adapter and starting ClearCase.
- Click ClearCase > Join Project.
- On the Choose a Project page, click InitialProject
and click Next.
- On the Create a Development Stream page, accept
the default stream names and click Next.
- On the Choose Location for a Snapshot View page,
in the Where would you like the root of this view
field, specify the development view location (for
example C:\views\dev1_InitialProject) and click
Next.
- On the Choose Location for a Snapshot View page,
in the Where would you like the root of this view
field, specify the integration view location (for
example C:\views\dev1_InitialProject_int) and click
Next.
- On the Choose Components page, clear the Start
component browser after creating view check box.
- Ensure that the test_vob component check
box is selected for loading and click Finish.
- In the Confirm window, click OK.
- Click File > Import.
- In the Import wizard, click Existing Project
into Workspace and click Next.
- On the Import Project From File System page, in
the Project contents field, browse to the location
of the Piggy Bank model in your view (for example
C:\views\dev1_InitialProject\test_vob\Piggy Bank Models).
Figure 15. Importing a project

- Click Finish.
- Log off as dev1 and repeat the entire procedure
as dev2.
Adding to
the modeling project
As dev2, make a change to a use-case diagram by renaming
an action.
To rename an action:
- In the Model Explorer view, double-click Use
Case Model.emx.
- Navigate to Use Case Model > Account Operations
> Display Balance > Display Balance and
double-click Display Balance Activity Diagram.
- In the diagram editor, rename Display Accounts
with balance to
Display Selected Account.
- In the Check Out Element(s) window, click OK.
- In the ClearCase - Select Activity window, create
a new activity and click OK.
The following figure illustrates how a renamed
action is displayed in the diagram editor.
Figure 16. Renaming an action

Saving your work and checking it in
Save your work, and then check your changes into ClearCase.
To save and check in your files:
- Click File > Save All.
- In the Model Explorer view, right-click Use Case
Model.emx; then click Team > Check In.
- In the Check In Element(s) window, click OK.
Delivering
to the integration stream
While logged in as dev2, from Rational Software Architect,
complete the delivery of your files to the integration
stream. For more information, see Delivering
to the integration stream.
Because your delivery only reflects new model changes
and no code changes, you do not need to test the projects
in the integration view before you complete the delivery.
Creating
and recommending a baseline
As ucm_admin, create and recommend a baseline so that
the changes that dev2 delivered are shared with the
team. For more information, see Creating
and recommending a baseline.
Rebasing
as dev1
As dev1, from Rational Software Architect, rebase your
development stream to the recommended baseline for the
integration stream to update your work area with the
changes that dev2 delivered.
To rebase to the recommended baseline:
- Log in as dev1.
- Start Rational Software Architect and select a workspace
to use.
- Enable the ClearCase SCM adapter and start ClearCase.
For more information, see Enabling
the ClearCase SCM adapter and starting ClearCase.
- Click ClearCase > Rebase Stream.
- To view the baseline for this rebase procedure,
in the Rebase Stream Preview window click Advanced.
- In the Change Rebase Configuration window, the baseline
to which you will rebase to is listed. To return to
the Rebase Stream Preview window, click OK.
- To begin the rebase, click OK.
- In the Rebasing in View window, click Complete.
Note: You should always rebase your view with
models closed. If you rebase your view when models are
open, you are not prompted to reload and you can erase
all changes from the previous version.
Tips for
working in ClearCase
If you work in ClearCase outside of Rational Software
Architect when a Rational Software Architect workspace
is open, your changes are not automatically reflected
in the workspace. If you do create this situation, resolve
it as follows:
- In the Model Explorer view, right-click a project;
then click Refresh.
- In the Model Explorer view, right-click a project;
then click Team > Refresh Status.
These actions synchronize the file system state on
disk with the in-memory state of the Model Explorer
view and the source control status.
Starting
parallel development: Comparing and merging models
In this exercise, you perform parallel development.
The two users on your team make different changes to
the same model element. In the next exercise, when the
second user tries to check in and deliver files, the
user must perform a merge to resolve the differences.
The following steps describe the workflow in this exercise:
- The user named dev1 checks out a file, makes changes,
and delivers the changes to the integration stream.
- The user named dev2 checks out the same file, makes
a conflicting change, and delivers the change, but
needs to perform a merge before the changes are delivered.
A merge typically starts when you check in a model
to a configuration management system and a newer version
of the same model already exists in the repository.
At the start of the merge, all non-conflicting differences
and trivial conflicts are resolved automatically. You
must then manually resolve the remaining conflicts by
selecting a version of a model from which to accept
changes. After you resolve the remaining conflicts,
you can save the merged model and close the merge editor.
Introducing conflicts to the model
In this exercise, dev1 introduces a change, and then
delivers the change to the integration stream. The dev2
user then makes a conflicting change, starts to deliver,
and initiates a merge so that the conflicting change
can be resolved.
To make a change as dev1:
- As dev1, in the Model Explorer view, double-click
Use Case Model.emx.
- Navigate to Use Case Model > Account Operations
and double-click Account Operations Use Cases.
- In the diagram editor, rename Teller to
Auditor.
- In the Check Out Element(s) window, click OK.
- When you are prompted for an activity, create a
new activity.
- Click File > Save All.
- Right-click Use Case Model.emx; then click
Team > Check In.
- In the Check In Element(s) window, click OK.
- Click ClearCase > Deliver Stream and complete
your delivery to the integration stream.
- Log off as dev1.
To make a conflicting change as dev2:
- Log in as dev2.
- In the Model Explorer view, double-click Use
Case Model.emx.
- Navigate to Use Case Model > Account Operations
and double-click Account Operations Use Cases.
- In the diagram editor, rename Teller to
Manager.
- In the Check Out Element(s) window, click OK.
- When you are prompted to create an activity, create
a new activity.
- Click File > Save All.
- Right-click Use Case Model.emx; then click
Team > Check In.
- In the Check In Element(s) window, click OK.
- Click ClearCase > Deliver Stream.
- In the Deliver from Stream Preview window, click
OK.
- In the Deliver from Stream window, ensure that Start
the Diff Merge tool for this element is selected
and click OK.
Figure 17. Starting a merge

The Merge window opens. You can view the differences
and conflicts between contributor and ancestor files
in the Left, Right, and Ancestor views. You can
also view details about each difference and conflict
in the Structural Differences view. The Merged result
view displays the merged model.
Resolving the conflict
At this point, dev1 and dev2 have both made changes
to the same file. The dev1 user has checked in and delivered
changes. The dev2 user delivered a conflicting change,
which started a merge. The dev2 user must resolve the
conflict and complete the delivery.
To resolve the conflict:
- To accept the change that dev2 made, in the Merge
window, in the Structural Differences view, right-click
Conflicting changes; then click Resolve
with Right Contributor.
Figure 18. Resolving a conflict

- In the Merged result view, click Save.
Figure 19. Saving a merged model

- Close the Merge window.
- In the Deliver from Stream - Merges Complete window,
click OK.
- In the Delivering to View window, click Complete.
The merge is now complete and the results are under
ClearCase control.
This concludes the initial setup of a team development
infrastructure. The next team development scenario will
cover the use of Rational Software Architect and Concurrent
Versions System (CVS).
Learn
Get products and technologies
Discuss
|