| БрМЭЦМі: |
| БОЮФРДздmamicodeЃЌжївЊаДИјЪЙгУУќСюааРДВйзїGitЕФгУЛЇЃЌгУгкЬсИпGitЪЙгУЕФаЇТЪЁЃ |
|
ЧАбд
БОЮФжївЊаДИјЪЙгУУќСюааРДВйзїGitЕФгУЛЇЃЌгУгкЬсИпGitЪЙгУЕФаЇТЪЁЃжСгкЪЙгУУќСюЛЙЪЧGUIЃЈTortoise
GitЛђVSЕФGitВхМўЃЉОЭВЛдкДЫЬжТлСЫЃЌДѓМвИљОнздМКЕФЕФЯВКУбЁдёОЭКУЁЃЮвИіШЫЪЧБШНЯЭЦМіЪЙгУУќСюааЕФЃЌвђЮЊУќСюааЪЧдЩњЕФПЭЛЇЖЫЃЌЕБЪьЯЄСЫУќСюаавдКѓЃЌЪЙгУаЇТЪВЂВЛЛсБШGUIЕЭЁЃЖјЧвЮвЪЧДгGUIЃЈTortoise
SVNЃЉзЊУќСюааЕФЃЌИеПЊЪМЕФЪБКђвВЪЧЭТВлУќСюааЕФЁАЗЧШЫадЛЏЁБЃЌЕЋЮвзпГіСЫЪцЪЪЧјЃЌеце§ЪЙгУЦ№УќСюааКѓЃЌЮвВХЗЂЯжСЫздМКжЎЧАЕФЯыЗЈЪЧЗєЧГЕФЁЃ
жИСюБ№Ућ
жИСюБ№УћОЭЪЧИјвЛаЉГЃгУЕФжИСюЩшжУвЛИіНЯЖЬЕФжИСюБ№УћРДЬсИпGitЕФЪЙгУаЇТЪЁЃ
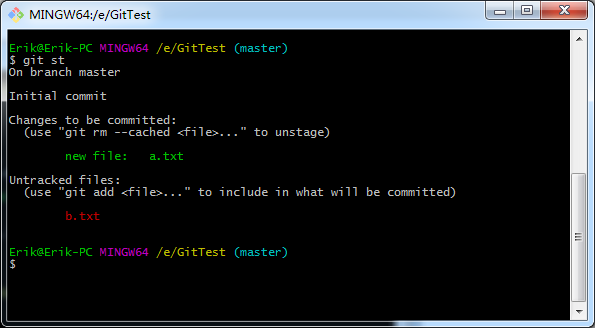
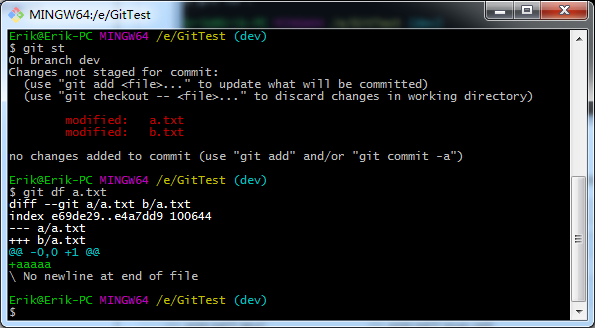
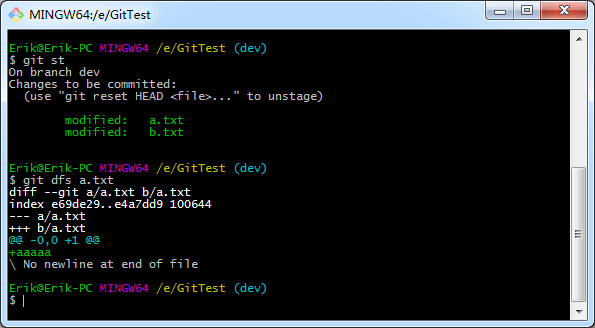
Шчgit st(git status)ЃК

ЪЙгУжИСюБ№УћЃЌВЂВЛЛсАбджИСюИВИЧЕєЃЌЖјЪЧЭЌЪБЩњаЇЃК

жИСюБ№УћЪфДэЕФЪБКђЃЌвВЛсгаЬсЪОЃК

ЮвдкетРяЛсЗжЯэЮвЩшжУЕФжИСюБ№УћЃЌЯЃЭћФмАяжњЬсИпЪЙгУаЇТЪЁЃ
1. ВщПДзДЬЌ(Show the working tree status) - git status
git st
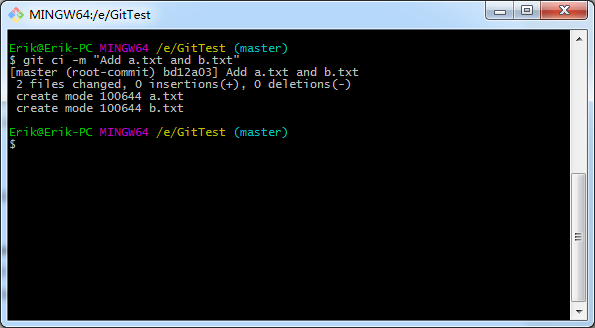
2. ЬсНЛ(Record changes to the repository) - git commit
git ci
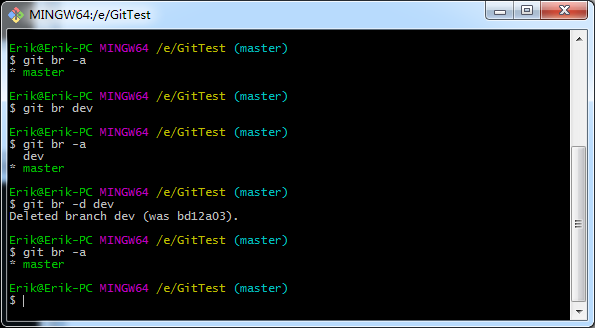
3. ЗжжЇВйзї(List, create, or delete branches) - git
branch
git br
4. ЧЉГі(Switch branches or restore working tree files)
- git checkout
git co
ЧЉГіЗжжЇ:

ЧЉГіЃЈЛЙдЃЉЙЄзїЧјЮФМўЃК

ЧЉГіЃЈЛЙдЃЉЙЄзїЧјЫљгаЮФМўЃК

5.Вювь(Show changes between commits, commit and working
tree, etc) - git diff
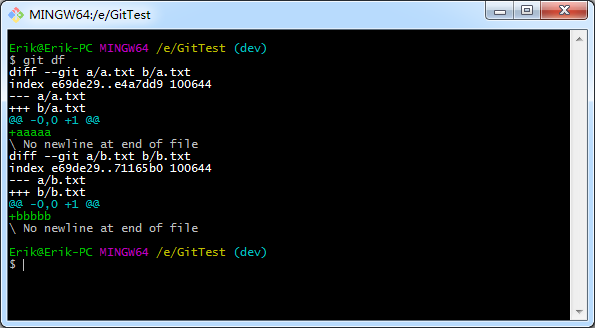
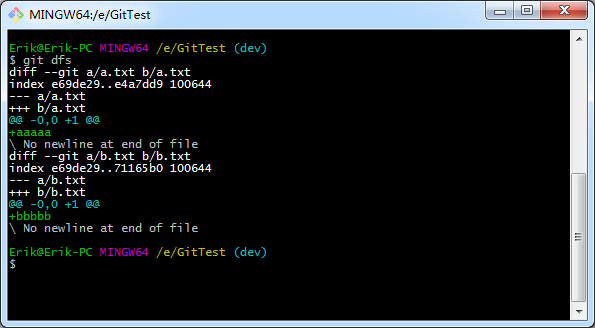
ЙЄзїЧјЃЈworking driectoryЃЉгыднДцЧјЃЈstaging areaЃЉЕФВювьЃК
git df
ЕЅИіЮФМўВювьЃК
ЫљгаЮФМўВювьЃК
днДцЧјЃЈstaging areaЃЉгыБОЕиВжПтЃЈrepositoryЃЉЕФВювьЃК
git dfs
ЕЅИіЮФМўВювьЃК
ЖрИіЮФМўВювьЃК
6.КЯВЂ(Join two or more development histories together)
- git merge
git mr

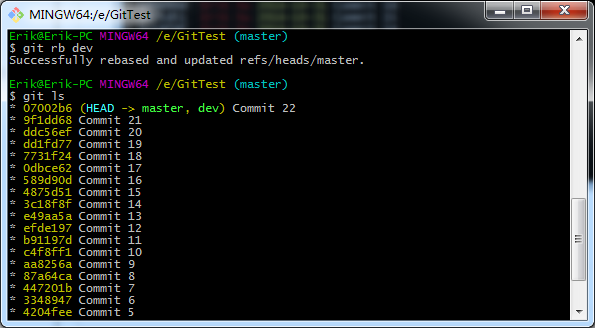
7.ШежО(Show commit logs) - git log
ВщПДзюНќвЛЬѕШежОЃК
git last

ВщПДШежОМАЗжжЇЬсНЛаХЯЂЃК
git ls

ЦфжаТЬЩЋЕФБэЪОlocalЗжжЇЃЌКьЩЋЕФЕФБэЪОhostЗжжЇЃЌДгЩЯЭМПЩвдПДГіЃЌlocalЕФmasterЗжжЇЁЂhostЕФmasterЗжжЇЁЂhostЕФdevЗжжЇЖМДІгкЭЌвЛИіЬсНЛЃЌlocalЕФdevЗжжЇСьЯШгкЧАУцЬсЕНЕФ3ИіЗжжЇЁЃЕБАцБОЯдЪОВЛШЋЬсНЛЪБЃЌПЩвдАДЛиГЕЃЈЛиГЕЃЉМЬајМгдиЬсНЛЃЌашвЊЭЫГіЪЧЃЌАДзжФИqЁЃСэЭтЃЌФуПЩвдМгЁА-nЁБжИЖЈВщПДЧАnЬѕМЧТМЃК

ВщПДШежОЁЂЗжжЇЬсНЛаХЯЂЁЂЬсНЛШЫЁЂЬсНЛЪБМфЃК
git lg

ЕБАцБОЯдЪОВЛШЋЬсНЛЪБЃЌПЩвдАДЛиГЕЃЈЛиГЕЃЉМЬајМгдиЬсНЛЃЌашвЊЭЫГіЪЧЃЌАДзжФИqЁЃСэЭтЃЌФуПЩвдМгЁА-nЁБжИЖЈВщПДЧАnЬѕМЧТМЃК

8.БфЛљ(Reapply commits on top of another base tip)
- git rebase
git rb
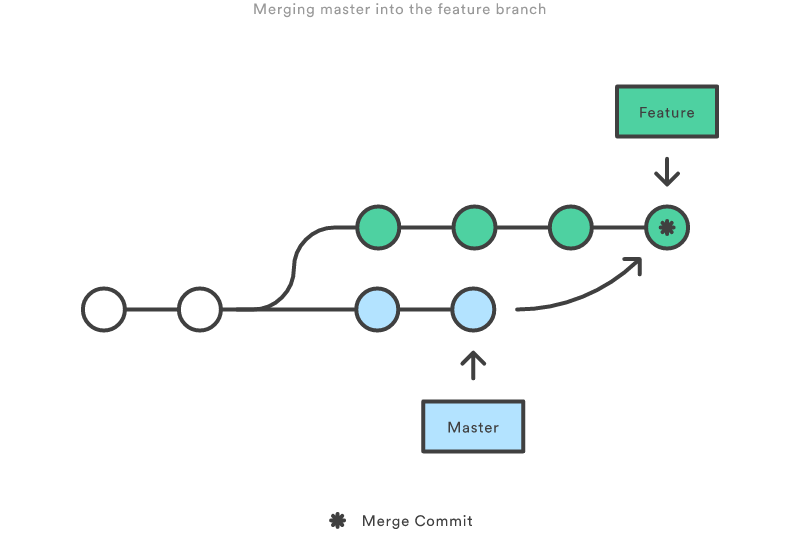
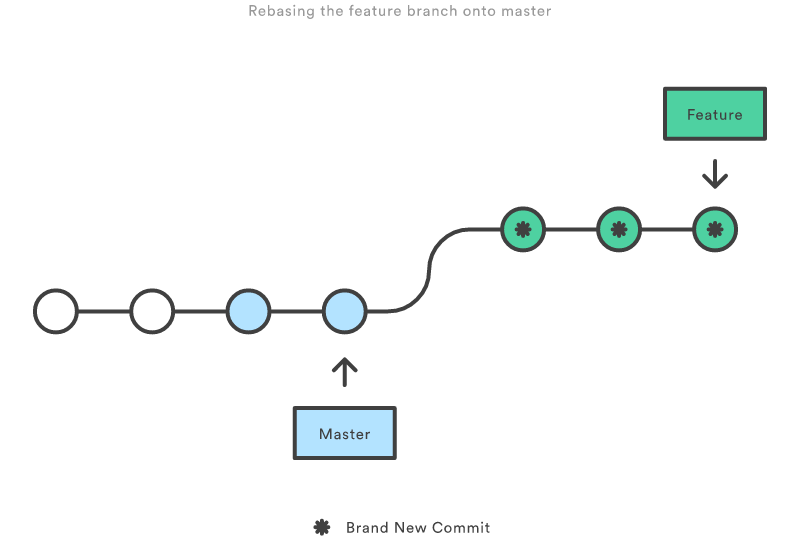
ЮвРэНтЕФrebaseКЭmergeЙІФмЩЯБШНЯРрЫЦЃЌжЛЪЧrebaseВйзїКѓЃЌЬсНЛЛљБОЖМЛсдквЛЬѕЯпЩЯЃЌЖјmergeЛсДгвЛЬѕЯпКЯЕНЕНСэЭтвЛЬѕЯпЁЃ
MergeЃК
RebaseЃК
9.М№бЁ(Apply the changes introduced by some existing
commits) - git cherry-pickЁЁ
git cb
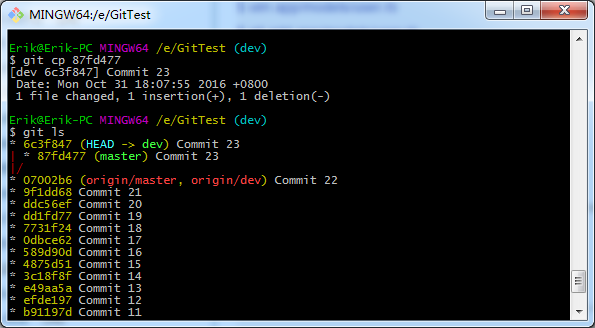
ДгЭМжаПДПДГіЃЌcherry-pickЪЧАбФГИіЬсНЛИДжЦЙ§РДзїЮЊвЛИіаТЕФЬсНЛЃЌКЭmergeЛђепrebaseЕФаЇЙћВЛЭЌЃЌcheck
pickКѓПЩвдНјааmergeЛђrebaseВйзїЃК

ЪЙгУBeyond CompareзїЮЊВювьБШНЯЙЄОп
УќСюааздДјЕФЮФМўВювьБШНЯЙЄОпЙІФмБШНЯМђЕЅЃЌгУРДВщПДЛђЖдБШЮФМўВювьЪБЃЌПЩФмаЇЙћВЛЬЋКУЃЌЬиБ№ЪЧдкНтОіГхЭЛЕФЪБКђЃЌЕЋЪЧЮвУЧПЩвдМЏГЩвЛаЉБШНЯЧПДѓЕФВювьБШНЯЙЄОпЃЌБШШчБОЮФЬсЕНЕФBeyond
CompareЁЃФЧУДЃЌЮвУЧЯШПДвЛЯТР§згЃК
здДјЕФВювьБШНЯаЇЙћЃК

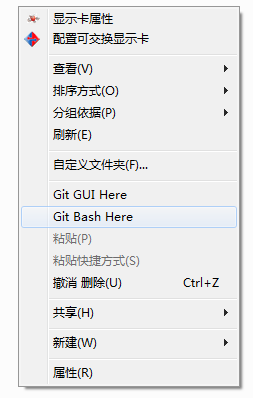
ЪЙгУdifftoolжИСюЕїгУBeyond CompareЕФБШНЯаЇЙћЃК

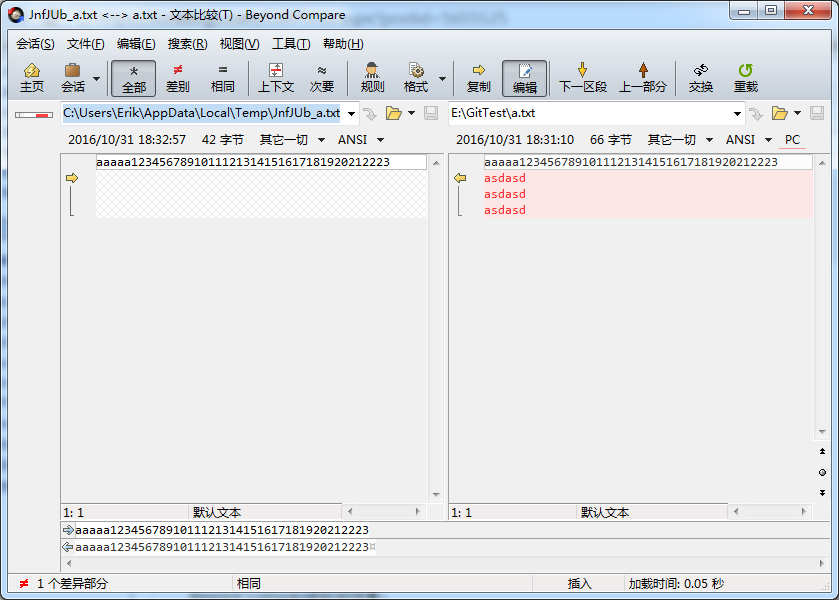
ЕБШЛdifftoolвВПЩвдЪЙгУжИСюБ№УћЃК

НтОіКЯВЂГхЭЛЃК
ЮвУЧдкdevЕФa.txtЮФМўжаЬэМгЁАdevЁБФкШнЃЌдкmasterЗжжЇЩЯЬэМгЁАmasterЁБФкШнЃЌШЛКѓгУmasterЗжжЇКЯВЂdevЁЃ

ЪЙгУmergetoolжИСюЕїгУBeyond CompareКЯВЂГхЭЛЃК

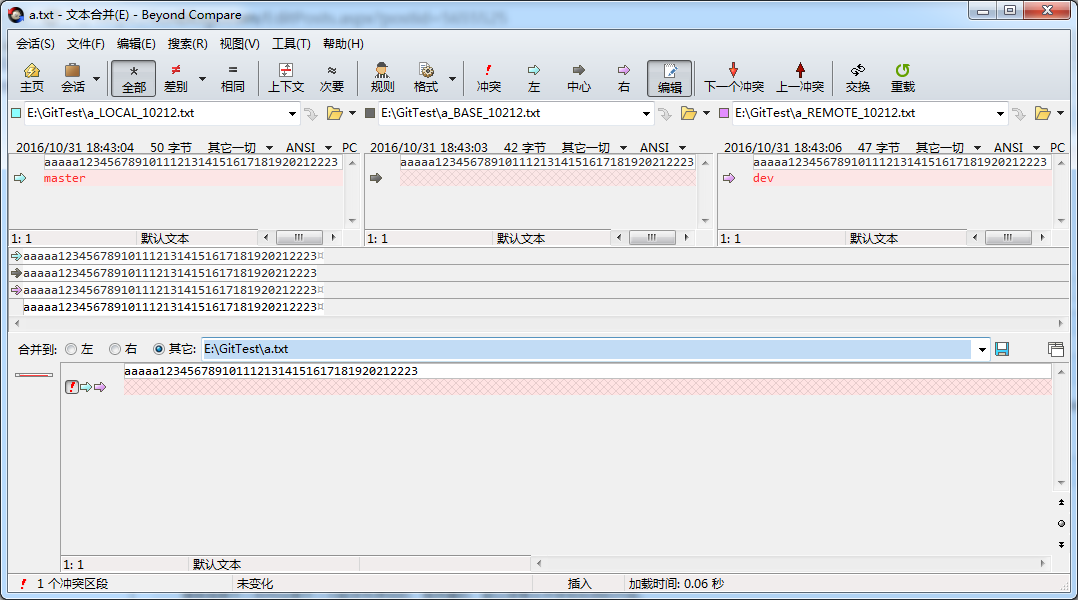
гЩЩЯЭМПЩвдПДГіЃЌзѓБпЪЧЕБЧАЗжжЇЕФАцБОЃЌгвБпЕФЪЧашвЊКЯВЂЕФЗжжЇЕФАцБОЃЌжаМфЕФЪЧЯрЭЌВПЗжЕФАцБОЃЌДІРэГхЭЛЕФВпТдДѓИХгавдЯТМИжжЃК
#1 ЕБЧАЗжжЇАцБОЬцЛЛКЯВЂЗжжЇАцБОЃЌЕуЛїТЬЩЋЕФМ§ЭЗЁЃ
#2 КЯВЂЗжжЇАцБОЬцЛЛЕБЧАЗжжЇАцБОЃЌЕуЛїЗлЩЋЕФМ§ЭЗЁЃ
#3 ЭЌЪБашвЊСНИіАцБОЕФФкШнЃЌЕуЛїТЬЩЋЛђЗлЩЋЕФМ§ЭЗЃЌШЛКѓАбСэЭтЕФЗжжЇЕФФкШнПНБДЕНЯТЗНЕФЮФБОБрМПђЁЃ
#4 жЛвЊЯрЭЌВПЗжЕФФкШнЃЌЪВУДЖМВЛИЩЁЃ
#5 ЦфЫћЁЃ
зюКѓЃЌЕуЛїКьЩЋЕФИаЬОКХЃЌБэЪОвбНтОіГхЭЛЁЃЮветРябЁдё#3ЕФВпТдЃК
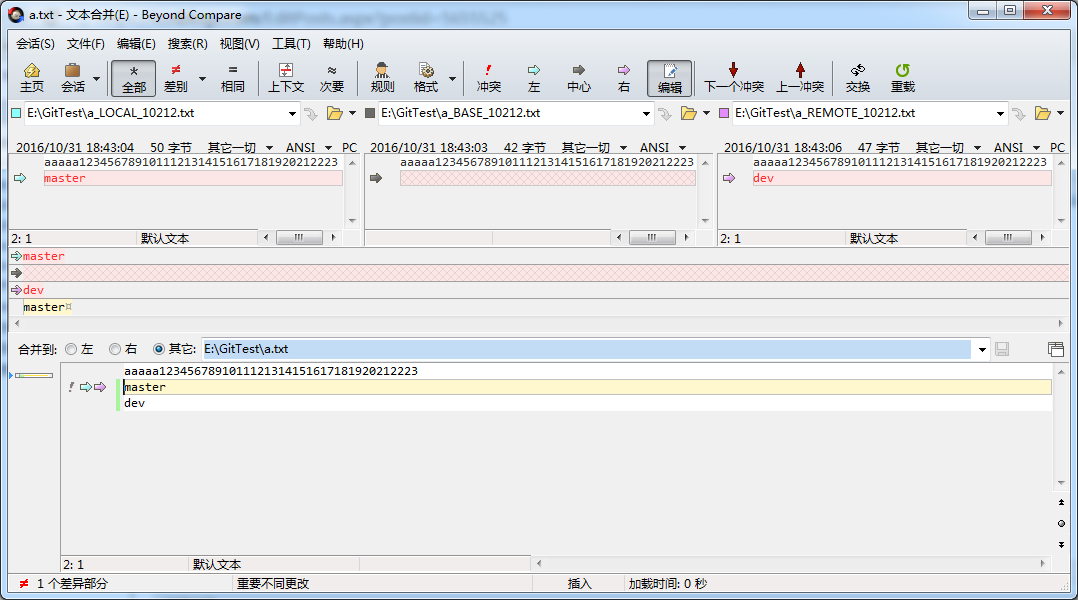
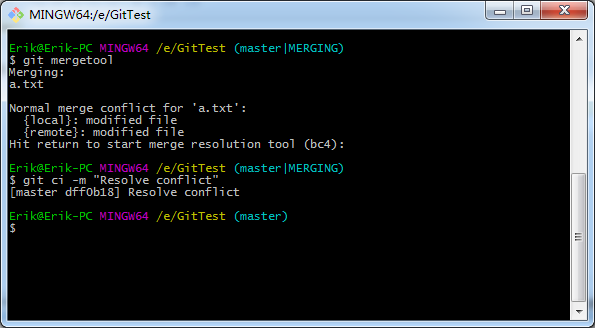
ЙиБеBeyond CompareЃЌЭъГЩКЯВЂВйзїЁЃ
ШчКЮХфжУ
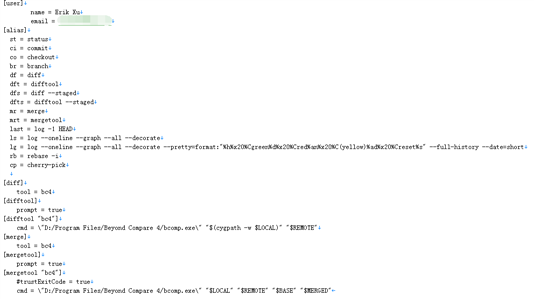
.gitconfigЪЧХфжУЕФжївЊЮФМўЃЌЫќвЛАудкC:\Users\{гУЛЇУћ}ФПТМжаЃЌШчЙћУЛгаЃЌПЩвдЭЈЙ§вдЯТСНВНДДНЈЃК
#1 ДђПЊУќСюааЙЄОп
#2 жДааЩшжУгУЛЇУћЛђепЩшжУгЪЯфЕФжИСюЁЃ
ЩшжУгУЛЇУћЃК
git config --global user.name "Ѓћyour usernameЃ§"
ЩшжУгЪЯфЃК
git config --global user.email "Ѓћyour emailЃ§"
ДђПЊ.gitconfigЮФМўЃЌАбвдЯТФкШнПНБДЕНЮФМўжаЃЌЭъГЩжИСюБ№УћЕФХфжУЃК
[alias]
st = status
ci = commit
co = checkout
br = branch
df = diff
dft = difftool
dfs = diff --staged
dfts = difftool --staged
mr = merge
mrt = mergetool
last = log -1 HEAD
ls = log --oneline --graph --all
--decorate
g = log --oneline --graph --all --decorate
--pretty= format :"%h%x20% Cgreen%d% x20% Cred%
an%x20% C(yellow)% ad%x20% Creset%s" --full-history
--date = short
rb = rebase -i
cp = cherry-pick
ДђПЊ.gitconfigЮФМўЃЌАбвдЯТФкШнПНБДЕНЮФМўжаЃЌЭъГЩBeyond CompareЕФХфжУЃК
[diff]
tool = bc4
[difftool]
prompt = true
[difftool "bc4"]
cmd = \"D: /Program Files /Beyond
Compare 4 /bcomp.exe\" "$ (cygpath -w $LOCAL)"
"$ REMOTE "
[merge]
tool = bc4
[mergetool]
prompt = true
[mergetool "bc4"]
#trustExitCode = true
cmd = \"D:/Program Files /Beyond
Compare 4 /bcomp.exe \" "$LOCAL" "$REMOTE"
"$BASE" "$ MERGED "
зюжеаЇЙћШчЭМЫљЪОЃК
зюКѓ
ЯЃЭћвдЩЯЗжЯэЕФаЁММЧЩПЩвдЬсИпДѓМвЕФаЇТЪЃЌДѓМввВПЩвдИљОнздМКЕФашвЊШЅЩшжУжИСюБ№УћЃЌЛЖгДѓМвЬжТлМАЗжЯэжИСюБ№УћЕФЪЙгУаФЕУЁЃ |