| 编辑推荐: |
本文主要介绍了如何通过 Services 对象暴露 Pod 中的服务。希望对你的学习有帮助。
本文来自于简书,由Linda编辑、推荐。 |
|
不同于只运行某个提供特定服务的单一 Pod,现在人们通常会以副本的形式部署多个
Pod 实例,以便工作负载能够均匀地分发到不同的集群节点上。
这也意味着同一个 Pod 的所有副本都提供相同的服务,且能够通过一个单一的地址访问。Kubernetes
中的 Services 对象就负责实现这部分功能。
Pods 间如何通信
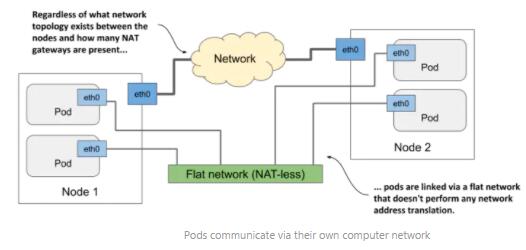
每个 Pod 都拥有自己的网络接口和 IP 地址。集群中的所有 Pod 通过一个私有的 Flat network
相互通信,该 Flat network 实际上是一个定义在实体网络之上的虚拟网络层。
Pod 中的容器可以通过这个虚拟网络层传输数据,无需进行 NAT 转换,就像是局域网中接入到同一个交换机上的计算机一样。
对于应用来说,Node 之间实际的网络拓扑是不重要的。
为什么需要 Service
如果某个 Pod 中的应用需要连接其他 Pod 中的另一个应用,则它需要知道目标 Pod 的访问地址,这是显而易见的。实际上实现起来要复杂的多:
Pods 是有生命周期的。一个 Pod 可以在任意时间被销毁和替代(IP 地址会变)
Pod 只有在分配给某个 Node 后才获取到 IP 地址,无法提前知道
在水平扩展中,多个 Pod 副本提供同样的服务,每个副本都有自己的 IP 地址。当另一个 Pod 访问所有这些副本时,就需要能够用一个单一的
IP 或 DNS 名称连接到负载均衡器,再通过负载均衡器在所有的副本间分担工作负载
Service 介绍
Kubernetes Service 对象可以为一系列提供同一服务的 Pod 集合,绑定一个单一、稳定的访问点。在
Service 的生命周期里,其 IP 地址稳定不变。客户端通过该 IP 地址创建网络连接,这些请求之后再被转发给后端提供服务的
Pod。
简单来说,Service 就是放置在 Pods 前面的负载均衡器。
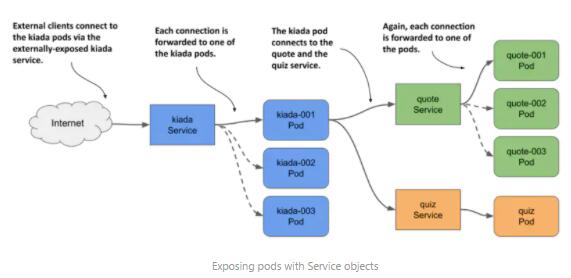
Pod 和 Service 如何组合在一起
Services 通过 label 和 label selector 机制找到对应的 Pods。
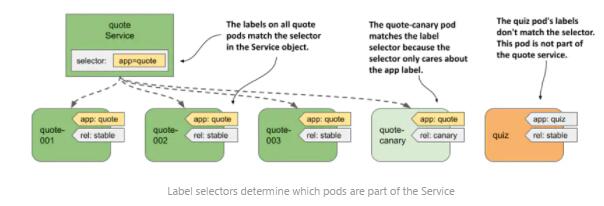
创建和更新 Service
PS:作者的示例代码可以从其 Github kubernetes-in-action-2nd-edition
处下载,Service 部分的代码位于 Chapter11。
在创建 Service 之前,可以先进入到 Chapter11 路径下,运行 kubectl apply
-f SETUP/ --recursive 命令,创建需要的 Pods。
$ kubectl get
po
NAME READY STATUS RESTARTS AGE
quiz 2/2 Running 0 33m
quote-001 2/2 Running 0 33m
quote-002 2/2 Running 0 33m
quote-003 2/2 Running 0 33m
quote-canary 2/2 Running 0 33m |
Kubernetes 支持如下几种 Service 类型:ClusterIP、NodePort、LoadBalancer
和 ExternalName。
ClusterIP 是默认的类型,仅用于集群内部通信。
通过 YAML 清单文件创建 Service
quote Service 最小版本的清单文件如下:
apiVersion:
v1
kind: Service
metadata:
name: quote
spec:
type: ClusterIP
selector:
app: quote
ports:
- name: http
port: 80
targetPort: 80
protocol: TCP |
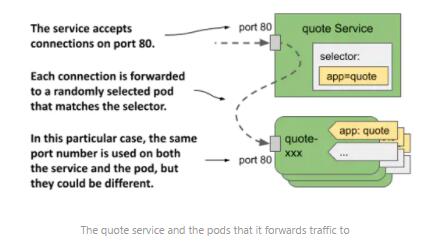
通过 kubectl expose 命令创建 Service
kubectl expose pod quiz --name quiz
获取 Services 列表
$ kubectl get
svc -o wide
NAME TYPE CLUSTER-IP EXTERNAL-IP PORT(S) AGE SELECTOR
quiz ClusterIP 10.106.164.155 <none> 8080/TCP
45s app=quiz,rel=stable
quote ClusterIP 10.102.134.27 <none> 80/TCP
62s app=quote |
修改 Service 的 label selector
kubectl set selector service quiz app=quiz
修改 Service 暴露的端口
可以运行 kubectl edit svc quiz 命令编辑清单文件,将 port 字段修改为 80,保存退出即可。
访问集群内部的 Services
前面创建的 ClusterIP 类型的 Service 只支持集群内部访问,可以 ssh 到任意一个
Node 或者 Pod 上来测试其连通性。
从 Pods 连接 Services
$ kubectl get
po
NAME READY STATUS RESTARTS AGE
quiz 2/2 Running 2 (26h ago) 27h
quote-001 2/2 Running 2 (26h ago) 27h
quote-002 2/2 Running 2 (26h ago) 27h
quote-003 2/2 Running 2 (26h ago) 27h
quote-canary 2/2 Running 2 (26h ago) 27h
$ kubectl get svc
NAME TYPE CLUSTER-IP EXTERNAL-IP PORT(S) AGE
quiz ClusterIP 10.106.164.155 <none> 80/TCP
26h
quote ClusterIP 10.102.134.27 <none> 80/TCP
26h
$ kubectl exec -it quote-001 -c nginx -- sh
/ # curl 10.106.164.155
This is the quiz service running in pod quiz
/ # curl 10.102.134.27
This is the quote service running in pod quote-002
on node minikube
/ # curl 10.102.134.27
This is the quote service running in pod quote-003
on node minikube
/ # curl 10.102.134.27
This is the quote service running in pod quote-002
on node minikube
/ # curl 10.102.134.27
This is the quote service running in pod quote-canary
on node minikube |
Services 的 DNS 解析
Kubernetes 有一个内部的 DNS 服务器组件,供集群中所有的 Pods 使用。允许通过 Service
的名称解析其 ClusterIP 地址。
/ # curl quiz
This is the quiz service running in pod quiz
/ # curl quote
This is the quote service running in pod quote-003
on node minikube
/ # curl quote
This is the quote service running in pod quote-canary
on node minikube
/ # curl quote
This is the quote service running in pod quote-003
on node minikube
/ # curl quote
This is the quote service running in pod quote-003
on node minikube |
在 Pod 中使用 Services
可以参考如下 YAML 清单文件:
apiVersion:
v1
kind: Pod
metadata:
name: kiada-003
labels:
app: kiada
rel: stable
spec:
containers:
- name: kiada
image: luksa/kiada:0.5
imagePullPolicy: Always
env:
- name: QUOTE_URL
value: http://quote/quote
- name: QUIZ_URL
value: http://quiz
ports:
- name: http
containerPort: 8080 |
完整的源代码参考 Chapter11 路径下的 kiada-stable-and-canary.yaml
文件。
运行 kubectl apply -f kiada-stable-and-canary.yaml 命令应用该清单文件。
所有容器成功运行后,运行 kubectl port-forward 命令启用本地端口转发:
$ kubectl port-forward
kiada-001 8080 8443
Forwarding from 127.0.0.1:8080 -> 8080
Forwarding from [::1]:8080 -> 8080
Forwarding from 127.0.0.1:8443 -> 8443
Forwarding from [::1]:8443 -> 8443 |
此时打开浏览器访问 http://localhost:8080 或 https://localhost:8443
即可进入应用页面:

向集群外部暴露服务
为了令某个 Service 能够被外部世界访问,可以采取如下几种措施:
为 Node 分配一个额外的 IP,并将其设置为 Service 的 externalIP
将 Service 的类型配置为 NodePort,通过 Node 端口访问该服务
创建 LoadBalancer 类型的 Service 对象
Ingress 对象
其中第一种方式会为 Service 对象的 spec.externalIPs 字段指定一个额外的 IP,这种方式并不常用。
更常见的方式是将 Service 类型设置为 NodePort。Kubernetes 会令该 Service
能够通过所有 Node 节点上的特定端口访问。通常还需要用户配置一个外部的负载均衡器负责将客户端流量转发到这些
Node 端口。
不同于 NodePort 一般需要手动配置负载均衡,Kubernetes 还支持自动完成类似搭建过程,只需要用户指定
Service 的类型为 LoadBalancer。但并不是所有环境下的集群都支持这样做,因为负载均衡的创建依赖特定的云服务供应商。
最后一种方式则是通过 Ingress 对象实现服务对外部的开放,其具体实现机制依赖于底层的 ingress
控制器。
NodePort Service

同 ClusterIP 类似,NodePort Service 支持通过内部的 cluster IP
访问。除此之外,它还可以通过任意一个 Node 的特定端口来访问。
最终由哪一个 Node 为客户端提供连接是不重要的,因为每一个 Node 都总是会将客户端请求转发给
Service 背后的任意 Pod,不管这个 Pod 是否运行在同一个 Node 上。
即 Node A 的端口接收到客户端请求,它可能会将该请求转发给 Node A 上运行的 Pod,也可能转发给
Node B 上运行的 Pod。
创建 NodePort Service
apiVersion:
v1
kind: Service
metadata:
name: kiada
spec:
type: NodePort
selector:
app: kiada
ports:
- name: http
port: 80
nodePort: 30080
targetPort: 8080
- name: https
port: 443
nodePort: 30443
targetPort: 8443 |
上面的清单文件中共有 6 个 port,可以参考如下截图理解各个 port 的不同含义: 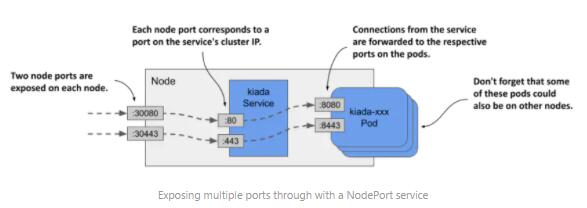
查看 NodePort Service
$ kubectl get
svc
NAME TYPE CLUSTER-IP EXTERNAL-IP PORT(S) AGE
kiada NodePort 10.103.96.75 <none> 80:30080/TCP,443:30443/TCP
6s
quiz ClusterIP 10.106.164.155 <none> 80/TCP
28h
quote ClusterIP 10.102.134.27 <none> 80/TCP
28h |
访问 NodePort Service
访问 NodePort Service 不仅仅需要知道端口号,还必须先获取到 Node 的 IP 地址。
可以使用 kubectl get nodes -o wide 命令查看 Node 的 IP 地址(INTERNAL-IP
和 EXTERNAL-IP)。
$ kubectl get
nodes -o wide
NAME STATUS ROLES AGE VERSION INTERNAL-IP EXTERNAL-IP
OS-IMAGE KERNEL-VERSION CONTAINER-RUNTIME
minikube Ready control-plane,master 144d v1.22.3
192.168.49.2 <none> Ubuntu 20.04.2 LTS 5.4.72-microsoft-standard-WSL2
docker://20.10.8 |
此时在集群内部,则可以使用以下几种 IP 端口组合来访问 Kiada 应用:
10.103.96.75:80:cluster IP 和内部端口
192.168.49.2:30080:Node IP 和 Node 端口
因为是 Minikube 单机模拟的集群环境,只有一个 Node 可以使用。
$ curl 192.168.49.2:30080
KUBERNETES IN ACTION DEMO APPLICATION v0.5
==== TIP OF THE MINUTE
You can use the `jq` tool to print out the value
of a pod’s `phase` field like this: `kubectl
get po kiada -o json | jq .status.phase`.
==== POP QUIZ
Which of the following statements is correct?
0) When the readiness probe fails, the container
is restarted.
1) When the liveness probe fails, the container
is restarted.
2) Containers without a readiness probe are
never restarted.
3) Containers without a liveness probe are never
restarted.
Submit your answer to /question/6/answers/<index
of answer> using the POST method. |
LoadBalancer Service
LoadBalancer 类型的 Service 实际上是 NodePort 类型的扩展。其基本配置如下:
apiVersion:
v1
kind: Service
metadata:
name: kiada
spec:
type: LoadBalancer
selector:
app: kiada
ports:
- name: http
port: 80
nodePort: 30080
targetPort: 8080
- name: https
port: 443
nodePort: 30443
targetPort: 8443 |
与前面 NodePort Service 的配置几乎完全一致,只是服务类型由 NodePort 改为了
LoadBalancer。

external traffic policy
任何通过 NodePort 的外部客户端连接,不管是直接访问 Node 端口还是通过 LoadBalancer
间接访问 Node 端口,客户端连接都有可能会被转发给另一个 Node 上的 Pod。即接收客户端连接的
Node 和执行任务的 Pod 所在的 Node 可能不是同一个。
在这种情况下,就意味着网络路径上多了一次跳转。
此外,在上述情况下,转发连接时还需要将 source IP 替换成一开始接收客户端连接的 Node
的 IP。这会导致 Pod 中运行的应用无法看到此网络连接的初始来源,即无法在其 access log
中记录真实的客户端地址。
Local external traffic policy 的优劣
为了解决上述问题,可以选择阻止 Node 将客户端连接转发给运行在其他 Node 上的 Pod。即访问
Node 的外部连接最终只会被同一个 Node 上的 Pod 接收到。具体方法是将 Service
对象 spec 字段下的 externalTrafficPolicy 字段改为 Local。
但上述配置同时会引发其他问题。
第一,如果接收到外部连接的 Node 上并没有 Pods 在运行,则该连接会卡住。因此必须确保负载均衡器只会将外部连接转发给有
Pod 运行的 Node,可以通过令负载均衡器持续检测 healthCheckNodePort 来实现。
第二,external traffic policy 设置为 Local 会导致 Pods 间的负载不够均衡。LoadBalancer
均匀地分发外部连接给 Nodes,Node 再将连接转发到自身运行的 Pods 上。但是每个 Node
实际上运行着不同数量的 Pods,不能跨 Node 转发就意味着,在每个 Node 接收等量连接的前提下,有些
Node 上的 Pods 较少,则这些 Pods 平均要承担的负载就更多。
externalTrafficPolicy 设置为 Cluster 与 Local 的区别可以参考下图:

|
