| БрМЭЦМі: |
БОЮФжївЊНщЩмLNMPМмЙЙИКдиОљКтЕФвЛаЉИХФюЃЌНтОіИпВЂЗЂЫМТЗЃЌвдМАЖдnginxЕФЯъЯИНщЩмЃЌЗўЮёДюНЈЃЌЯЃЭћЖдФњЕФбЇЯАгаЫљАяжњЁЃ
РДздгкcsdn,гЩЛ№СњЙћШэМўAliceБрМЁЂЭЦМіЁЃ |
|
вЛЁЂМИИіЛљБОИХФю
1ЁЂpv жЕ
pv жЕ(page views):вГУцЕФфЏРРСП
ИХФюЃКвЛИіЭјеОЕФЫљгавГУцЃЌдквЛЬьФкЃЌБЛфЏРРЕФзмДЮЪ§ЁЃ(ДѓаЭЭјеОЭЈГЃЪЧЩЯЧЇЭђЕФМЖБ№)
2ЁЂuvжЕ
uvжЕ(unique visitor)ЖРСЂЗУПЭ
ИХФюЃКвЛИіЭјеОЃЌдквЛЬьФкЕФгУЛЇЗУЮЪЪ§ЁЃ(ДѓаЭЭјеОЭЈГЃДя10ЭђвдЩЯ)
3ЁЂЖРСЂIP
ИХФюЃКвЛИіЭјеОЃЌдквЛЬьФкЃЌгаЖрЩйИіЖРСЂЕФipЕижЗРДЗУЮЪЁЃ
МјгквЛИіОжгђЭјЖдЭтЗУЮЪЪБЖМЪЧЙВгУЭЌвЛИіЙЋЭјIPЕФЃЌвђДЫUVжЕвЛАувЊТдДѓгкЖРСЂipжЕ
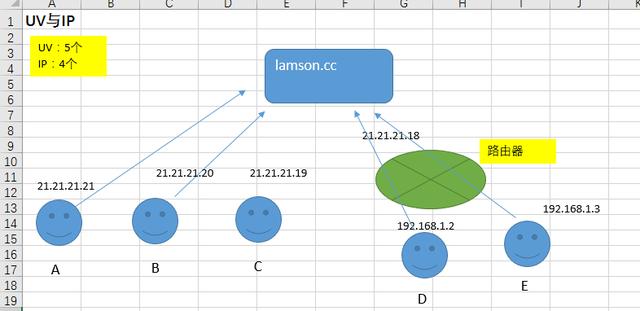
ПЩвдЭЈЙ§АЎеОЭј РДВщбЏетаЉВЮЪ§жЕ
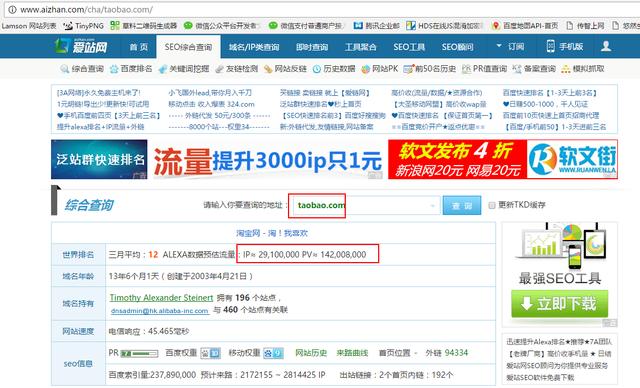
ЖўЁЂНтОіИпВЂЗЂЫМТЗ
ШчЙћвЛИіЭјеОЕФuv,pv,ЖРСЂipБфДѓЃЌдђЛсЕМжТИпЕФВЂЗЂЃЌетЪБвЊЖдЭјеОЗжВуВМОжМмЙЙЃЌВЩгУИКдиОљКтЁЃ
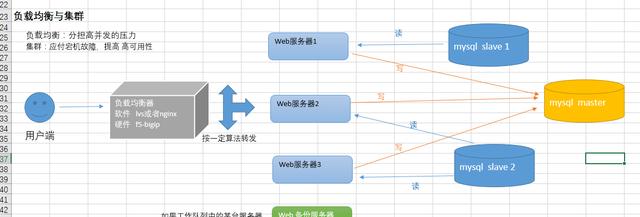
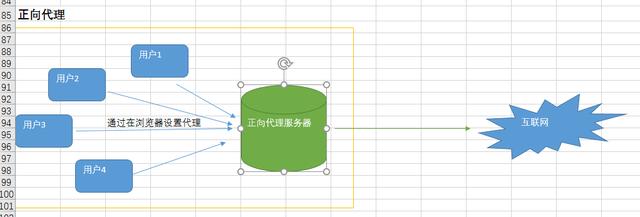
ИКдиОљКт
гВМўЃКСЂИЭМћгАЃЌаЇЙћЗЧГЃКУЃЌМлИёЗЧГЃАКЙѓЃЌБШШчF5-BIGIP
ШэМўЃКlvs(linux virtual server) ЃЌnginx(webЗўЮёЦїЃЌИКдиОљКт)
ИКдиОљКтЪЕЯжВпТд
ЃЈ1ЃЉТжбЏЃЌ
ИКдиОљКтЦїАбЧыЧѓТжСїзЊЗЂИјКѓУцЕФwebЗўЮёЦїЁЃ
ЃЈ2ЃЉipЙўЯЃЃЌ
ЭЌвЛИіЕижЗЕФПЭЛЇЖЫЃЌЪМжеЧыЧѓЭЌвЛЬЈжїЛњЁЃ
ЃЈ3ЃЉзюЩйСЌНг
ИКдиОљКтЦїАбЧыЧѓИјИКдизюаЁЕФФФЬЈЗўЮёЦїЁЃ
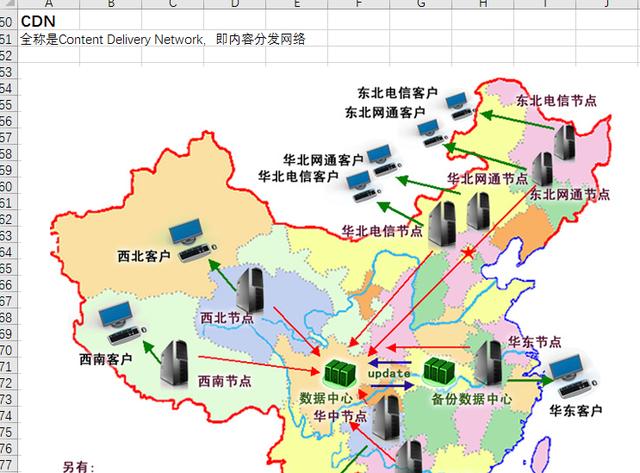
МмЙЙЭМШчЯТЃК
ШчЙћВЂЗЂЪ§МЬајдіДѓЃЌЛЙПЩвдНшжњCDNРДМмЙЙ
Ш§ЁЂnginxЕФНщЩм
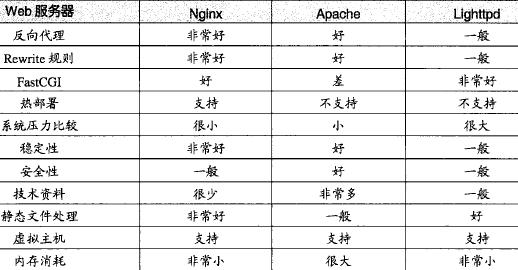
1ЁЂГЃгУwebЗўЮёЦї
apache:ЙІФмЭъЩЦЃЌРњЪЗгЦОУЃЌФЃПщжЇГжЗЧГЃЗсИЛЃЌЪєгкжиСПМЖВњЦЗЃЌБШНЯКФЗбФкДцЁЃ
ШБЕуЃКДІРэУПвЛИіphpБШНЯЗбзЪдДЃЌЕМжТШчЙћИпВЂЗЂЪБЛсКФЗбЗўЮёЦїзЪдДЮоЗЈДІРэИќЖрЧыЧѓЁЃ
lighttpdЃКФкДцПЊЯњЕЭЃЌcpuеМгУТЪЕЭЃЌаЇФмКУЃЌФЃПщЗсИЛЕШЬиЕуЃЌЧсСПМЖwebЗўЮёЦїЁЃ
nginx:ЪЁзЪдДЃЌЪЁcpuЃЌЫљвддкИпВЂЗЂЪБФмЙЛДІРэИќЖрЕФЧыЧѓЃЌИпЖЫФмДяЕН3ЭђЕН5ЭђЕФВЂЗЂСПЁЃ
IIS windowsздДјЕФwebЗўЮёЦїШэМў
NginxЕФСНДѓгІгУЃК
ЃЈ1ЃЉ httpЕФЗўЮёЦї
ЃЈ2ЃЉДњРэЗўЮёЦї
е§ЯђДњРэ
ЗДЯђДњРэ

2ЁЂбЁдёnginxРэгЩ
ЃЈ1ЃЉЫќПЩвдИпВЂЗЂСЌНгЃЌЙйЗНВтЪдФмЙЛжЇГХ5ЭђВЂЗЂСЌНгЃЌдкЪЕМЪЩњВњЛЗОГжаПЩвджЇГХ2ЕН4ЭђВЂЗЂСЌНгЁЃ
ЃЈ2ЃЉФкДцЯћКФЩй
Nginx+php(FastCGI)ЗўЮёЦїдк3ЭђВЂЗЂСЌНгЯТЃЌПЊЦєЕФ10ИіNginxНјГЬЯћКФ150MBФкДцЃЈ15MB*10=150MBЃЉПЊЦєЕФ64Иіphp-cgiНјГЬЯћКФ1280MBФкДцЃЈ20MB*64=1280MBЃЉ
ЃЈ3ЃЉГЩБОЕЭСЎ
ЙКТђF5 BIG-IP ,NetScalerЕШгВМўИКдиОљКтНЛЛЛЛњашвЊ10ЖрЭђЩѕжСМИЪЎЭђШЫУёБвЁЃЖјNginxЮЊПЊдДШэМўЃЌПЩвдУтЗбЪдгУЃЌВЂЧвПЩгУгкЩЬвЕгУЭОЁЃ

ЃЈ4ЃЉХфжУЮФМўЗЧГЃМђЕЅЃКЭЈЫзвзЖЎЃЌМДЪЙЗЧзЈвЕЙмРэдБвВФмПДЖЎЁЃ
ЃЈ5ЃЉжЇГж rewriteжиаДЙцдђЃКФмИљОнгђУћЁЂURLЕФВЛЭЌЃЌНЋHTTPЧыЧѓЗжЕНВЛЭЌЕФКѓЖЫЗўЮёЦїШКзщЁЃ
ЃЈ6ЃЉФкжУЕФНЁПЕМьВщЙІФмЃКШчЙћnginx proxyКѓЖЫЕФФГЬЈЗўЮёЦїхДЛњСЫЃЌВЛЛсгАЯьЧАЖЫЗУЮЪЁЃ
ЃЈ7ЃЉНкЪЁДјПэЃЌжЇГжgzipбЙЫѕЁЃ
ЃЈ8ЃЉЮШЖЈадИпЃКгУгкЗДЯђДњРэЃЌхДЛњЕФИХТЪЮЂКѕЦфЮЂЁЃ
ЃЈ9ЃЉжЇГжШШВПЪ№ЁЃдкВЛМфЖЯЗўЮёЕФЧщПіЯТЃЌЖдШэМўАцБОЩ§МЖЁЃ
nginxдкЗДЯђДњРэЃЌrewriteЙцдђЃЌЮШЖЈадЃЌОВЬЌЛЏЮФМўДІРэЃЌФкДцЯћКФЕШЗНУцЃЌБэЯжГіСЫКмЧПЕФгХЪЦЃЌбЁгУnginxШЁДњДЋЭГЕФapache
ЗўЮёЦїЃЌНЋЛсЛёЕУЖрЗНУцЕФадФмЬсЩ§ЁЃ
ЃЈ8ЃЉжЇГжЕФВйзїЯЕЭГ
FreeBSD 3.x,4.x,5.x,6.x i386; FreeBSD 5.x,6.x amd64;Linux
2.2,2.4,2.6 i386; Linux 2.6 amd64;Solaris 8 i386;
Solaris 9 i386 and sun4u; Solaris 10 i386;MacOS X
ЃЈ10.4ЃЉ PPC;
ЫФЁЂnginxЕФДюНЈ
1ЁЂАВзА
АВзАЧАзЂвтЃК
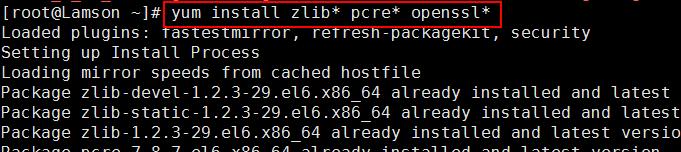
ФЃПщвРРЕадЃКNginxЕФвЛаЉФЃПщашвЊЦфЫћЕкШ§ЗНПтЕФжЇГжЃЌР§ШчgzipФЃПщашвЊzlib ПтЃЌrewriteФЃПщашвЊpcreПтЃЌsslЙІФмашвЊopensslПтЕШЁЃ
(1) ШЗБЃЕзВуПтЖМвбАВзА
дЫаа yum install zlib* pcre* openssl*
(2) ДДНЈвЛИігУЛЇКЭгУЛЇзщ
ДДНЈwwwзщгыwwwгУЛЇ ,РэТлЩЯРДНВгУЛЇгыгУЛЇзщЕФУћГЦЮоЫљЮНЃЌЕЋОЁСПвЊгавтвх
groupadd www
useradd -g www -s /usr/sbin/nologin www
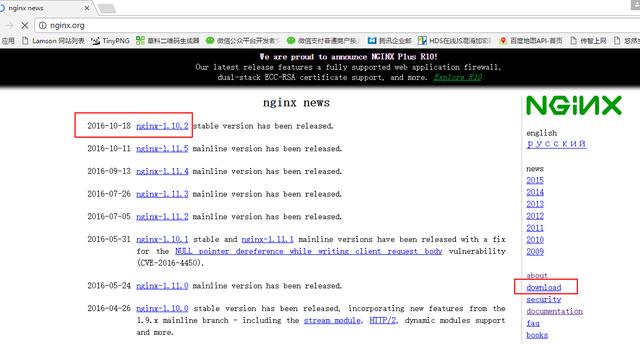
(3) БрвыАВзАnginx
ЕквЛВНЃКЯТдиnginx
wget

ЕкЖўВНЃКНтбЙВЂНјШыФПТМ
tar Ё.

Cd Ё

ЕкШ§ВНЃКХфжУ
ЯШВщПДconfigureЕФХфжУЯюЃЌВЂБЃДцГЩвЛИіАяжњЮФЕЕ

НЋГЃгУЕФХфжУЯюБЃДцГЩвЛИіАВзАНХБОЮФМў
Vim nginx_install.sh
ФкШнШчЯТЃК
./configure --prefix=/usr/local/nginx --user=www
--group=www --with-http_ssl_module --with-http_flv_module
--with-http_stub_status_module --with-http_gzip_static_module
--with-http_realip_module --with-http_image_filter_module
--with-pcre --http-client-body-temp-path=/usr/local/nginx/tmp/client_body_temp
--http-fastcgi-temp-path=/usr/local/nginx/tmp/fastcgi_temp
--http-proxy-temp-path=/usr/local/nginx/tmp/proxy_temp
--http-uwsgi-temp-path=/usr/local/nginx/tmp/uwsgi_temp
--http-scgi-temp-path=/usr/local/nginx/tmp/scgi_temp
ИјshЮФМўМгЩЯПЩжДааЕФШЈЯо

ШЛКѓжДаа
ЕкЫФВНЃКБрвыАВзА
make && make install
2ЁЂЙмРэ
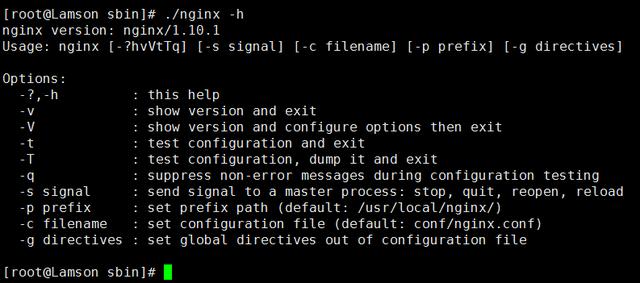
ЃЈ1ЃЉВщПДАяжњЮФЕЕ
Cd /usr/local/nginx/sbin
./nginx -h
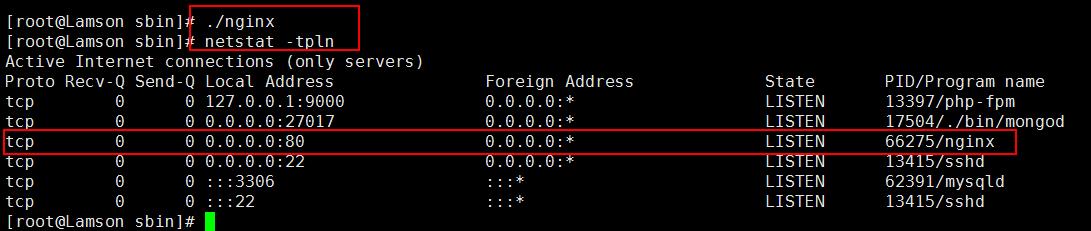
ЃЈ2ЃЉЦєЖЏnginx
жБНгжДааАВзАФПТМЯТЕФsbinФПТМЯТЕФnginx
ЃЈ3ЃЉЙиБеnginx
ПЩвджДаа nginx -s stop Лђеп жДаа pkill nginx

ЃЈ4ЃЉШШЦєЖЏ
ПЩвджДаа nginx -s reload ЃЈЧАЬсЪЧnginxвбОдкдЫаажаЃЉ

РЉеЙЃКШчЙћЯыгУservice ЗўЮёУћ бЁЯюРДжиЦєЛђЭЃжЙnginxЃЌПЩвдАДвдЯТВНжшВйзїЃК
жЊЪЖЕуЃКservice ЗўЮёУћ ФмВйзїГЩЙІЕФЧАЬсЪЧ /etc/rc.d/init.dФПТМЯТвЊгагыЗўЮёУћЭЌУћЕФПЩжДааЮФМў

ЫљвдЮвУЧПЩвддкетИіФПТМЯТаТНЈnginxЮФМў
vim /etc/rc.d/init.d/nginx |
ФкШнЃК
#!/bin/sh
# chkconfig: - 85 15
# description: nginx is a World Wide Web server.
It is used to serve
start() {
echo 'Starting Nginx ...'
/usr/local/nginx/sbin/nginx > /dev/null
2>&1 &
}
stop() {
echo 'Stoping Nginx ...'
/usr/local/nginx/sbin/nginx -s stop > /dev/null
2>&1 &
}
reload() {
echo 'Reloading Nginx ...'
/usr/local/nginx/sbin/nginx -s reload
}
if [ $# -ne 1 ]
then
echo 'please input one params like start|restart|stop|reload'
exit 1
fi
case "$1" in
'start')
start
;;
'stop')
stop
;;
'restart')
stop
sleep 2
start
;;
'reload')
reload
;;
'*')
echo 'please input one params like start|restart|stop|reload'
;;
esac |
МЧЕУИјетИіЮФМўЬэМгПЩжДааШЈЯо
| chmod +x /etc/rc.d/init.d/nginx |
МгШыЕНПЊЛњздЦєЖЏЃК
chkconfig
--add nginx
chkconfig --level 345 nginx on |
ЮхЁЂащФтжїЛњХфжУ
1ЁЂХфжУЮФМўНщЩм
NginxЕФХфжУЮФМўЮЛгкАВзАФПТМЯТЕФconfФПТМЯТ
ПЩвдгУвдЯТУќСюВщПДЗЧзЂЪЭВПЗжЕФФкШн
egrep -v '#|^$' nginx.conf
-v ДњБэШЁЗДЃЈШЅЕєЦЅХфЕНЕФФкШнЃЉ
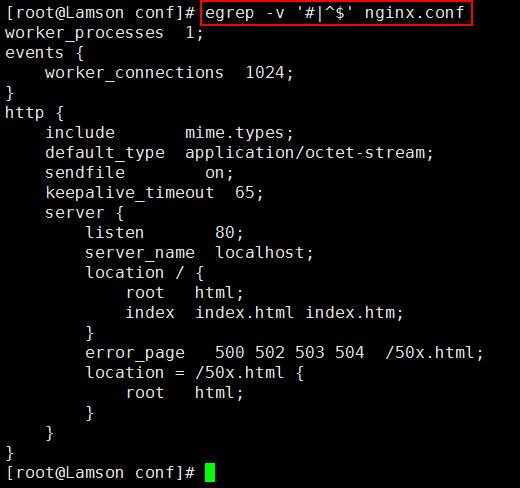
дкХфжУЮФМўжаЃЌhttpЖЮРяУцЕФserverЖЮЪЧХфжУащФтжїЛњЪЙгУЕФЁЃШчЙћЯывЊХфжУЖрИіащФтжїЛњЃЌдђОЭдкhttpЖЮРяУцДДНЈЖрИі
serverЖЮМДПЩЁЃ
зЂвтХфжУЮФМўжаЃЌУПвЛаавЊЪЙгУЗжКХНсЪјЃЌжИСюгы{жЎМфгаПеИёЁЃ
Listen КѓУцПЩвдЪЧЖЫПкКХЃЌвВПЩвдЪЧIP:ЖЫПкКХ
Server_name КѓУцПЩвдЪЧгђУћЃЌЖрИігђУћжЎМфПеИёИєПЊЃЌвВПЩвдЪЧIPЕижЗ
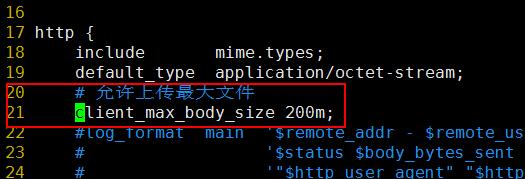
дк http{}ДњТыЖЮРяЬэМг client_max_body_size 200m; вджЇГж php
ЩЯДЋДѓЮФМўЁЃЃЈЧыИљОнздМКЯюФПашЧѓРДЖЈжЕЃЉ
СљЁЂБрвы phpгыnginxећКЯ
1ЁЂБрвыАВзАphp
(1) ЕквЛВНЃКАВзАPHP
1) ЯТдиphp
shell># cd ~
shell># wget
2) НтбЙВЂНјШыФПТМ
shell># tar zxf php-5.6.24.tar.gz
shell># cd php-5.6.24
3) НЋconfigureВЮЪ§МАЯъЧщНтЮіСэДцЮЊвЛИіЮФМўЃЌвдЙЉбЇЯАВЮПМгУЃК
shell># ./configure --help > php_configure.txt
4) БраДвЛИіИЈжњshellЮФМўЃЌАяЮвУЧХфжУphp
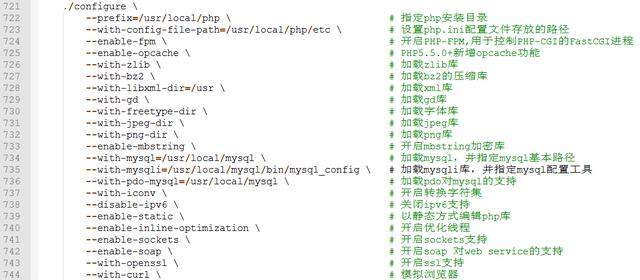
shell># vim php_install.sh
ЮЊСЫБмУтаДДэЃЌНЈвщДѓМвжБНгИДжЦвдЯТФкШнЃЈЖМаДдквЛааЩЯЃЌВЛвЊЛЛааЃЉЃК
./configure --prefix=/usr/local/php --with-config-file-path=/usr/local/php/etc
--enable-fpm --enable-opcache --with-zlib-dir --with-bz2
--with-libxml-dir=/usr --with-gd --with-freetype-dir
--with-jpeg-dir --with-png-dir --enable-mbstring --with-mysql=/usr/local/mysql
--with-mysqli=/usr/local/mysql/bin/mysql_config --with-pdo-mysql=/usr/local/mysql
--with-iconv --disable-ipv6 --enable-static --enable-inline-optimization
--enable-sockets --enable-soap --with-openssl --with-curl
вдЩЯФкШнЕФНтЪЭШчЭМ
АбИеИеЕФshellЮФМўМгЩЯПЩжДааШЈЯоЃК
shell># chmod +x ./php_install.sh
5) жДааshellЮФМўНјааШэМўЕФХфжУКЭЛЗОГМьВт
shell># ./php_install.sh
6) БрвыШэМўВЂЧвНјааАВзА
shell># make && make install
(2) ЕкЖўВНЃКХфжУ
1) ИДжЦХфжУЮФМў
shell># cp php.ini-production /usr/local/php/etc/php.ini
shell># cp sapi/fpm/init.d.php-fpm /etc/rc.d/init.d/php-fpm
ИГгшЦфПЩжДааШЈЯо
shell># chmod +x /etc/rc.d/init.d/php-fpm
ПНБДВњЩњphp-fpmЕФХфжУЮФМў
shell># cd /usr/local/php/etc
shell># cp php-fpm.conf.default php-fpm.conf
2) ХфжУphp.ini
shell># vim php.ini
· евЕН;date.timezone = аоИФЮЊ date.timezone
= Asia/Shanghai
· ИљОнздМКЕФашЧѓЕїећвдЯТбЁЯюЕФжЕ
error_reporting = E_ALL & ~E_NOTICE & ~E_STRICT
& ~E_DEPRECATED
display_errors = On
max_execution_time = 60
max_input_time = 60
memory_limit = 256M
post_max_size = 256M
upload_max_filesize = 256M
3) ХфжУphp-fpm.conf
shell># vim php-fpm.conf
· евЕНuser = nobody КЭ group = nobodyЃЌНЋnobodyИФГЩwww
· евЕНlisten.owner=nobodyКЭlisten.group=
nobodyЃЌНЋnobodyИФГЩwww
4) НЋphp-fpmМгШыЗўЮёВЂздЖЏЦєЖЏ
shell># service php-fpm start
shell># chkconfig --add php-fpm
shell># chkconfig --level 345 php-fpm on
2ЁЂХфжУnginxжЇГжphp
ЕквЛВНЃКдкnginx.confжаевЕНlocation ~ .php$
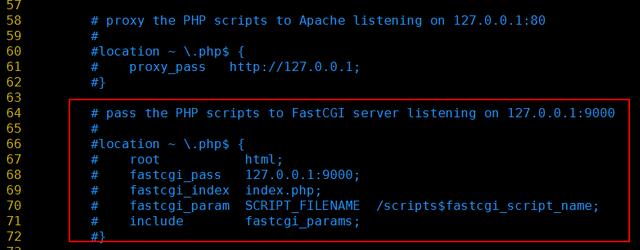
ИДжЦВЂШЅЕєзЂЪЭЃЌНЋrootИФГЩФуЕФащФтжїЛњЕФТЗОЖ
БЃДцВЂжидиХфжУЮФМўЃЌ
shell># /usr/local/nginx/sbin/nginx -s reload
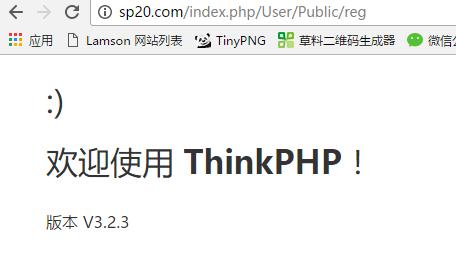
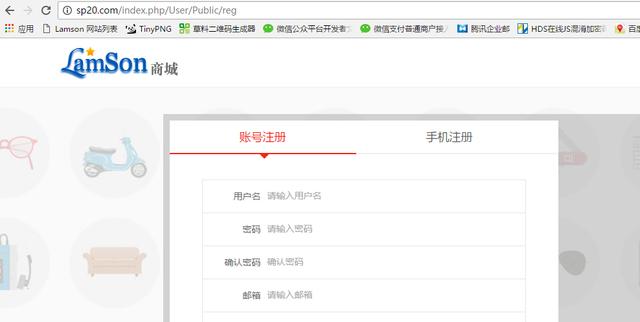
дкhtmlФПТМЯТаТНЈвЛИіPHPЮФМўЃЌДњТыШчЯТЃК
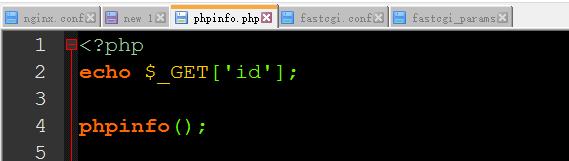
дкфЏРРЦїЪфШыphpвГУцЕФЭјжЗЃЌПЩвдЗЂЯжВЂВЛФмЗУЮЪ

двђЪЧЙйЗНИјЕФФЌШЯХфжУЮФМўжаЃЌ
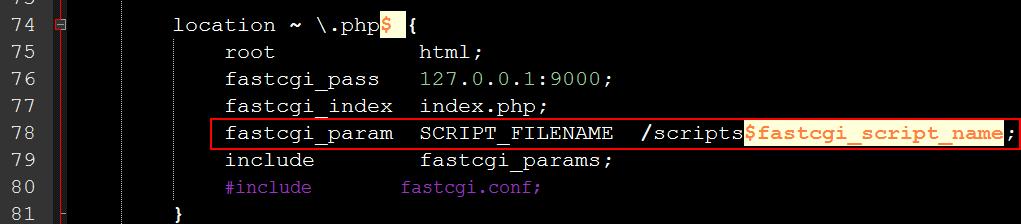
вЊЧѓвЊАбphpЮФМўЗХЕН/scriptsФПТМЯТЁЃЦфЪЕетИівЊЧѓЮвУЧВЛвЛЖЈвЊзёДгЁЃ
ИФНјЕФЗНАИШчЯТЃК

БЃДцВЂжиди
ОЭПЩвдШУnginxжЇГжЗУЮЪРрЫЦhttp://www.a.com/index.phpвдМАhttp://www.a.com/index.php?id=5етбљЕФвГУцСЫЁЃ
3ЁЂгХЛЏnginxХфжУЮФМў
ЕкЖўВНЃКгХЛЏ
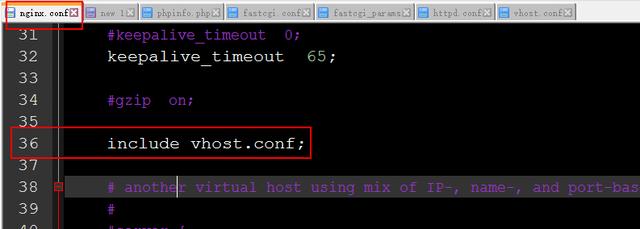
ШчЙћАбЫљгаЕФserverДњТыЖЮЖМЗХдкnginx.confРяУцЕФЛАЃЌЛсШУnginx.confЯдЕУгжгЗжзгжТвЁЃНЈвщАбЫќУЧЗжРыШЅЁЃ
Р§ШчЃЌжБНгАбЫљгаЕФserverДњТыЖЮЖММєЧаЕН/usr/local/nginx/conf/vhost.confРяУц
ШЛКѓдкnginx.confРяУцЛЛГЩ
include vhost.conf

ащФтжїЛњЕФДњТыЖМвЦЕНСЫvhost.confРяУцСЫ
жСДЫЃЌnginx.confвбОКмгХЛЏСЫЃЌЮвУЧдйРДгХЛЏvhost.conf
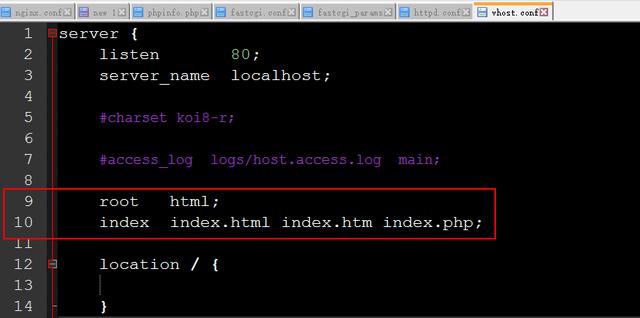
ЕкШ§ВНЃКгХЛЏvhost.conf
НЋrootгяОфКЭ indexгяОфЖМЬсШЁЕНlocationЭтУц
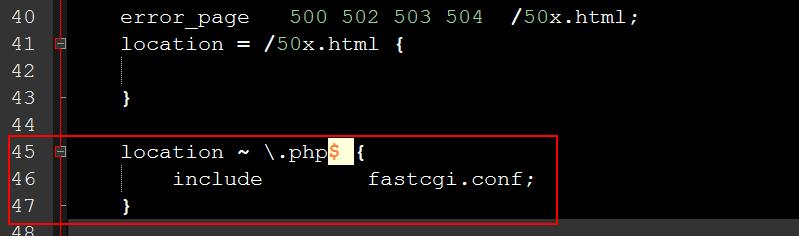
ЕкЫФВНЃКдйвЛДЮгХЛЏvhost.conf
fastcgi_pass 127.0.0.1:9000;
fastcgi_index index.php;
етСНИігяОфЖММєЧаЕНfastcgi.confРяУцШЅ
жЛСєЯТinclude fastcgi.conf;
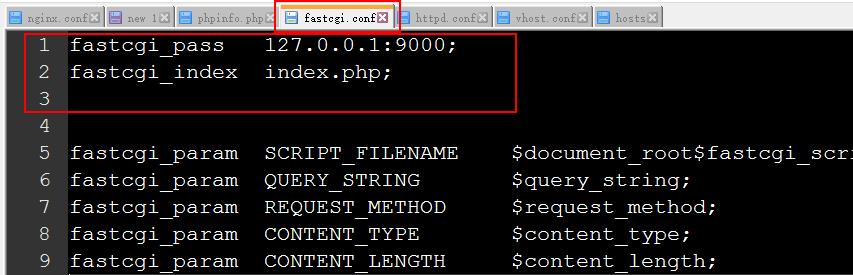
fastcgi.confЮФМўжааТдіСЫвдЯТСНОфЃК

жСДЫЃЌnginxвбОжЇГжЗУЮЪphpвГУцЃЌВЂЧвnginx.confКЭvhost.confвбОКмгХЛЏСЫЁЃ
жЛЪЧЛЙЮоЗЈжЇГжЯёthinkphpЕФpathinfoаЮЪНЕФЗУЮЪ
http://www.a.com/index.php/Admin/public/login
4ЁЂгыThinkPHPећКЯ
ЕквЛВНЃКНЋvhost.confЕФlocation ~ .php$ { ЕФ$ШЅЕє
ПЩвдЗЂЯжФмжЇГжpathinfoЕФЗУЮЪЗНЪНЃЌЕЋЪЧЮоЗЈЪЖБ№ГіФЃПщЁЂПижЦЦїКЭЗНЗЈ
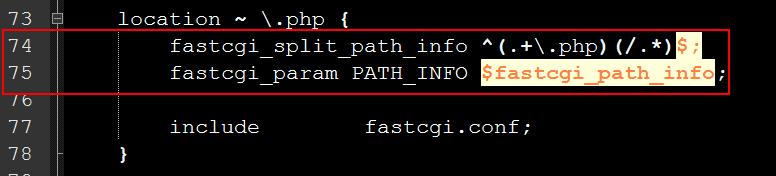
ШЛКѓНЋlocationДњТыЖЮаДГЩ
location ~
.php {
fastcgi_split_path_info ^(.+.php)(/.*)$;
fastcgi_param PATH_INFO $fastcgi_path_info;
include fastcgi.conf; |
БЃДцВЂжидиnginx
ОЭПЩвджЇГжthinkphpЕФpathinfoаЮЪНЕФЗУЮЪ
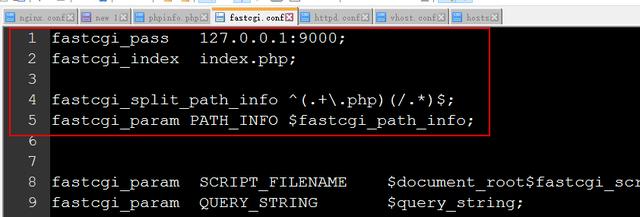
ЕкЖўВНЃКгХЛЏvhost.conf
НЋетСНОф
fastcgi_split_path_info ^(.+.php)(/.*)$;
fastcgi_param PATH_INFO $fastcgi_path_info;
ЖММєЧаЕН fastcgi.confРяУцЃЌжЛСєЯТinclude fastcgi.conf; гяОфМДПЩ
ЕкШ§ВНЃКПЊЦєЮБОВЬЌЙІФм
дкserverРяУцЕФlocation / { ДњТыЖЮРяЃЌаДЩЯ
try_files $uri /index.php$uri;
БЃДцВЂжидиnginx
ОЭПЩвджЇГжthinkphpЕФrewriteЗУЮЪ
http://www.a.com/Admin/public/login
ЦпЁЂИКдиОљКт
1ЁЂИКдиОљКтдРэЭМ
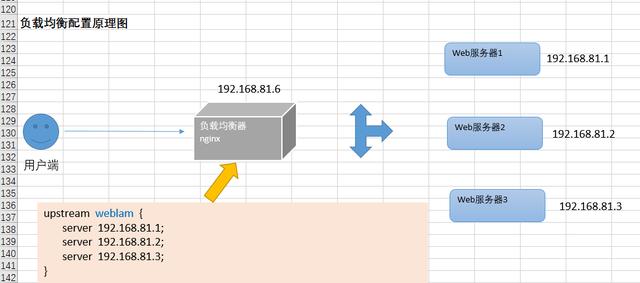
2ЁЂЪЕЯжвЛИіМђЕЅЕФИКдиОљКт
ЗўЮёЦїСаБэ
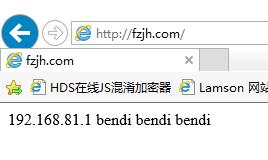
БОЛњ 192.168.81.1
VM 192.168.81.6
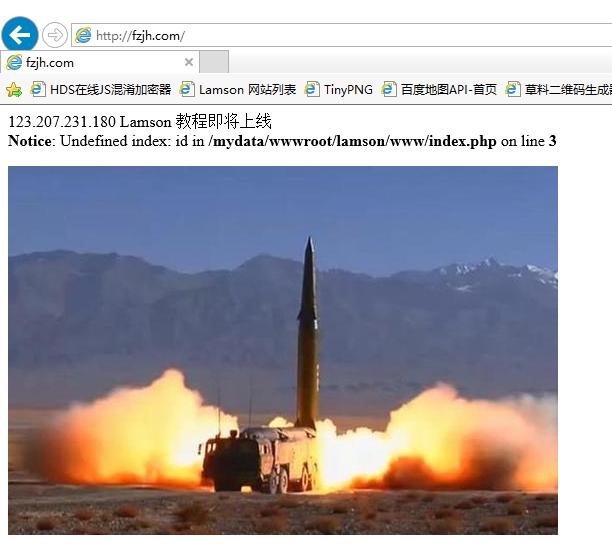
ЬкбЖдЦ 123.207.231.180
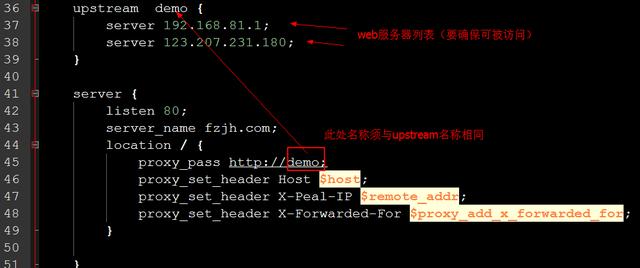
ИКдиОљКтЦїЕФХфжУ
upstream demo
{
server 192.168.81.1;
server 123.207.231.180;
}
server {
listen 80;
server_name fzjh.com;
location / {
proxy_pass http://demo;
proxy_set_header Host $host;
proxy_set_header X-Peal-IP $remote_addr;
proxy_set_header X-Forwarded-For $proxy_add_x_forwarded_for; |
ВЂЧввЊШЗБЃ fzjh.comвЊНтЮіЕНИКдиОљКтЦїЕФIPЕижЗ

БЃДцХфжУЮФМўЃЌВЂЧвжиди
ЗУЮЪаЇЙћЃК
|