| 编辑推荐: |
| 本文来自于lrwinx.github.io,本篇文章以websocket的原理和落地为核心,来叙述websocket的使用,以及相关应用场景。 |
|
websocket概述
http与websocket
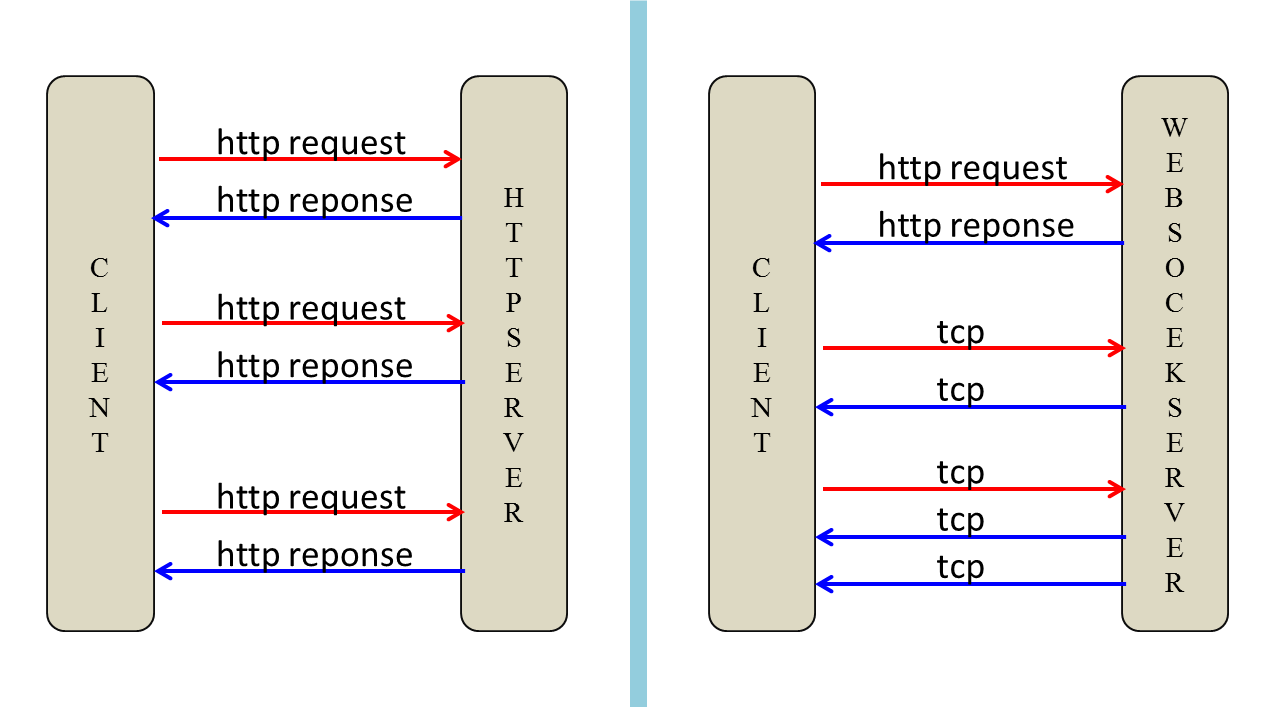
如我们所了解,http连接为一次请求一次响应(request->response),必须为同步调用方式。
而websocket为一次连接以后,会建立tcp连接,后续客户端与服务器交互为全双工方式的交互方式,客户端可以发送消息到服务端,服务端也可将消息发送给客户端。

http,websocket
此图来源于Websocket协议的学习、调研和实现,如有侵权问题,告知后,删除。
根据上图,我们大致可以了解到http与websocket之间的区别和不同。
为什么要使用websocket
那么了解http与websocket之间的不同以后,我们为什么要使用websocket呢? 他的应用场景是什么呢?
我找到了一个比较符合websocket使用场景的描述
“The best fit for WebSocket is in
web applications where the client and server need
to exchange events at high frequency and with low
latency.”
翻译: 在客户端与服务器端交互的web应用中,websocket最适合在高频率低延迟的场景下,进行事件的交换和处理
此段来源于spring websocket的官方文档
了解以上知识后,我举出几个比较常见的场景:
游戏中的数据传输
股票K线图数据
客服系统
根据如上所述,各个系统都来使用websocket不是更好吗?
其实并不是,websocket建立连接之后,后边交互都由tcp协议进行交互,故开发的复杂度会较高。当然websocket通讯,本身要考虑的事情要比HTTP协议的通讯考虑的更多.
所以如果不是有特殊要求(即 应用不是”高频率低延迟”的要求),需要优先考虑HTTP协议是否可以满足。
比如新闻系统,新闻的数据晚上10分钟-30分钟,是可以接受的,那么就可以采用HTTP的方式进行轮询(polling)操作调用REST接口。
当然有时我们建立了websocket通讯,并且希望通过HTTP提供的REST接口推送给某客户端,此时需要考虑REST接口接受数据传送给websocket中,进行广播式的通讯方式。
至此,我已经讲述了三种交互方式的使用场景:
websocket独立使用场景
HTTP独立使用场景
HTTP中转websocket使用场景
相关技术概念
websocket
websocket为一次HTTP握手后,后续通讯为tcp协议的通讯方式。
当然,和HTTP一样,websocket也有一些约定的通讯方式,http通讯方式为http开头的方式,e.g.
http://xxx.com/path ,websocket通讯方式则为ws开头的方式,e.g. ws://xxx.com/path
SSL:
HTTP: https://xxx.com/path
WEBSOCKET: wss://xxx.com/path

websocket通讯
此图来源于WebSocket 教程,如有侵权问题,告知后,删除。
SockJS
正如我们所知,websocket协议虽然已经被制定,当时还有很多版本的浏览器或浏览器厂商还没有支持的很好。
所以,SockJS,可以理解为是websocket的一个备选方案。
那它如何规定备选方案的呢?
它大概支持这样几个方案:
Websockets
Streaming
Polling
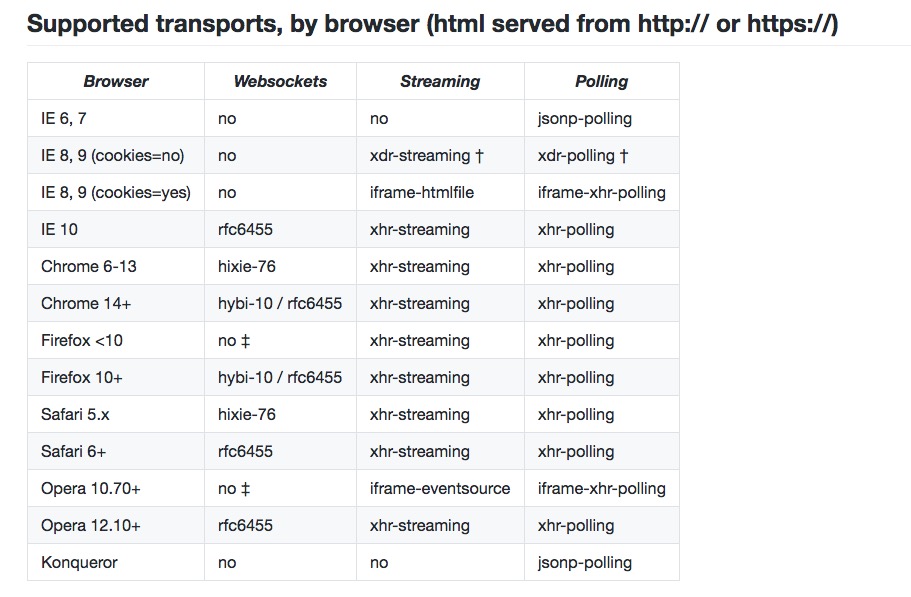
当然,开启并使用SockJS后,它会优先选用websocket协议作为传输协议,如果浏览器不支持websocket协议,则会在其他方案中,选择一个较好的协议进行通讯。
看一下目前浏览器的支持情况:

Supported transports,
by browser
此图来源于github: sockjs-client
所以,如果使用SockJS进行通讯,它将在使用上保持一致,底层由它自己去选择相应的协议。
可以认为SockJS是websocket通讯层上的上层协议。
底层对于开发者来说是透明的。
STOMP
STOMP 中文为: 面向消息的简单文本协议
websocket定义了两种传输信息类型: 文本信息 和 二进制信息 ( text and binary
).
类型虽然被确定,但是他们的传输体是没有规定的。
当然你可以自己来写传输体,来规定传输内容。(当然,这样的复杂度是很高的)
所以,需要用一种简单的文本传输类型来规定传输内容,它可以作为通讯中的文本传输协议,即交互中的高级协议来定义交互信息。
STOMP本身可以支持流类型的网络传输协议: websocket协议和tcp协议
它的格式为:
COMMAND
header1:value1
header2:value2
Body^@
SUBSCRIBE
id:sub-1
destination:/topic/price.stock.*
^@
SEND
destination:/queue/trade
content-type:application/json
content-length:44
{"action":"BUY","ticker":"MMM","shares",44}^@ |
当然STOMP已经应用于很多消息代理中,作为一个传输协议的规定,如:RabbitMQ, ActiveMQ
我们皆可以用STOMP和这类MQ进行消息交互.
除了STOMP相关的代理外,实际上还提供了一个stomp.js,用于浏览器客户端使用STOMP消息协议传输的js库。
让我们很方便的使用stomp.js进行与STOMP协议相关的代理进行交互.
正如我们所知,如果websocket内容传输信息使用STOMP来进行交互,websocket也很好的于消息代理器进行交互(如:RabbitMQ,
ActiveMQ)
这样就很好的提供了消息代理的集成方案。
总结,使用STOMP的优点如下:
不需要自建一套自定义的消息格式
现有stomp.js客户端(浏览器中使用)可以直接使用
能路由信息到指定消息地点
可以直接使用成熟的STOMP代理进行广播 如:RabbitMQ, ActiveMQ
技术落地
后端技术方案选型
websocket服务端选型:spring websocket
支持SockJS,开启SockJS后,可应对不同浏览器的通讯支持
支持STOMP传输协议,可无缝对接STOMP协议下的消息代理器(如:RabbitMQ, ActiveMQ)
前端技术方案选型
前端选型: stomp.js,sockjs.js
后端开启SOMP和SockJS支持后,前对应有对应的js库进行支持.
所以选用此两个库.
总结
上述所用技术,是这样的逻辑:
开启socktJS:
如果有浏览器不支持websocket协议,可以在其他两种协议中进行选择,但是对于应用层来讲,使用起来是一样的。
这是为了支持浏览器不支持websocket协议的一种备选方案
使用STOMP:
使用STOMP进行交互,前端可以使用stomp.js类库进行交互,消息一STOMP协议格式进行传输,这样就规定了消息传输格式。
消息进入后端以后,可以将消息与实现STOMP格式的代理器进行整合。
这是为了消息统一管理,进行机器扩容时,可进行负载均衡部署
使用spring websocket:
使用spring websocket,是因为他提供了STOMP的传输自协议的同时,还提供了StockJS的支持。
当然,除此之外,spring websocket还提供了权限整合的功能,还有自带天生与spring家族等相关框架进行无缝整合。
应用场景
应用背景
2016年,在公司与同事一起讨论和开发了公司内部的客服系统,由于前端技能的不足,很多通讯方面的问题,无法亲自调试前端来解决问题。
因为公司技术架构体系以前后端分离为主,故前端无法协助后端调试,后端无法协助前端调试
在加上websocket为公司刚启用的协议,了解的人不多,导致前后端调试问题重重。
一年后的今天,我打算将前端重温,自己来调试一下前后端,来发掘一下之前联调的问题.
当然,前端,我只是考虑stomp.js和sockt.js的使用。
代码阶段设计
角色
客服
客户
登录用户状态
上线
下线
分配策略
用户登陆后,应该根据用户角色进行分配
关系保存策略
应该提供关系型保存策略: 考虑内存式策略(可用于测试),redis式策略
备注:优先应该考虑实现Inmemory策略,用于测试,让关系保存策略与存储平台无关
通讯层设计
归类topic的广播设计(通讯方式:1-n)
归类queue的单点设计(通讯方式:1-1)
代码实现
角色
import org.springframework.security .core.GrantedAuthority;
import org.springframework.security .core.authority.SimpleGrantedAuthority;
import org.springframework .security.core.userdetails.User;
import java.util.Collection;
public enum Role {
CUSTOMER_SERVICE,
CUSTOMER;
public static boolean isCustomer (User user)
{
Collection< GrantedAuthority> authorities
= user.getAuthorities();
SimpleGrantedAuthority customerGrantedAuthority
= new SimpleGrantedAuthority ("ROLE_"
+ Role.CUSTOMER.name());
return authorities.contains (customerGrantedAuthority);
}
public static boolean isCustomerService(User
user) {
Collection<GrantedAuthority> authorities
= user.getAuthorities();
SimpleGrantedAuthority customerServiceGrantedAuthority
= new SimpleGrantedAuthority ("ROLE_"
+ Role.CUSTOMER_SERVICE.name());
return authorities.contains (customerServiceGrantedAuthority);
}
} |
代码中User对象,为安全对象,即 spring中org.springframework.
security.core.userdetails.User,为UserDetails的实现类。
User对象中,保存了用户授权后的很多基础权限信息,和用户信息。
如下:
public interface
UserDetails extends Serializable {
Collection<? extends GrantedAuthority> getAuthorities();
String getPassword();
String getUsername();
boolean isAccountNonExpired();
boolean isAccountNonLocked();
boolean isCredentialsNonExpired();
boolean isEnabled();
} |
方法 #isCustomer 和 #isCustomerService 用来判断用户当前是否是顾客或者是客服。
登录用户状态
| public interface
StatesManager {
enum StatesManagerEnum{
ON_LINE,
OFF_LINE
}
void changeState (User user , StatesManagerEnum
statesManagerEnum);
StatesManagerEnum currentState(User user);
} |
设计登录状态时,应存在登录状态管理相关的状态管理器,此管理器只负责更改用户状态和获取用户状态相关操作。
并不涉及其他关联逻辑,这样的代码划分,更有助于面向接口编程的扩展性
分配策略
public interface
DistributionUsers {
void distribution(User user);
} |
分配角色接口设计,只关注传入的用户,并不关注此用户是客服或者用户,具体需要如何去做,由具体的分配策略来决定。
关系保存策略
| public interface
RelationHandler {
void saveRelation(User customerService,User
customer);
List<User> listCustomers (User customerService);
void deleteRelation (User customerService,User
customer);
void saveCustomerService (User customerService);
List<User> listCustomerService();
User getCustomerService(User customer);
boolean exist(User user);
User availableNextCustomerService();
} |
关系保存策略,亦是只关注关系保存相关,并不在乎于保存到哪个存储介质中。
实现类由Inmemory还是redis还是mysql,它并不专注。
但是,此处需要注意,对于这种关系保存策略,开发测试时,并不涉及高可用,可将Inmemory先做出来用于测试。
开发功能同时,相关同事再来开发其他介质存储的策略,性能测试以及UAT相关测试时,应切换为此介质存储的策略再进行测试。
用户综合管理
对于不同功能的实现策略,由各个功能自己来实现,在使用上,我们仅仅根据接口编程即可。
所以,要将上述所有功能封装成一个工具类进行使用,这就是所谓的 设计模式: 门面模式
@Component
public class UserManagerFacade {
@Autowired
private DistributionUsers distributionUsers;
@Autowired
private StatesManager statesManager;
@Autowired
private RelationHandler relationHandler;
public void login(User user) {
if (roleSemanticsMistiness(user)) {
throw new SessionAuthenticationException ("角色语义不清晰");
}
distributionUsers.distribution(user);
statesManager.changeState (user, StatesManager .StatesManagerEnum.ON_LINE);
}
private boolean roleSemanticsMistiness(User
user) {
Collection<GrantedAuthority> authorities
= user.getAuthorities();
SimpleGrantedAuthority customerGrantedAuthority
= new SimpleGrantedAuthority ("ROLE_" +Role.CUSTOMER.name());
SimpleGrantedAuthority customerServiceGrantedAuthority
= new SimpleGrantedAuthority ("ROLE_" +Role.CUSTOMER_SERVICE.name());
if (authorities.contains(customerGrantedAuthority)
&& authorities.contains(customerServiceGrantedAuthority))
{
return true;
}
return false;
}
public void logout(User user){
statesManager.changeState (user, StatesManager .StatesManagerEnum.OFF_LINE);
}
public User getCustomerService(User user){
return relationHandler.getCustomerService(user);
}
public List<User> listCustomers(User
user){
return relationHandler.listCustomers(user);
}
public StatesManager .StatesManagerEnum getStates(User
user){
return statesManager.currentState(user);
}
} |
UserManagerFacade 中注入三个相关的功能接口:
@Autowired
private DistributionUsers distributionUsers;
@Autowired
private StatesManager statesManager;
@Autowired
private RelationHandler relationHandler; |
可提供:
登录(#login)
登出(#logout)
获取对应客服(#getCustomerService)
获取对应用户列表(#listCustomers)
当前用户登录状态(#getStates)
这样的设计,可保证对于用户关系的管理都由UserManagerFacade来决定
其他内部的操作类,对于使用者来说,并不关心,对开发来讲,不同功能的策略都是透明的。
通讯层设计 - 登录,授权
spring websocket虽然并没有要求connect时,必须授权,因为连接以后,会分发给客户端websocket的session
id,来区分客户端的不同。
但是对于大多数应用来讲,登录授权以后,进行websocket连接是最合理的,我们可以进行权限的分配,和权限相关的管理。
我模拟例子中,使用的是spring security的Inmemory的相关配置:
| public class
WebSecurityConfig extends WebSecurityConfigurerAdapter
{
@Override
protected void configure (AuthenticationManagerBuilder
auth) throws Exception {
auth.inMemoryAuthentication() .withUser("admin").password
("admin").roles (Role.CUSTOMER_SERVICE.name());
auth.inMemoryAuthentication() .withUser("admin1").password
("admin").roles (Role.CUSTOMER_SERVICE.name());
auth.inMemoryAuthentication() .withUser("user").password
("user").roles(Role.CUSTOMER.name());
auth.inMemoryAuthentication() .withUser("user1").password
("user").roles(Role.CUSTOMER.name());
auth.inMemoryAuthentication() .withUser("user2").password
("user").roles(Role.CUSTOMER.name());
auth.inMemoryAuthentication() .withUser("user3").password
("user").roles(Role.CUSTOMER.name());
}
@Override
protected void configure (HttpSecurity http)
throws Exception {
http.csrf().disable()
.formLogin()
.and()
.authorizeRequests()
.anyRequest()
.authenticated();
}
} |
相对较为简单,创建2个客户,4个普通用户。
当认证管理器认证后,会将认证后的合法认证安全对象user(即 认证后的token)放入STOMP的header中.
此例中,认证管理认证之后,认证的token为org.springframework
.security.authentication .UsernamePasswordAuthenticationToken,
此token认证后,将放入websocket的header中。(即 后边会谈到的安全对象 java.security.Principal)
通讯层设计 - websocket配置
@Order(Ordered.HIGHEST_PRECEDENCE
+ 99)
@Configuration
@EnableWebSocketMessageBroker
public class WebSocketConfig extends AbstractWebSocketMessageBroker Configurer
{
@Override
public void registerStompEndpoints(StompEndpointRegistry
registry) {
registry.addEndpoint("/portfolio").withSockJS();
}
@Override
public void configureMessageBroker (MessageBrokerRegistry
config) {
config.setApplicationDestinationPrefixes("/app");
config.enableSimpleBroker("/topic",
"/queue");
}
} |
此配置中,有几点需进行讲解:
其中端点”portfolio”,用于socktJs进行websocket连接时使用,只用于建立连接。
“/topic”, “/queue”,则为STOMP的语义约束,topic语义为1-n(广播机制),queue语义为1-1(单点机制)
“app”,此为应用级别的映射终点前缀,这样说有些晦涩,一会看一下示例将会清晰很多。
通讯层设计 - 创建连接
用于连接spring websocket的端点为portfolio,它可用于连接,看一下具体实现:
<script src= "http://cdn.bootcss.com/sockjs-client/1.1.1/sockjs.min.js"></script>
<script src= "http://cdn.bootcss.com/stomp.js/2.3.3/stomp.js"></script>
<script src= "http://cdn.bootcss.com/jquery/3.1.1/jquery.min.js"></script>
var socket = new SockJS("/portfolio");
stompClient = Stomp.over(socket);
stompClient.connect({}, function(frame) {
showGreeting("登录用户: " + frame.headers["user-name"]);
}); |
这样便建立了连接。 后续的其他操作就可以通过stompClient句柄进行使用了。
通讯层设计 - spring websocket消息模型
见模型图:

message-flow-simple-broker
此图来源spring-websocket官方文档
可以看出对于同一定于目标都为:/topic/broadcast,它的发送渠道为两种:/app/broadcast和/topic/broadcast
如果为/topic/broadcast,直接可将消息体发送给定于目标(/topic/broadcast)。
如果是/app/broadcast,它将消息对应在MessageHandler方法中进行处理,处理后的结果发放到broker
channel中,最后再讲消息体发送给目标(/topic/broadcast)
当然,这里边所说的app前缀就是刚才我们在websocket配置中的前缀.
看一个例子:
前端订阅:
stompClient.subscribe
('/topic/broadcast', function(greeting){
showGreeting(greeting.body);
}); |
后端服务:
@Controller
public class ChatWebSocket extends AbstractWebSocket{
@MessageMapping("broadcast")
public String broadcast (@Payload @Validated Message
message, Principal principal) {
return "发送人: " + principal.getName()
+ " 内容: " + message.toString();
}
}
@Data
public class Message {
@NotNull(message = "标题不能为空")
private String title;
private String content;
} |
前端发送:
function sendBroadcast()
{
stompClient.send ("/app/broadcast",{},JSON.stringify({'content':'message
content'}));
} |
这种发送将消息发送给后端带有@MessageMapping注解的方法,然后组合完数据以后,在推送给订阅/topic/broadcast的前端
function sendBroadcast()
{
stompClient.send ("/topic/broadcast",{},JSON.stringify({'content':'message
content'}));
} |
这种发送直接将消息发送给订阅/topic/broadcast的前端,并不通过注解方法进行流转。
我相信上述这个理解已经解释清楚了spring websocket的消息模型图
通讯层设计 - @MessageMapping
带有这个注解的@Controller下的方法,正是对应websocket中的中转数据的处理方法。
那么这个注解下的方法究竟可以获取哪些数据,其中有什么原理呢?

方法说明
我大概说一下:
Message,@Payload,@Header,@Headers
,MessageHeaders, MessageHeaderAccessor, SimpMessageHeaderAccessor,StompHeaderAccessor
以上这些都是获取消息头,消息体,或整个消息的基本对象模型。
@DestinationVariable
这个注解用于动态监听路径,很想rest中的@PathVariable:
e.g.:
@MessageMapping("/queue/chat/{uid}")
public void chat (@Payload @Validated Message
message, @DestinationVariable("uid")
String uid, Principal principal) {
String msg = "发送人: " + principal.getName()
+ " chat ";
simpMessagingTemplate .convertAndSendToUser (uid,"/queue/chat",msg);
} |
java.security.Principal
这个对象我需要重点说一下。
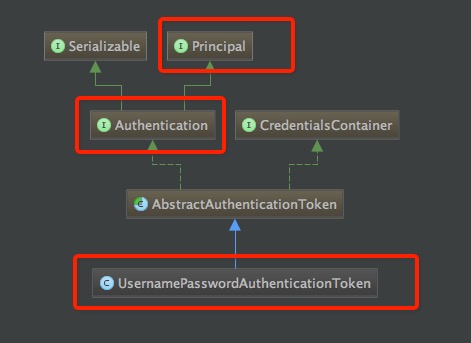
他则是spring security认证之后,产生的Token对象,即本例中的UsernamePasswordAuthenticationToken.

UsernamePasswordAuthenticationToken类图
不难发现UsernamePasswordAuthenticationToken是Principal的一个实现.
可以将Principal直接转成授权后的token,进行操作:
| UsernamePasswordAuthenticationToken
user = (UsernamePasswordAuthenticationToken) principal; |
正如前边设计章节所说,整个用户设计都是对org.springframework.security.core.userdetails.User进行操作,那如何拿到User对象呢。
很简单,如下:
UsernamePasswordAuthenticationToken
user = (UsernamePasswordAuthenticationToken) principal;
User user = (User) user.getPrincipal() |
通讯层设计 - 1-1 && 1-n
1-n topic:
此方式,上述消息模型章节已经讲过,此处不再赘述
1-1 queue:
客服-用户沟通为1-1用户交互的案例
前端:
stompClient.subscribe
('/user/queue/chat',function(greeting){
showGreeting(greeting.body);
}); |
后端:
@MessageMapping("/queue/chat/{uid}")
public void chat (@Payload @Validated Message message,
@DestinationVariable ("uid") String uid,
Principal principal) {
String msg = "发送人: " + principal.getName()
+ " chat ";
simpMessagingTemplate. convertAndSendToUser (uid,"/queue/chat",msg);
}; |
发送端:
function chat(uid)
{
stompClient.send ("/app/queue/chat/" +uid, {},JSON.stringify ({'title': 'hello','content' :'message
content'}));
} |
上述的转化,看上去没有topic那样1-n的广播要流畅,因为代码中采用约定的方式进行开发,当然这是由spring约定的。
约定转化的处理器为UserDestinationMessageHandler。
大概的语义逻辑如下:
“An application can send messages targeting a specific
user, and Spring’s STOMP support recognizes destinations
prefixed with “/user/“ for this purpose. For example,
a client might subscribe to the destination “/user/queue/position-updates”.
This destination will be handled by the UserDestinationMessageHandler
and transformed into a destination unique to the user
session, e.g. “/queue/position-updates-user123”. This
provides the convenience of subscribing to a generically
named destination while at the same time ensuring
no collisions with other users subscribing to the
same destination so that each user can receive unique
stock position updates.”
大致的意思是说:如果是客户端订阅了/user/queue/position-updates,
将由UserDestinationMessageHandler转化为一个基于用户会话的订阅地址,比如/queue/position-updates-user123,然后可以进行通讯。
例子中,我们可以把uid当成用户的会话,因为用户1-1通讯是通过spring security授权的,所以我们可以把会话当做授权后的token.
如登录用户token为: UsernamePassword AuthenticationToken newToken
= new UsernamePassword AuthenticationToken (“admin”,”user”);
且这个token是合法的,那么/user/queue/chat订阅则为/queue/chat-admin
发送时,如果通过/user/admin/queue/chat,则不通过@MessageMapping直接进行推送。
如果通过/app/queue/chat/admin,则将消息由@MessageMapping注解处理,最终发送给/user/admin/queue/chat终点
追踪代码simpMessaging Templat e.convertAndSendToUser:
@Override
public void convertAndSendToUser(String user,
String destination, Object payload, Map<String,
Object> headers,
MessagePostProcessor postProcessor) throws MessagingException
{
Assert.notNull(user, "User must not be
null");
user = StringUtils.replace (user, "/",
"%2F");
super.convertAndSend (this.destinationPrefix
+ user + destination, payload, headers, postProcessor);
} |
说明最后的路径依然是/user/admin/queue/chat终点.
通讯层设计 - @SubscribeMapping
@SubscribeMapping注解可以完成订阅即返回的功能。
这个很像HTTP的request-response,但不同的是HTTP的请求和响应是同步的,每次请求必须得到响应。
而@SubscribeMapping则是异步的。意思是说:当订阅时,直到回应可响应时在进行处理。
通讯层设计 - 异常处理
@MessageMapping是支持jsr 303校验的,它支持@Validated注解,可抛出错误异常,如下:
@MessageMapping ("broadcast")
public String broadcast (@Payload @Validated Message
message, Principal principal) {
return "发送人: " + principal.getName()
+ " 内容: " + message.toString();
} |
那异常如何处理呢
@MessageExceptionHandler,它可以进行消息层的异常处理
@MessageExceptionHandler
@SendToUser (value = "/queue/error",broadcast
= false)
public String handleException (MethodArgumentNotValidException
methodArgumentNotValidException) {
BindingResult bindingResult = methodArgumentNotValidException
.getBindingResult();
if (!bindingResult.hasErrors()) {
return "未知错误";
}
List<FieldError> allErrors = bindingResult.getFieldErrors();
return "jsr 303 错误: " + allErrors.iterator().next() .getDefaultMessage();
} |
其中@SendToUser,是指只将消息发送给当前用户,当然,当前用户需要订阅/user/queue/error地址。
注解中broadcast,则表明消息不进行多会话的传播(有可能一个用户登录3个浏览器,有三个会话),如果此broadcast=false,则只传给当前会话,不进行其他会话传播
总结
本文从websocket的原理和协议,以及内容相关协议等不同维度进行了详细介绍。
最终以一个应用场景为例,从项目的结构设计,以及代码策略设计,设计模式等不同方面展示了websocket的通讯功能在项目中的使用。
如何实现某一功能其实并不重要,重要的是得了解理论,深入理论之后,再进行开发。
|