| 相信做过后台管理界面的同学,都非常清楚这个布局。最直观的方式是框架这个我不想多写费话,因为我们的重心不在这里。如果有不了解的同学可以百度、google。这里我不得不吐下槽!!
百度实在让我这个“粉丝”失望。就目前情况来说,百度已经完全轮为“有钱人排行榜”!再也不顾及用户的搜索需求了,因为主导地位实在是:不可撼动!
不相信的同学,可以亲身对比下B vs G的搜索结果。别告诉我google如何强大!!
很久以前,百度的搜索结果更符合目标,因为他更了解中国人的习惯,这是不可争议,现在情况已经完全相反!
虽然google经常是六脉神剑,但我更欣赏它的搜索结果。吐槽打住!!!
下面说下要求:
1 头部固定高度,宽度100%自适应父容器;
2 底部固定高度,宽度100%自适应父容器;
3 中间是主体部分,自动填满,浏览器可视区域剩余部分,内容超出则中间部分出现流动条;
4 整个内容填满浏览器可视区域,并且不超出此区域!
先看下效果图:

相信,做过两年前端的同学,拿到这个需求,都有一个感觉——这挺简单的!
是的,本来就挺简单!
方法一:position:absolute定位,不设高,并改变"包含块"的尺寸渲染
从我脑海崩出来的第一个念头就是定位布局——position
而我也是这么做的,因为要固定头尾,所以,至少头和尾要用到position定位。因为浏览器大小是可以调节的,而且不同尺寸,不同分辨率的浏览器可视区域的高度是不固定的,
这就决定是中间主体部分的高度不固定。所以真正的问题核心也正在此。解决了这个问题,整个布局也就解决了一多半。
上代码,相信这也是符合大部分思路的实现方式:
<!DOCTYPE HTML>
<html>
<head>
<meta charset="gb2312">
<title>头尾固定中间高度

自适应布局</title>
<style>
html, body {
    height:100%;
    margin:0;
    padding:0
}
#dHead {
    height:100px;
    line-height:100px;
    background:#690;
    width:100%;


position:absolute;
    z-index:5;
    top:0;
    text-align:center;
}
#dBody {


background:#FC0;
    width:100%;
    overflow:auto;
    top:100px;
    position:absolute;


z-index:10;
    bottom:100px;
}
.mycontent {
    padding:20px;
}
#dFoot {
    height:100px;


line-height:100px;
    background:#690;
    width:100%;
    position:absolute;
    z-

index:200;
    bottom:0;
    text-align:center;
}
</style>
</head>

<body>
<div

id="dHead">固定头部100px;</div>
<div id="dBody">
  <div class="mycontent"> 中间自

适应部分<br>
    中间自适应部分<br>
    中间自适应部分<br>
    中间自适应部分

<br>
    中间自适应部分<br>
    中间自适应部分<br>
    中间自适应部分<br>
    中间自适应部分<br>
    中间自适应部分<br>
    中间自适应部分<br>
    中间自适应部分

<br>
    中间自适应部分<br>
    中间自适应部分<br>
    中间自适应部分<br>
    中间自适应部分<br>
    中间自适应部分<br>
    中间自适应部分<br>
    中间自适应部分

<br>
    中间自适应部分<br>
    中间自适应部分<br>
    中间自适应部分<br>
    中间自适应部分<br>
    中间自适应部分<br>
    中间自适应部分<br>
    中间自适应部分

<br>
    中间自适应部分<br>
    中间自适应部分<br>
  </div>
</div>
<div

id="dFoot">固定尾部100px</div>
</body>
</html> |

结果也如上图所示,预期已经达到。经测试:IE7+、firefox、chrome、safari、opera均通过测试!
这里有点要特别说明的地方:当容器被position:absolute或者float:left
or right的时候,在没有设定宽度的情况下窗口的表现为紧贴内容;
<!DOCTYPE HTML>
<html>
<head>
<meta charset="gb2312">
<title>无标题文档</title>
<style>
*{padding:0;margin:0}
</style>
</head>

<body>
<div style="height:200px;position:absolute; background:#FF9900;">内容测试</div>
</body>
</html> |
看下效果图:

但是如果在position:absolute下,同时设定left和right或者同时设定top和bottom的话。宽度和高会被拉伸到指定位置,需要说明的这就是宽度或者高度缺省时position:absolute
or fixed 情况下,浏览器对容器的尺寸解析方式。
需要说明的是,对于一个浮动元素,如果不设定宽度,同样采用“包含块”的渲染方式,宽度取决于内容的宽度。但是,如果这个浮动元素内部有一个右浮动的子元素,宽度会扩展到父容器的宽度。这个就不给出具体的例子了,自己可以下去测试。另外可以表现为“包含块的”还有display:inline-block
当然,IE 如果display inline 如果 has a layout 同样会表现出“包含块”渲染。这里就不深入探讨了。
下面对于position:absolute or fixed 定位的“包含块”,做一个渲染测试。
<!DOCTYPE HTML>
<html>
<head>
<meta charset="gb2312">
<title>无标题文档

</title>
<style>
*{padding:0;margin:0}
</style>
</head>

<body>
<div

style="height:200px;position:absolute; background:#FF9900;left:0;right:0">内容测试

</div>
</body>
</html> |
下面效果图:

但这里我要郑重宣布:IE6除外!经测试:经测试:IE7+、firefox、chrome、safari、opera均遵从此解析模式!IE怪异模式下是不遵从这个原则的。
如果不准备兼容IE6,相信已经可以到此为止了,我不想批评IE6。因为它在整个浏览发展历程中是个代表,也是个经典。没有一款浏览能在如此长的时间在市场上占据如此高的地位。
这当然也得益于它的与xp捆绑推广策略。但是,就近年web的发展趋势来看,IE6已经成为一个负担。就连微软也力不从心。
好了关于IE6我不想多谈什么。因为就目前国内的形式而言,完全放弃IE6只是一个美好的期望。
我们看下IE6下的效果:

显然中高的高度超出了预期。显然,不应该出现滚动条。需要body或者html
overflow:hidden。
<!DOCTYPE HTML>
<html>
<head>
<meta charset="gb2312">
<title>头尾固定中间高度自适应布局</title>
<style>
html, body {
    height:100%;
    margin:0;
    padding:0;
    overflow:hidden
}
#dHead {
    height:100px;
    line-height:100px;
    background:#690;
    width:100%;
    position:absolute;
    z-index:5;
    top:0;
    text-align:center;
}
#dBody {
    background:#FC0;
    width:100%;
    overflow:auto;
    top:100px;
    position:absolute;
    z-index:10;
    bottom:100px;
    _height:100%
}
.mycontent {
    padding:20px;
}
#dFoot {
    height:100px;
    line-height:100px;
    background:#690;
    width:100%;
    position:absolute;
    z-index:200;
    bottom:0;
    text-align:center;
}
</style>
</head>
<body>
<div id="dHead">固定头部100px;</div>
<div id="dBody">
  <div class="mycontent"> 中间自适应部分<br>
    中间自适应部分<br>
    中间自适应部分<br>
    中间自适应部分<br>
    中间自适应部分<br>
    中间自适应部分<br>
    中间自适应部分<br>
    中间自适应部分<br>
    中间自适应部分<br>
    中间自适应部分<br>
    中间自适应部分<br>
    中间自适应部分<br>
    中间自适应部分<br>
    中间自适应部分<br>
    中间自适应部分<br>
  </div>
</div>
<div id="dFoot">固定尾部100px</div>
</body>
</html> |
看下面效果图:

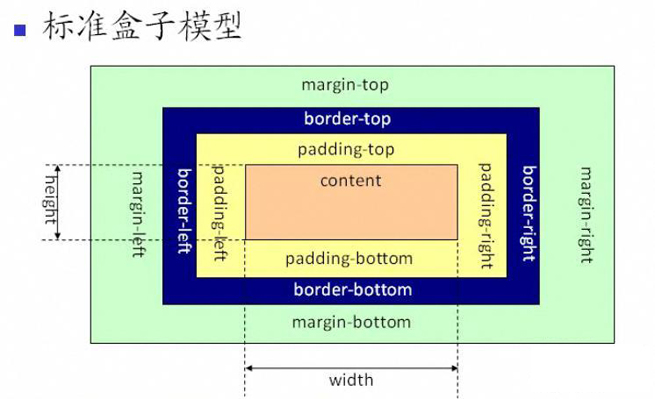
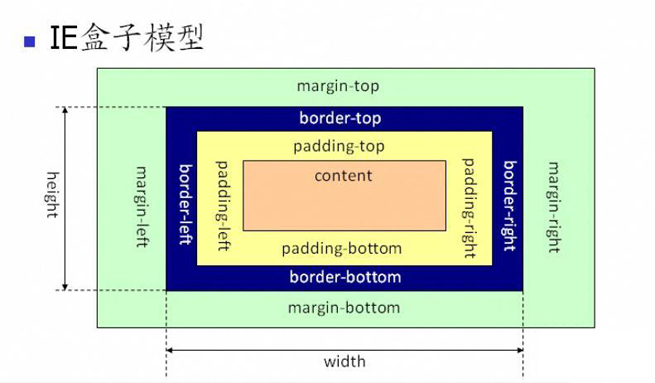
看右下角显然主体部分被挡住了,并没达到我们想要的预期!结合两种IE6下的效果表现。其实,可以归结为height:100%造成的。也可以归结于w3c的盒子模型;
这里简单的介绍一下IE与W3C两种不同中的盒子模型:
先看一下面两种盒子的解析图:


从上图可以看到 IE 盒子模型的范围也包括 margin、border、padding、content,和标准
W3C 盒子模型不同的是:IE 盒子模型的 content 部分包含了 border 和 pading。
IE的盒子模型后来修复掉了,在标准模式下是表现w3c盒子模型的,在quirks模式下表现自己的盒子模型。
如果在IE6盒子模型下,设定BODY的padding哪么剩余的高度被主体部分继承,就符合我们的预期了;
(当然css3中有box-sizing可以改变盒子的模型,从这方面看IE6的盒子模型,是符合逻辑的。连w3c都做了兼容吸收)
那现在就是怎么触发IE6的quirks的问题了。
这里我只说几种常见的方法,其它方法,读者自已搜索:
1、 去除掉DOCTYPE声明,显然这不是我们想看到的结果;
2、DOCTYPE 之前有一个 XML 声明:<?xml version="1.0"
encoding="GBK"?>,这只是针对IE6的方式;
3、如果 DOCTYPE 之前有任何语句,quirks 模式在任何版本的
IE 中(截至 IE 9)同样会被触发,例如:
<!-- This comment will put IE 6,
7, 8, and 9 in quirks mode -->加一个注释
我这里采用了第二种方式,其实第三种方式更合理些,因为我们不想触发quirks模式,造成浏览的不一致。但现在我们只需要在IE6下触发quirks模式,所以采用了第二种方法。
<?xml version="1.0" encoding="GBK"?>
<!DOCTYPE html>
<html>
<head>
<meta charset="gb2312">
<title>头尾固定中间高度自适应布局</title>
<style>
html,body{height:100%;}
body {
    margin:0;
    overflow:hidden;
    _padding:100px 0;
}
#dHead {
    height:100px;
    line-height:100px;
    background:#690;
    width:100%;
    position:absolute;
    z-index:5;
    top:0;
    text-align:center;
}
#dBody {
    background:#FC0;
    width:100%;
    position:absolute;
    z-index:100;
    top:100px;
    bottom:100px;
    overflow:auto;
    _position:relative;
    _top:0;
    _bottom:0;
    _height:100%;
    _overflow:auto
}
.mycontent {
    padding:20px;
}
#dFoot {
    height:100px;
    line-height:100px;
    background:#690;
    width:100%;
    position:absolute;
    z-index:200;
    bottom:0;
    text-align:center;
}
</style>
</head>

<body>
<div id="dHead">固定头部100px;</div>
<div id="dBody">
  <div class="mycontent"> 中间自适应部分<br>
    中间自适应部分<br>
    中间自适应部分<br>
    中间自适应部分<br>
    中间自适应部分<br>
    中间自适应部分<br>
    中间自适应部分<br>
    中间自适应部分<br>
    中间自适应部分<br>
    中间自适应部分<br>
    中间自适应部分<br>
    中间自适应部分<br>
    中间自适应部分<br>
    中间自适应部分<br>
    中间自适应部分<br>
    中间自适应部分<br>
    中间自适应部分<br>
    中间自适应部分<br>
    中间自适应部分-----------------------------------<br>
  </div>
</div>
<div id="dFoot">固定尾部100px</div>
</body>
</html> |
经测试达到预期!这样我们想要的结果都有了。当然如果,不设定body的padding设dBody的上下border也是一样的,这个留给读者自己下去自己测试吧。这里就不贴Demo了
缺点:为ie6做了太多的bug处理,同时还触发了IE6的怪异模式,使得盒子解析模式跟W3C不符,这样会影其它版块的盒子书写。
方法二:利用boxsizing改变盒子模型
其实,第二种方法跟第一种方法,有部分重叠。其中“滋味”,读者自己体会吧!万变不离其宗。
其实这个方法是蓝色理想上看到的一办法。
实现原理是,先为html设定box-sizing然后,加上上下padding值。布局模块均采用position:relative定位。
然后,头部采用负向margin向上平移(因为有了html padding),如查采用负top的话需要为每个布局版加上负top;看实现代码:
<!DOCTYPE html PUBLIC "-//W3C//DTD XHTML 1.0 Transitional//EN" "http://www.w3.org/TR/xhtml1/DTD/xhtml1-transitional.dtd">
<html xmlns="http://www.w3.org/1999/xhtml">
<head>
<meta http-equiv="Content-Type" content="text/html; charset=utf-8" />
<meta name="author" content="Chomo" />
<link rel="start" href="http://www.14px.com" title="Home" />
<title>利用box-sizing实现div仿框架</title>
<style type="text/css">
* {
    margin:0;
    padding:0;
}
html {
    -webkit-box-sizing:border-box;
    -moz-box-sizing:border-box;
    box-sizing:border-box;
    padding:100px 0;
    overflow:hidden;
}
html, body {
    height:100%;
}
.top {
    position:relative;
    top:-100px;
    height:100px;
    background:#f60;
}
.side {
    top:-100px;
    position:relative;
    height:100%;
    background:#fc0;
    overflow:auto;
    width:200px;
    float:left;
    margin-right:0 !important;
    margin-right:-3px;
    overflow:auto;
}
.main {
    top:-100px;
    position:relative;
    overflow:auto;
    height:100%;
    background:#f30;
}
.bottom {
    top:-100px;
    position:relative;
    height:100px;
    background:#f60;
    clear:both;
}
</style>
</head>
<body>
<div class="top"> top </div>
<div class="side"> side <br />
  <br />
  <br />
  <br />
  <br />
  <br />
<br />
  <br />
  <br />
<br />
  <br />
  <br />
  <br />
  <br />
</div>
<div class="main"> main <br />
  <br />
  <br />
  <br />
  <br />
  <br />
  <br />
  <br />
  <br />
  <br />
<br />
  <br />
</div>
<div class="bottom"> bottom </div>
</body>
</html>
|
了解box-sizing的同学们应该知道,它来自离微国比较遥远的css3世界,因此IE6/IE7是不支持的,但经过验证正常兼容IE6/IE7。
IE6/IE7下,<html>的box-sizing默认值本就是border-box(注:IE7有一点点不正常,overflow:hidden后神志有所恢复)。
这种方法看起更加完美,因为它不用触发ie6的怪异模式,不会影响整体布局。
另外如果给头部是absolute定位的话也是可以实现的。
<!DOCTYPE html>
<html xmlns="http://www.w3.org/1999/xhtml">
<head>
<meta http-equiv="Content-Type" content="text/html; charset=utf-8" />
<meta name="author" content="Chomo" />
<link rel="start" href="http://www.14px.com" title="Home" />
<title>利用box-sizing实现div仿框架</title>
<style type="text/css">
* {
    margin:0;
    padding:0;
}
html {
    -webkit-box-sizing:border-box;
    -moz-box-sizing:border-box;
    box-sizing:border-box;
    padding:100px 0;
    overflow:hidden;
}
html, body {
    height:100%;
}
.top {
    position:absolute;
    top:0;
    left:0;
    width:100%;
    height:100px;
    background:#f60;
}
.side {
    height:100%;
    background:#fc0;
    width:200px;
    float:left;
    margin-right:0 !important;
    margin-right:-3px;
    overflow:auto;
}
.main {
    overflow:auto;
    height:100%;
    background:#f30;
}
.bottom {
    position:relative;
    height:100px;
    background:#f60;
    clear:both;
}
</style>
</head>
<body>
<div class="top"> top </div>
<div class="side"> side <br />
  <br />
  <br />
  <br />
  <br />
  <br />
  <br />
  <br />
  <br />
</div>
<div class="main"> main <br />
  <br />
  <br />
  <br />
  <br />
  <br />
  <br />
  <br />
  <br />
  <br />
  <br />
  <br />
</div>
<div class="bottom"> bottom </div>
</body>
</html> |
方法三:这个方法其实是从方法一和方法二结合实现的
其它浏览器依然采用position定位,不设高度,然后,触发“包含块”的尺寸。
IE6下,采用html的box-sizing默认为box-border来实现。具体的原理上面都已经讲过了直接上代码:
.<!DOCTYPE html>
<html>
<head>
<meta http-equiv="Content-Type" content="text/html; charset=gb2312" />
<title>头尾固定的自适应内容布局</title>
<style type="text/css">
<!--
* {
    margin:0;
    padding:0;
}
html{
    _padding:100px 0 100px 0;
    _overflow:hidden;
}
html,body {
    height:100%;
    width:100%;
}

.wrap {
    background:#FF8C00;
    width:100%;
    overflow:auto;
    position:absolute;
    z-index:20;
    left:0;
    top:100px;
    bottom:100px;
    _height:100%;
}
.top {
    height:100px;
    width:100%;
    left:0;
    top:0px;
    background:#6B8E23;
    position: absolute;
    z-index:100
}
.footer {
    height:100px;
    width:100%;
    background: #EE4063;
    position: absolute;
    bottom:0;
    left:0;
    z-index:100
}

-->
</style>
</head>
<body>
<div class="top">固定头部100px;</div>
<div class="wrap">
中间自适应部分<br>
    中间自适应部分<br>
    中间自适应部分<br>
    中间自适应部分<br>
    中间自适应部分<br>
    中间自适应部分<br>
    中间自适应部分<br>
    中间自适应部分<br>
    中间自适应部分<br>
    中间自适应部分<br>
    中间自适应部分<br>
    中间自适应部分-----------------------------------<br>
</div>
<div class="footer">固定尾部100px</div>
</body>
</html> |
经测试,确实可以。问题在于IE 6/7这两个不支持box-sizing。
但有解决办法,这里说两个常用的办法:
1 依然是触发IE的怪异模式,采用上面说的第三种办法,因为要兼容IE
6/7两个条件:<!--quirks IE 6/7-->;
2 采用boxsizing.htc的方式,让IE 6/7支持box-sizing。至于选哪个,这是见仁见智的事情了。这里附下:下载地址
https://github.com/Schepp/box-sizing-polyfill
这里我就不发,具体代码了,自己去测试一下吧。
方法五:js来设置中间的高度
对于这种办法,我就不多说了,相信大部同学都是可以很轻松的搞定的!
至于采用哪种模式,自己选择吧
出处:穆乙 http://www.cnblogs.com/pigtail/
|


