| БрМЭЦМі: |
БОЮФгкcsdn,жївЊЮЊTensorFlowЪЧЪВУДЃЌTensorFlowЬиЕуЁЂАВзАКЭЪЙгУЁЃЪ§ОнЛёШЁКЭЪфШыЕШЁЃ
|
|
TensorFlowЪЧЪВУДЃП
TensorFlowЪЧGoogleПЊдДЕФЕкЖўДњгУгкЪ§зжМЦЫуЃЈnumerical computationЃЉЕФШэМўПтЁЃЫќЪЧЛљгкЪ§ОнСїЭМЕФДІРэПђМмЃЌЭМжаЕФНкЕуБэЪОЪ§бЇдЫЫуЃЈmathematical
operationsЃЉЃЌБпБэЪОдЫЫуНкЕужЎМфЕФЪ§ОнНЛЛЅЁЃTensorFlowДгзжУцвтвхЩЯРДНВгаСНВуКЌвхЃЌвЛИіЪЧTensorЃЌЫќДњБэЕФЪЧНкЕужЎМфДЋЕнЕФЪ§ОнЃЌЭЈГЃетИіЪ§ОнЪЧвЛИіЖрЮЌЖШОиеѓЃЈmultidimensional
data arraysЃЉЛђепвЛЮЌЯђСПЃЛЕкЖўВувтЫМFlow,жИЕФЪЧЪ§ОнСїЃЌаЮЯѓРэНтОЭЪЧЪ§ОнАДееСїЕФаЮЪННјШыЪ§ОндЫЫуЭМЕФИїИіНкЕуЁЃ
TensorFlowЪЧвЛИіЗЧГЃСщЛюЕФПђМмЃЌЫќФмЙЛдЫаадкИіШЫЕчФдЛђепЗўЮёЦїЕФЕЅИіЛђЖрИіCPUКЭGPUЩЯЃЌЩѕжСЪЧвЦЖЏЩшБИЩЯЁЃTensorFlowзюдчЪЧGoogleДѓФдЭХЖгЮЊСЫбаОПЛњЦїбЇЯАКЭЩюЖШЩёОЭјТчЖјПЊЗЂЕФЃЌЕЋКѓРДЗЂЯжетИіЯЕЭГзуЙЛЭЈгУЃЌФмЙЛжЇГжИќМгЙуЗКЕФгІгУЁЃжСгкЮЊЪВУДЙШИшвЊПЊдДетИіПђМмЃЌЫќЪЧетбљЛигІЕФЃК
ЁАIf TensorFlow is so great, why open
source it rather than keep it proprietary? Theanswer
is simpler than you might think : We believe that
machine learning is akey ingredient to the innovative
products and technologies of the future . Research
in this area is global and growing fast , but lacks
standard tools. Bysharing what we believe to be one
of the best machine learning toolboxes in theworld
, we hope to create an open standard for exchanging
research ideas and putting machine learning in products.
Google engineers really do use Tensor Flowin user-facing
products and services, and our research group intends
to share TensorFlow implementations along side many
of our research publications.ЁБ
TensorFlowЬиЕу
1. СщЛюЃЈDeep FlexibilityЃЉ
ЫќВЛНіЪЧПЩвдгУРДзіЩёОЭјТчЫуЗЈбаОПЃЌвВПЩвдгУРДзіЦеЭЈЕФЛњЦїбЇЯАЫуЗЈЃЌЩѕжСЪЧжЛвЊФуФмЙЛАбМЦЫуБэЪОГЩЪ§ОнСїЭМЃЌЖМПЩвдгУTensorFlowЁЃ
2. БуаЏЃЈTrue PortabilityЃЉ
етИіЙЄОпПЩвдВПЪ№дкИіШЫPCЩЯЃЌЕЅCPUЃЌЖрCPUЃЌЕЅGPUЃЌЖрGPUЃЌЕЅЛњЖрGPUЃЌЖрЛњЖрCPUЃЌЖрЛњЖрGPUЃЌAndroidЪжЛњЩЯЕШЃЌМИКѕКИЧИїжжГЁОАЕФМЦЫуЩшБИЁЃ
3. баОПКЭВњЦЗЕФЧХСКЃЈConnect Research andProductionЃЉ
дкЙШИшЃЌбаОППЦбЇМвПЩвдгУTensorFlowбаОПаТЕФЫуЗЈЃЌВњЦЗЭХЖгПЩвдгУЫќРДбЕСЗЪЕМЪЕФВњЦЗФЃаЭЃЌИќживЊЕФЪЧетбљОЭИќШнвзНЋбаОПГЩЙћзЊЛЏЕНЪЕМЪЕФВњЦЗЁЃСэЭтGoogleдкАзЦЄЪщЩЯЫЕЕРЃЌМИКѕЫљгаЕФВњЦЗЖМгУЕНСЫTensorFlowЃЌБШШчЫбЫїХХађЃЌгявєЪЖБ№ЃЌЙШИшЯрВсЃЌздШЛгябдДІРэЕШЁЃ
4. здЖЏзіЮЂЗждЫЫуЃЈAuto-DifferentiationЃЉ
ЛњЦїбЇЯАжаЕФКмЖрЫуЗЈЖМгУЕНСЫЬнЖШЃЌЪЙгУTensorFlowЃЌЫќНЋздЖЏАяФуЧѓГіЬнЖШЃЌжЛвЊФуЖЈвхКУФПБъКЏЪ§ЃЌдіМгЪ§ОнОЭКУСЫЁЃЬ§ЩЯШЅКмгеШЫЃЌднЪБВЛжЊЕРОпЬхеІЪЕЯжЕФЁЃ
5. гябдСщЛюЃЈLanguage OptionsЃЉ
TensorFlowЪЙгУC++ЪЕЯжЕФЃЌШЛКѓгУPythonЗтзАЃЌднЪБжЛжЇГжетСНжжгябдЃЌЙШИшКХейЩчЧјЭЈЙ§SWIGПЊЗЂИќЖрЕФгябдНгПкРДжЇГжTensorFlowЁЃ
6. зюДѓЛЏадФмЃЈMaximize PerformanceЃЉ
ЭЈЙ§ЖдЯпГЬЃЌЖгСаКЭвьВНМЦЫуЕФжЇГжЃЈfirst-class supportЃЉЃЌTensorFlowПЩвддЫаадкИїжжгВМўЩЯЃЌЭЌЪБИљОнМЦЫуЕФашвЊЃЌКЯРэНЋдЫЫуЗжХфЕНЯргІЕФЩшБИЃЌБШШчОэЛ§ОЭЗжХфЕНGPUЩЯЁЃ
TensorFlowАВзА
ОпЬхАВзАПЩвдВЮПДетИіСДНгЃК
https://www.tensorflow.org /versions
/master/get_started/os_setup.html
дДТыПЩвдДгетИіСДНгЯТдиЃК
https://github.com /tensorflow/tensorflow
АВзАКмМђЕЅЃЌУЛгаГЂЪдGPUЃК
# Ubuntu/Linux 64-bit
$ sudo apt-get install python-pip python-dev
# Mac OS X
$ sudo easy_install pip |
| Install TensorFlow:
# Ubuntu/Linux 64-bit, CPU only:
$ sudo pip install --upgrade https: // storage.googleapis.com
/tensorflow /linux/cpu /tensorflow-0.6.0- cp27
-none-linux_ x86_64 .whl |
# Ubuntu/Linux 64-bit, GPU enabled:
$ sudo pip install --upgrade https:// storage.googleapis.com /tensorflow/linux/gpu/ tensorflow-0.6.0 - cp27- none- linux_x 86_64.whl |
# Mac OS X, CPU only:
$ sudo easy_install --upgrade six
$ sudo pip install --upgrade https:// storage. googleapis .com / tensorflow /mac/ tensorflow- 0.6.0 - py2- none- any.whl |
АВзАЭъГЩКѓЃЌЪфШыШчЯТУќСюЃЌМьВтЪЧЗёАВзАГЩЙІЁЃ
$ python
...
>>> import tensorflow as tf
>>> hello = tf.constant('Hello, TensorFlow!')
>>> sess = tf.Session()
>>> print(sess.run(hello))
Hello, TensorFlow!
>>> a = tf.constant(10)
>>> b = tf.constant(32)
>>> print(sess.run(a + b))
42
>>> |
ШчЙћБЈЮоЗЈЛёШЁ
CPU
аХЯЂДэЮѓЃЌПЩвддкЩЯЪіДњТыжаЃЌаоИФЬэМгШчЯТМИааЃК
NUM_CORES = 4 # Choose how many cores
to use.
sess = tf.Session(
config=tf.ConfigProto (inter_op_ parallelism_threads = NUM_CORES,
intra_op_ parallelism_ threads = NUM_CORES)) |
ЛљДЁЪЙгУ
дкЪЙгУTensorFlowжЎЧАЃЌгаБивЊСЫНтШчЯТМИИіИХФюЃК
1. МЦЫуЪЧгУЭМЕФаЮЪНБэЪОЕФЁЃ
2. SessionsЪЧжДааЕФШыПкЃЌРрЫЦгкSparkContextЁЃ
3. Ъ§ОнЪЧгУtensorБэЪОЕФЁЃ
4. VariablesгУРДБэЪОПЩБфзДЬЌЃЌБШШчФЃаЭВЮЪ§ЁЃ
5. ЪЙгУfeedsКЭfetchesДгдЫЫуНкЕуЪфШыКЭЪфГіЪ§ОнЁЃ
TensorFlowМЦЫуПђМмвЊЧѓЫљгаЕФМЦЫуЖМБэЪОГЩЭМЃЌНкЕудкЭМжаБЛГЦЮЊдЫЫуop(operationМђГЦ)ЁЃвЛИідЫЫуПЩвдЛёЕУСуИіЛђепЖрИіTensorsЃЌОЙ§МЦЫуЃЌПЩвдВњЩњСуИіЛђепЖрИіTensorsЁЃвЛИіTensorЪЧвЛИіЖрЮЌЪ§зщЃЌОйИіР§згЃЌПЩвдАбвЛХњЭМЯёЪ§ОнБэЪОГЩвЛИі4ЮЌИЁЕуЪ§зщ[batch,
height, width, channels]
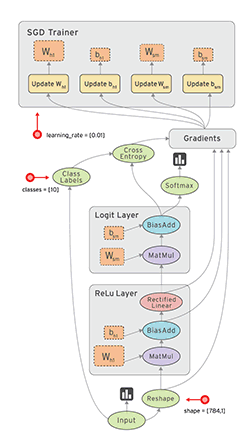
МЦЫуЭМЪЧЭЈЙ§SessionЬсНЛЃЌвЛИіSessionОіЖЈЭМжаЕФдЫЫуИУЕНФЧИіЩшБИЩЯШЅМЦЫуЃЌБШШчЪЧбЁCPUЛЙЪЧCPUЁЃдЫЫуopВњЩњЕФНсЙћдкpythonжаЪЧвЛИіnumpy.ndarrayЪ§зщЖдЯѓЃЌдкCКЭC++жаЪЧtensorflow::TensorЪЕР§ЁЃ
ЙЙНЈвЛИіМЦЫуЭМ
ЙЙНЈЭМЪзЯШгаЙЙНЈдЫЫуopЃЌopВЛвЛЖЈвЊгаЪфШыЃЌПЩвдгУConstantЩЬСПРДЙЙНЈвЛИідЫЫуНкЕуЃЌШЛКѓАбЫќЕФНсЙћЪфГіЕНСэЭтЕФдЫЫужаЁЃШчЯТЪЧРћгУConstantЩњГЩвЛИіМђЕЅЕФдЫЫуЃЌВЂЧввдДЫЙЙНЈСЫвЛИіМЦЫуЭМЁЃ
import tensorflow
as tf
# ДДНЈвЛИі1X2ЕФОиеѓmatrix1
matrix1 = tf.constant([[3., 3.]])
# ДДНЈвЛИі2X1ЕФОиеѓmatrix2
matrix2 = tf.constant([[2.],[2.]])
# ДДНЈmatrix1КЭmatrix2ЕФГЫЛ§дЫЫуЃЌЗЕЛиОиеѓproduct
product = tf.matmul(matrix1, matrix2)
|
ЩЯУцетИіЭМжаАќКЌШ§ИідЫЫуЃЌСНИіconstant()дЫЫуЃЌвЛИіОиеѓГЫЗЈдЫЫуmatmul()ЁЃвЊЛёЕУзюжеОиеѓГЫЛ§ЕФНсЙћЃЌашвЊгУsessionЬсНЛетИіЭМЁЃ
SessionЬсНЛМЦЫуЭМ
# ДДНЈsessionЖдЯѓ
sess = tf.Session()
# ЭЈЙ§Sessionжаrun()ЗНЗЈЬсНЛМЦЫуЭМ
result = sess.run(product)
print(result)
# ==> [[ 12.]]
# дЫааЭъЙиБеетИіSession
sess.close()
|
ЕБSessionдЫааЭъГЩКѓЃЌашвЊЪжЖЏЙиБеЃЌЕБШЛФувВПЩвдРћгУЁАwithЁБЙиМќзжЃЌдЫааЭъздЖЏЙиБеЁЃ
with tf.Session() as sess:
result= sess.run([product])
print(result) |
дкЗжВМЪНдЫааЛЗОГЯТЃЌвЛАуВЛашвЊЪжЖЏжИГіФФаЉдЫЫуИУЗХЕНФФаЉЛњЦїЩЯЃЌБШШчCPUЃЌGPUЃЌЕЋЪЧПђМмЬсЙЉСЫЪжЖЏЩшжУЕФЙІФмЁЃ
with tf.Session() as sess:
withtf.device("/gpu:1"):
matrix1 = tf.constant([[3., 3.]])
matrix2 = tf.constant([[2.],[2.]])
product = tf.matmul(matrix1, matrix2)
...
|
ФПЧАжЇГжетМИжжЩшБИЃК
"/cpu:0": The CPU of your machine.
"/gpu:0": The GPU of your machine, if
you have one.
"/gpu:1": The second GPU of your machine,
etc.
НЛЛЅЪНЪЙгУ
TensorFlowЬсЙЉСЫвЛИіРрЫЦiPythonЕФЛњжЦЃЌЭЈЙ§ДДНЈInteractiveSeesionЖдЯѓРДЪЕЯжЁЃ
# Enter an interactive
TensorFlow Session.
import tensorflow as tf
sess = tf.InteractiveSession()
x = tf.Variable([1.0, 2.0])
a = tf.constant([3.0, 3.0])
# Initialize 'x' using the run() method of itsinitializer
op.
x.initializer.run()
# Add an op to subtract 'a' from 'x'. Run it and
print the result
sub = tf.sub(x, a)
print(sub.eval())
# ==> [-2. -1.]
# Close the Session when we're done.
sess.close() |
БфСПЃЈVariablesЃЉ
БфСПЮЌЛЄећИіжДааЭМЙ§ГЬжаМфЕФзДЬЌЃЌБШШчHadoopжаЕФМЦЪ§ЦїОЭЪЧвЛИіБфСПЁЃОпЬхдкЛњЦїбЇЯАШЮЮёжаЃЌЕБЮвУЧбЕСЗвЛИіЩюЖШЩёОЭјТчЕФЪБКђЃЌУПвЛВуЕФНкЕуШЈжиОЭЪЧгУVariableРДБэЪОЕФЃЌдкбЕСЗЙ§ГЬжаЃЌШЈжиЛсВЛЖЯЕиИќаТЁЃПДШчЯТЪОР§ЃК
# Create a
Variable, that will be initializedto the scalar
value 0.
state = tf.Variable(0,name="counter")
# Create an Op to add one to `state`.
one = tf.constant(1)
new_value = tf.add(state, one)
update = tf.assign(state, new_value)
# Variables must be initialized by running
an`init` Op after having
# launched the graph. We first have to add
the `init` Op to thegraph.
init_op = tf.initialize_all_variables()
# Launch the graph and run the ops.
with tf.Session() as sess:
# Runthe 'init' op
sess.run(init_op)
# Printthe initial value of 'state'
print(sess.run(state))
# Runthe op that updates 'state' and print
'state'.
for _in range(3):
sess.run(update)
print(sess.run(state))
# output:
# 0
# 1
# 2
# 3 |
assign()ЪЧИГжЕдЫЫуЃЌЪЕМЪЕФжДааЪЧдк run() БЛжДааЕФЪБКђПЊЪМЁЃ
Ъ§ОнЛёШЁЃЈFetchesЃЉ
ЛёШЁвЛИіopЕФдЫЫуНсЙћЃЌПЩвдЭЈЙ§ЕїгУSessionжаЕФrunЃЈЃЉЗНЗЈЃЌЭЌЪБПЩвдЛёЕУЖрИіНсЙћЃЌЫљгаНсЙћЛёШЁжЛашвЊжДаавЛДЮrunЧыЧѓЁЃ
input1 = tf.constant(3.0)
input2 = tf.constant(2.0)
input3 = tf.constant(5.0)
intermed = tf.add(input2, input3)
mul = tf.mul(input1, intermed)
with tf.Session() as sess:
result= sess.run([mul, intermed])
print(result)
# output:
# [array([ 21.], dtype=float32), array([ 7.],dtype=float32)] |
Ъ§ОнЪфШыЃЈFeedsЃЉ
жЎЧАНщЩмЕФЪ§ОнЪфШыЪЙгУConstantЃЌжБНгЪфШывЛИіУїШЗЕФГЃСПЪ§ОнЃЌTensorFlowЭЌЪБЬсЙЉСЫвЛжжЁАеМЮЛЗћЃЈplaceholderЃЉЁБЗНЪНЃЌгУРДБэЪОвЛИіЪ§ОнЃЌШЛКѓдкЕїгУrunЃЌЭЈЙ§ВЮЪ§ДЋШыХњСПЪфШыЪ§ОнНјШЅКѓЃЌОпЬхЛёШЁЪ§ОнЃЌОпЬхПЩвдШчЯТЪОР§ЃК
# ДДНЈСНИіЪфШыinput1КЭinput2ЃЌетЪБетСНИіЪ§ОнРяУцЪВУДЖМУЛга
# ПЩвдРэНтЮЊЩъУїСЫСНИіЪфШыБфСПЁЃ
input1 = tf.placeholder(tf.float32)
input2 = tf.placeholder(tf.float32)
output = tf.mul(input1, input2)
>
with tf.Session() as sess:
print(sess.run([output], feed_dict={input1:[7.],
input2:[2.]}))
# output:
<# [array([ 14.], dtype=float32)] |
ОпЬхЪфШыЪЧfeed_dictЁЃ
|