| БрМЭЦМі: |
БОЮФРДздгкcsdnЃЌЮФеТНщЩмСЫЪ§ОнМЏЁЂФЃаЭбЕСЗжаЖСШЁбЕСЗЪ§ОнвдМАФЃаЭМьВтПЩЪгЛЏЕШЯрЙиФкШнЁЃ |
|
дкетИіYolo v3ЗЂВМЕФДѓКУШезгЁЃ
Deeplearning4jжегкгРДСЫаТЕФАцБОИќаТ1.0.0-alphaЃЌдкzoo modelжав§ШыTinyYoloФЃаЭПЩвдбЕСЗздМКЕФЪ§ОнгУгкФПБъМьВтЁЃ
ВЛЕУВЛЫЕЃЌдкYolo v3етжжадФмКЭзМШЗТЪЩЯУцЖМгаДѓЗљЖШЬсЩ§ЕФЧщПіЯТЃЌdl4jВХв§ШыTinyYoloзмгавЛжж49ФъМгШыЙњОќЕФИаОѕ
вЛЁЂШЮЮёКЭЪ§Он
Ъ§ОнРДдДзд https://github.com/cosmicad/dataset ЃЌжївЊФПЕФЪЧЪЖБ№ВЂЖЈЮЛЭМЯёжаЕФКьЯИАћЁЃ
Ъ§ОнМЏзмЙВЗжЮЊСНИіВПЗжЃК
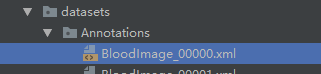
Ъ§ОнМЏЃКJPEGImages
БъЧЉЃКAnnotations
1.1 Ъ§ОнМЏ
Ъ§ОнМЏбљеХШчЭМЫљЪОЃК

Ъ§ОнМЏжаЫљгаЕФЭМЯёОљЮЊ.jpgИёЪНЁЃвЛЙВга410еХЭМЦЌгУгкФЃаЭЕФбЕСЗЁЃ
1.2 БъЧЉ
БъЧЉШчЭМЫљЪОЃЌУПвЛИіЭМЦЌЖМЛсгавЛИіЖдгІЕФxmlЮФМўзїЮЊбЕСЗБъЧЉЁЃ
УЛвЛИіБъЧЉЕФЪ§ОнЖМЪЧзёЪиPASCAL VOCЕФЪ§ОнИёЪНЃЌЮФМўФкШнШчЯТЃК
<annotation
verified="no">
<folder>RBC</folder>
<filename>BloodImage_00000</filename>
//ЖдгІЕФЭМЦЌ
<path>/Users/cosmic/WBC_CLASSIFICATION_ANNO
/RBC/BloodImage_00000.jpg</path>
//ТЗОЖЃЈВЛживЊЃЉ
<source> //Ъ§ОнРДдДЃЈВЛживЊЃЉ
<database>Unknown</database>
</source>
<size> //ЭМЯёЕФПэИпКЭЭЈЕРЪ§
<width>640</width>
<height>480</height>
<depth>3</depth>
</size>
<segmented>0</segmented> //ЪЧЗёгУгкЗжИюЃЈдкЭМЯёЮяЬхЪЖБ№жа01ЮоЫљЮНЃЉ
<object> //ашвЊМьВтЕФЮяЬх
<name>RBC</name>
//ЮяЬхРрБ№ЕФБъЧЉЃЌПЩвдЪЙгУжаЮФ
<pose>Unspecified</pose>
//ХФЩуНЧЖШ
<truncated>0</truncated>
//ЪЧЗёБЛНиЖЯЃЈ0БэЪОЭъећЃЉ
<difficult>0</difficult>
//ФПБъЪЧЗёФбвдЪЖБ№ЃЈ0БэЪОШнвзЪЖБ№ЃЉ
<bndbox> //bounding-boxЃЈАќКЌзѓЩЯНЧКЭгвЯТНЧxyзјБъЃЉ
<xmin>216</xmin>
<ymin>359</ymin>
<xmax>316</xmax>
<ymax>464</ymax>
</bndbox>
</object>
... //ШчЙћашвЊМьВтЖрИіЮяЬхЃЌдђЖЈвхЖрИі<object></object>ЖдЯѓМДПЩ
</annotation> |
1.3 ШчКЮжЦзїздМКЕФЪ§ОнМЏ
BBox-Label-Tool: https://github.com/puzzledqs/BBox-Label-Tool
ОЋСщБъзЂ: http://jl.shenjian.io/
ЖўЁЂФЃаЭбЕСЗ
2.1 дЄЖЈвхВЮЪ§гУгкФЃаЭЕФбЕСЗ
// parameters
matching the pretrained TinyYOLO model
int width = 416;
int height = 416;
int nChannels = 3;
int gridWidth = 13;
int gridHeight = 13; |
вдЩЯДњТыЖЈвхЕФЪЧЃК
ПэИпКЭЭМЯёЕФЭЈЕРЪ§
YOLOФЃаЭЖдЭМЯёЗжИюЕФГпДчЃЌдкетРяБЛЗжИюГЩЮЊ13 x 13
// number classes
for the red blood cells (RBC)
int nClasses = 1; |
ЖЈвхЮвУЧашвЊЗжРрЕФЪ§СПЃЌдкетРяЮвУЧжЛЪЖБ№КьЯИАћетвЛИіЮяЬхЃЌвђЮЊжЕЮЊ1ЁЃ
// parameters
for the Yolo2OutputLayer
int nBoxes = 5;
double lambdaNoObj = 0.5;
double lambdaCoord = 5.0;
double[][] priorBoxes = { { 2, 2 }, { 2, 2 },
{ 2, 2 }, { 2, 2 }, { 2, 2 } };
double detectionThreshold = 0.3; |
ЖЈвхЮвУЧФЃаЭЪфГіВуЕФвЛаЉВЮЪ§ЁЃ
// parameters
for the training phase
int batchSize = 2;
int nEpochs = 50;
double learningRate = 1e-3;
double lrMomentum = 0.9; |
ЖЈвхвЛаЉЮвУЧбЕСЗЪБФЃаЭЕФВЮЪ§ЃК
batchSizeЮЊ2ЃЌетРяжївЊЪЧвђЮЊЮвЪЙгУCPUдЫааЃЌЖјЧвЕчФджЛга8GдЫДцЃЌвђДЫЕБФуЕчФдХфжУИќИпЕФЪБКђПЩвдбЁдёИќДѓЕФжЕЪЙЕУФЃаЭЛёЕУИќКУЕФбЕСЗНсЙћЁЃ
nEpochЮЊ50ЃЌзмЙВбЕСЗЪ§Он50ИіТжДЮЁЃ
learningRateЃЌбЇЯАТЪЮЊ1e-3ЁЃ
бЇЯАТЪЫЅМѕЖЏСПЃЌгІгУгкNesterovsИќаТЦїЁЃ
2.2 Ъ§ОнЖСШЁ
String dataDir
= new ClassPathResource("/datasets").getFile().getPath();
File imageDir = new File(dataDir, "JPEGImages"); |
дкБОЯюФПжаЪ§ОнБЛДцЗХдкresourcesЮФМўМаЯТЃЌвђДЫашвЊЛёШЁРрТЗОЖЃЌетРяжївЊЪЧЛёШЁЭМЯёФПТМЁЃ
log.info("Load
data...");
RandomPathFilter pathFilter = new RandomPathFilter(rng)
{
@Override
protected boolean accept(String name) {
name = name.replace("/JPEGImages/",
"/Annotations/").replace(".jpg",
".xml");
try {
return new File(new URI(name)).exists();
} catch (URISyntaxException ex) {
throw new RuntimeException(ex);
}
}
};
InputSplit[] data = new FileSplit(imageDir, NativeImageLoader.ALLOWED_FORMATS,
rng).sample(pathFilter, 0.8, 0.2);
InputSplit trainData = data[0];
InputSplit testData = data[1]; |
ЖСШЁбЕСЗЪ§ОнЃЌВЂЧвНЋЪ§ОнЛЎЗжЮЊбЕСЗМЏКЭВтЪдМЏЁЃ
ObjectDetectionRecordReader
recordReaderTrain = new ObjectDetectionRecordReader(height,
width, nChannels, gridHeight, gridWidth, new VocLabelProvider(dataDir));
recordReaderTrain.initialize(trainData);
ObjectDetectionRecordReader recordReaderTest =
new ObjectDetectionRecordReader(height, width,
nChannels, gridHeight, gridWidth,
new VocLabelProvider(dataDir));
recordReaderTest.initialize(testData);
// ObjectDetectionRecordReader performs regression,
so we need to specify it here
RecordReaderDataSetIterator train = new RecordReaderDataSetIterator(recordReaderTrain,
batchSize, 1, 1, true);
train.setPreProcessor(new ImagePreProcessingScaler(0,
1));
RecordReaderDataSetIterator test = new RecordReaderDataSetIterator(recordReaderTest,
1, 1, 1, true);
test.setPreProcessor(new ImagePreProcessingScaler(0,
1)); |
ЙЙНЈбЕСЗМЏКЭВтЪдМЏЕФЕќДњЦїЃЌВЂЧвДДНЈЪ§ОндЄДІРэЦїЃЌЪЙЕУЭМЯёЪ§ОндкбЕСЗЪББЛЫѕЗХжС0~1ЗЖЮЇФкЁЃ
2.3 ФЃаЭЙЙНЈ
ComputationGraph
model;
String modelFilename = "model_rbc.zip";
ComputationGraph pretrained = (ComputationGraph)
new TinyYOLO().initPretrained();
INDArray priors = Nd4j.create(priorBoxes); |
ЪзЯШЛсДгЭјТчЩЯУцЯТдидЄбЕСЗФЃаЭЃЌЯТдиЕижЗЮЊгУЛЇФПТМЯТЕФ.deeplearning4jФПТМЯТЃЌФкШнШчЭМЫљЪОЃК
НгЯТРДЪЙгУfine tuneЖдФЃаЭНсЙЙНјааИќИФЃК
FineTuneConfiguration
fineTuneConf = new
FineTuneConfiguration.Builder().seed(seed)
.optimizationAlgo(OptimizationAlgorithm
.STOCHASTIC_GRADIENT_DESCENT)
.gradientNormalization
(GradientNormalization.RenormalizeL2PerLayer)
.gradientNormalizationThreshold(1.0).updater(new
Adam.Builder().learningRate(learningRate).build())
.updater(new Nesterovs.Builder().learningRate(learningRate)
.momentum(lrMomentum).build())
.activation(Activation.IDENTITY)
.trainingWorkspaceMode(WorkspaceMode.SEPARATE)
.inferenceWorkspaceMode(WorkspaceMode.SEPARATE).build(); |
вдЩЯДњТыжївЊзіСЫетМИМўЪТЧщЃК
ЪЙгУЫцЛњЬнЖШЯТНЕгХЛЏЫуЗЈ
ЪЙгУ RenormalizeL2PerLayer ЬнЖШБъзМЛЏЫуЗЈЃЌгУгкЗРжЙЬнЖШЯћЪЇКЭЬнЖШБЌеЈЁЃ
ЪЙгУNesterovsИќаТЦїЃЌХфжУбЇЯАТЪКЭЖЏСП
ЩшЖЈбЕСЗФЃЪНЁЃ
жЎКѓЪЙгУЧЈвЦбЇЯАЖдгкФЃаЭМмЙЙМЧадаоИФЃК
model = new TransferLearning.GraphBuilder(pretrained)
.fineTuneConfiguration(fineTuneConf)
.removeVertexKeepConnections("conv2d_9")
.addLayer("convolution2d_9",
new ConvolutionLayer.Builder(1, 1).nIn(1024).nOut(nBoxes
* (5 + nClasses)).stride(1, 1).convolutionMode(ConvolutionMode.Same)
.weightInit(WeightInit.UNIFORM).hasBias(false)
.activation(Activation.IDENTITY).build(),
"leaky_re_lu_8")
.addLayer("outputs", new Yolo2OutputLayer.Builder()
.lambbaNoObj(lambdaNoObj).lambdaCoord(lambdaCoord)
.boundingBoxPriors(priors).build(),
"convolution2d_9")
.setOutputs("outputs")
.build(); |
жївЊЪЧХфжУЪЖБ№ЕФжжРрЪ§ФПЁЃ
2.4 ФЃаЭбЕСЗ
model.setListeners(new
ScoreIterationListener(1));
for (int i = 0; i < nEpochs; i++) {
train.reset();
while (train.hasNext()) {
model.fit(train.next());
}
log.info("*** Completed epoch {} ***",
i);
}
ModelSerializer.writeModel(model, modelFilename,
true);
|
ФЃаЭбЕСЗЭъГЩжЎКѓЃЌађСаЛЏБЃДцдкБОЕиЁЃ
2.5 ФЃаЭМьВтПЩЪгЛЏ
// visualize
results on the test set
NativeImageLoader imageLoader = new NativeImageLoader();
CanvasFrame frame = new CanvasFrame("RedBloodCellDetection");
OpenCVFrameConverter.ToMat converter = new OpenCVFrameConverter.ToMat();
org.deeplearning4j.nn.layers.objdetect.Yolo2OutputLayer
yout = (org.deeplearning4j.nn.layers.objdetect.Yolo2OutputLayer)
model.getOutputLayer(0);
List<String> labels = train.getLabels();
test.setCollectMetaData(true);
while (test.hasNext() && frame.isVisible())
{
org.nd4j.linalg.dataset.DataSet ds = test.next();
RecordMetaDataImageURI metadata = (RecordMetaDataImageURI)
ds.getExampleMetaData().get(0);
INDArray features = ds.getFeatures();
INDArray results = model.outputSingle(features);
List<DetectedObject> objs = yout.getPredictedObjects(results,
detectionThreshold);
File file = new File(metadata.getURI());
log.info(file.getName() + ": " + objs);
Mat mat = imageLoader.asMat(features);
Mat convertedMat = new Mat();
mat.convertTo(convertedMat, CV_8U, 255, 0);
int w = metadata.getOrigW() * 2;
int h = metadata.getOrigH() * 2;
Mat image = new Mat();
resize(convertedMat, image, new Size(w, h));
for (DetectedObject obj : objs) {
double[] xy1 = obj.getTopLeftXY();
double[] xy2 = obj.getBottomRightXY();
String label = labels.get(obj.getPredictedClass());
int x1 = (int) Math.round(w * xy1[0] / gridWidth);
int y1 = (int) Math.round(h * xy1[1] / gridHeight);
int x2 = (int) Math.round(w * xy2[0] / gridWidth);
int y2 = (int) Math.round(h * xy2[1] / gridHeight);
rectangle(image, new Point(x1, y1), new Point(x2,
y2), Scalar.RED);
putText(image, label, new Point(x1 + 2, y2 - 2),
FONT_HERSHEY_DUPLEX, 1, Scalar.GREEN);
}
frame.setTitle(new File(metadata.getURI()).getName()
+ " - RedBloodCellDetection");
frame.setCanvasSize(w, h);
frame.showImage(converter.convert(image));
frame.waitKey();
}
frame.dispose(); |
Ш§ЁЂЪЕбщНсЙћ
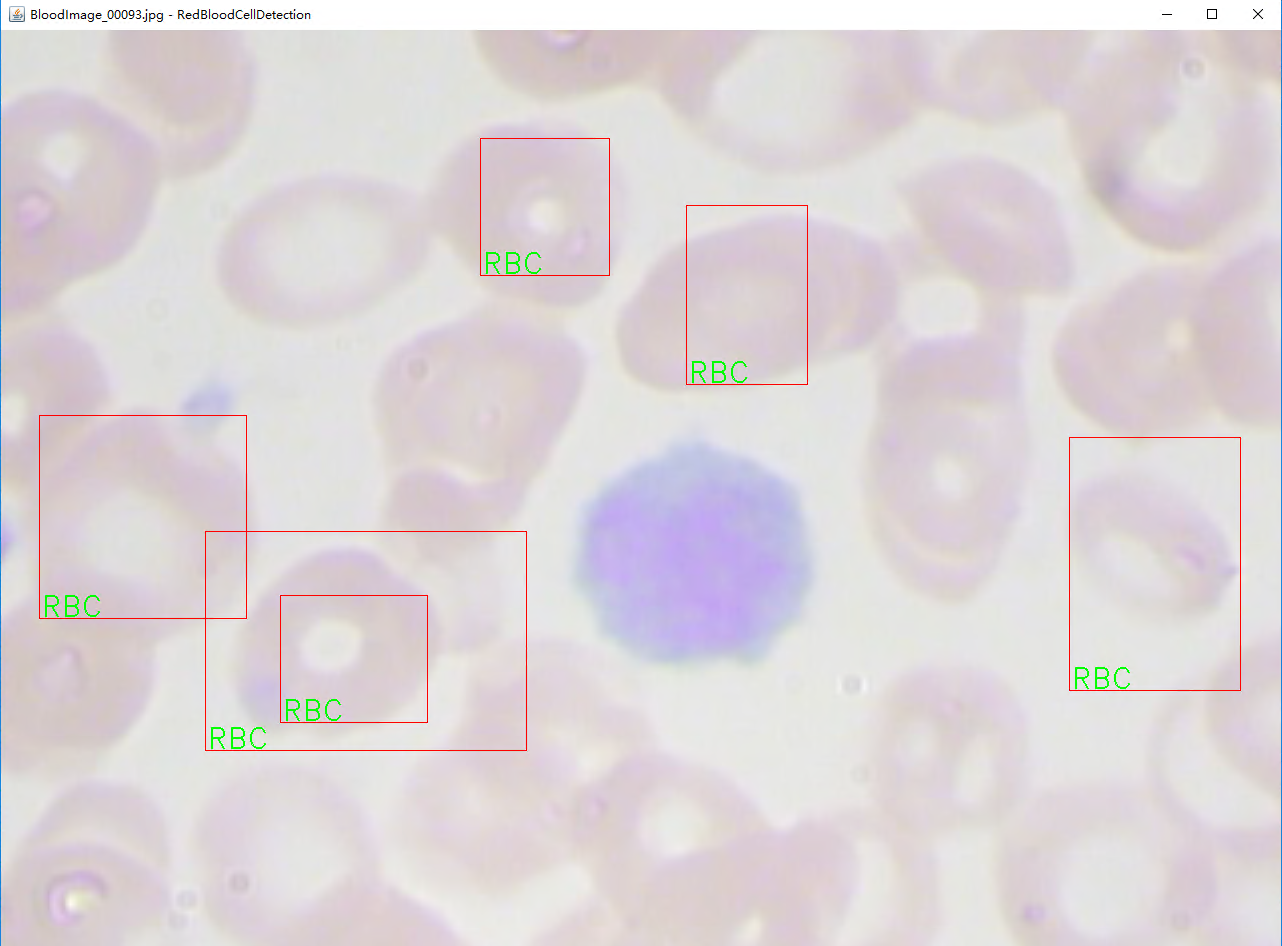
вђЮЊЪ§ОнСПЩйЃЌбЕСЗТжДЮаЁ гааЫШЄЕФПЩвдздМКГЂЪдМЬајбЕСЗЁЃ
ЫФЁЂДњТыЕижЗ
ДњТыЕижЗвбОЗХдкgithubЩЯУцЃЌздааЯТдиМДПЩЃКhttps://github.com/sjsdfg/dl4j-tutorials
дкАќobjectdetectionЯТЃЌПЩвдЫцвтдЫааЁЃ |


